My Other Pages

To make it easier to read about our trip to Ireland, I have made a page that is just for that. There is a tab above for Ireland Trip 2014 or click on the Home tab to read my other posts. I have also created a new page for My Weight Loss Journey if you are interested in that, click on the tab above.

Monday, September 28, 2015

Flower box


One day a while ago, my friend Julie asked me how to make 
accordion folded flowers.
I sent her some instructions and she thanked me.
I thought she was doing some kind of decorations for a shower or
something of that sort.
Earlier today she posted this picture to my facebook
wall and said this is what she needed the instructions for.
Is this the cutest flower box ever?
She has a little camper and she made this for the camper window.
I think she did a beautiful job.
She said the only thing she would change is to make
the flowers double sides, as they are white from the inside of the camper.
My suggestion would be either double sided scrapbook paper, 
or use light weight paper and fold it in half
before accordion folding.
How cute would this be to cheer up an office,
or the window sill in someones hospital or nursing home room?
Thanks for letting me post about your darling flowers Julie!
You did a fabulous job all the way around!

Thanks for stopping by today,
come again soon.
You never know what you'll see on 
Kristie Kreates!


Friday, September 25, 2015

Using unexpected supplies

Hello crafters!
Today I have a tutorial posted on 
that will tell you how I made these backgrounds 
with an unexpected supply.
Can you guess what I used to make these stripes?
I made 4 different backgrounds,
I'm sure you can guess which one was the first one
I made.
 I'm glad I didn't stop
after the first one, because even though I wasn't 
crazy about that one,
I do like the way the other 3 turned out.
Here is what I did with the 3 that I liked.
I liked the orange and brown together and thought
the twine was a perfect accent with the colors.
I cut the blue and red piece into 3 panels and 
used foam tape to adhere them to the card front.
I added a few sequins for a little extra interest.
This card is very simple, but I love how it turned out.

Thanks for stopping by today,
I hope you'll check out my tutorial on
to learn how I made these backgrounds.
And I hope you'll be inspired to use
some unexpected supplies when you are crafting.
Hope to see you again soon!

Tuesday, September 22, 2015

Wedding Card

Hello crafty people!
Today I have a wedding card to show you.
A while ago my sister in law called and asked if I could
make a wedding card for her 97 yr old aunt.
Her nephew is getting married and it's a same sex wedding.
Aunt "E" lives in an assisted living facility
and can't get out to the store to find a card this specific.
I said "Sure, no problem"
Then she told me that this is the nephew that sends her
the most gorgeous cards, so beautiful they could be framed.
No pressure, eh?
So I set to work and I worked and I changed it
and I worked some more and changed some more.
I was so frazzled and unsure of what I was doing,
it was making me nuts!
Finally, I realized that I was trying to create something
that just wasn't "me" and scratched most of what I 
had planned.
Have you ever just had a idea in your mind, 
but it just wouldn't come together on paper.
That was my problem and the idea wasn't something
I would normally do, but I was pressuring myself to create 
something that was totally out of my wheelhouse.
So far out that it wasn't even a challenge,
it was an impossibility. 
When I started to create something that was my style,
I did much better and this is the card I created.
It's clean and simple and I think, very elegant.
I created this heart with the 2 men in it using my 
Silhouette Studio Designer Edition software.
  I traced the men, created the heart and then
welded them all together.
I cut it from silver card stock and layered it onto 
a white diecut that I had made just slightly larger.
I printed some damask onto white card stock,
covered it with vellum and adhered the 
heart piece on top of that.
My friend, Mary, helped me find the perfect font and
suggested Wedding Wishes as the sentiment for the
front of the card.  I cut that with my Silhouette also.
For the inside of the card, I printed more of the
gray damask.
I printed 3 sentiments that I found on the internet,
as I had no idea what Aunt E would like for the 
inside.
Here are the other 2 sentiments that I printed.
(click on them to make them larger and easier to read)
I put double sided tape on the back of these and will 
have my sis in law adhere the panel that Aunt E. chooses 
into the card.
Since this was an odd sized card, I used my 
We R Memory Keepers Envelope Punch Board
to create an envelope.
This was such an odd size that there weren't 
directions for this size.
So I went with my motto
"There are no mistakes, just opportunities to be more creative!"
I cut, scored and folded the envelope, but before sticking it together,
I put some foam tape in the bottom of the envelope.
Now the card sits right where it should in the envelope.
I also made an envelope liner. 
Unfortunately, I couldn't get a good picture that shows
how pretty it looks and how well it matches the card.
I used the gray damask with vellum over it for the liner.
All in all, I really love how the card turned out.
I sure hope Aunt E. likes it as much as I do.

Thanks for stopping by today,
I hope you will come by again soon.

Saturday, September 19, 2015

Final frames and b-day celebration Fix #7

Hello!
I hope your day is going well.
Today is the 7th post in my 
frame fix series
and it's the last.  (I hope that isn't cheering I hear!)
I so enjoyed fixing these frames for my son and
I hope you have enjoyed seeing them and how I fixed them.
This frame didn't need much fixing.  I added some little 
"bling" to the bottom corner, which doesn't show up too well
and a little bee to the upper corner.
These things both have a reason.
This picture is of Jaryd with Aunt Bea.
Aunt Bea was my husband's aunt, she passed away
about a year and a half ago.
She was a very special lady who we all loved dearly.
This was one picture that Jaryd had told Sara that he wanted.
When Aunt Bea passed away Jaryd inherited her 
Schultz and Dooley steins and he wanted a picture
of him with her to go on the shelf with them.
I'm sure you get why I put the bee in the one corner,
the "bling" is because Aunt Bea did love her jewelry.
I thought this was perfect for the picture.
I didn't do anything to this frame except put these pictures
of Jaryd and Sara into it.  They are pictures her Mom took
of them when they visited and I love them.

Sara and I wanted to surprise Jaryd with the new pictures,
so we got him out of the apartment to play tennis with Dad and I went
over and hung them all.
The larger collage frames and a few of the others were ones they had
on the wall already.  I just rehung them and added the ones
I fixed for him.
There are a few spaces that need to have something in them,
but this wall is a work in progress and they intend to hang more pictures
as they get them.
(Click on the picture to make it larger to see them better.)
And the burning question is.....
Did Jaryd like them?
Here is a picture I took of Jaryd when he walked in and saw the wall,
what do you think?
Yes, he loved them.
That evening we went out to dinner to celebrate his birthday,
here are a few pictures from that dinner.
The birthday boy and his lovely girlfriend.
Me with my husband.
Not a great picture, but it's the best of the bunch,
getting a good picture of Dave is nearly impossible.
Me with our daughter Kelsie.
Must have been family night, they had a guy that 
went around to the tables and made balloon animals
and such.  He made this birthday hat for Jaryd.

Thanks for coming by today.
I hope you have enjoyed my frame fix series as 
much as I enjoyed making them and showing you.
Come back soon to see what else I've been up to.
Until then, happy crafting!

Wednesday, September 16, 2015

C/C trip #3 Eating and Walking

There are things we almost always do when we are in
Charleston.  One of them is eat at Nick's.
Nick's is located on King Street.
This trip, it was a bit difficult for me, with just having
a hip replacement not 3 months before the trip,
but walk I did and I did fine.
As we were walking down King Street we could see
Nick's pig from a distance.
We always stop at Nick's for lunch.
This isn't a fancy place in any sense of the word,
but it is clean, the service is wonderful and
the food is absolutely delicious!
You order and pay for your food at the counter,
are given a number for your table and find a place to sit.
The dining room is paneled in dark wood and there are
pictures and memorabilia covering the walls.
You are sitting there conversing and looking at pictures
and then your food is delivered.
HEAVEN!
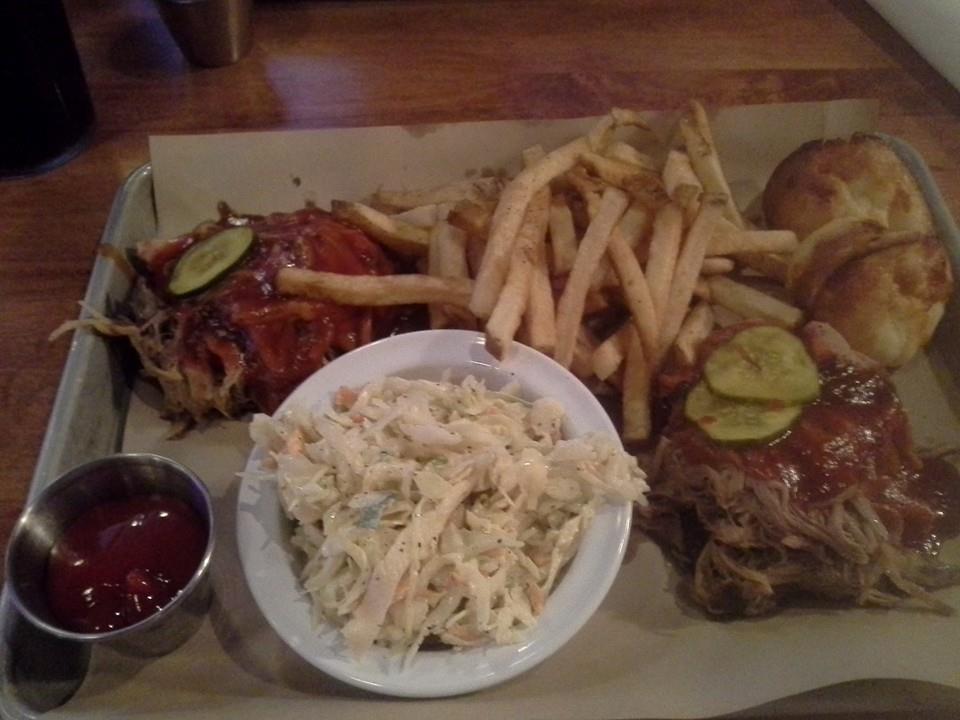
I love, love, love pulled pork so instead of getting
2 different meats, I always get 2 servings of the pulled
pork.  Along with it I got fries, slaw and corn bread.
You can get different sized "plates" less or more than
what I ordered, but for me this was perfect.
I ate my lunch and took some back to the hotel 
for my dinner.
Dave really enjoyed his meal too.
He got the brisket and pulled pork for his meats,
along with that he got baked beans, fries and of course the 
corn bread which I believe comes with every meal.
The service at Nick's is great too.
Dave saw something on the tv at the bar and left the
to check it out.  In the few minutes he was gone,
3 different servers noticed that his tea needed refilling
and asked if he had sweet or non-sweetened tea,
of course, I didn't know what he had, but when he 
got back to the table, he wasn't seated a minute
when someone came to refill his drink.
They are really on top of things and refill your drinks often
 and offer any assistance you need.
When we left Nick's we really lucked out.
While we ate lunch there was a mid day downpour,
but when we left, not a drop.
We took a leisurely walk back to our room.
Along the way I stopped to take a couple pictures of 
some beautiful flowers.
I know this really isn't a flower, but a plant, 
even so, it was beautiful.
These were in a huge planter outside a hotel 
along the way.
I snapped this quickly just to show some of the beautiful 
metal work that you can see in Charleston.

Here's a closer look at the iron work.
This is one of the buildings near our hotel.
I took this to show the architecture.
"Carriage Hardware
1860-1909"
is at the top of this beautiful building,
so I'm assuming it was built in 1860.
I didn't take as many pictures around the city this
trip, since I wasn't able to walk as much, but 
Dave took a lot of pictures.
Of course, he always does, he gets up early and 
walks for miles all over the city taking pictures.
Here are a few of the photos that he sells;
and
These are just a few of the hundreds of pictures that he
has taken in Charleston over the years.
If you take a peek at them, be sure to go to
The Photo Gallery
where you'll be able to navigate his website and
see the many gorgeous pictures he has.

On to more about food.
One place we loved to eat was Bocce, but we
found that they had closed.  So Dave checked out a few
possibilities while he was walking and shooting.
And believe me there are a LOT of possibilities, 
but the thoughtful guy that he is, he kept in mind how far
I could walk without it being a problem.
We decided on Tommy Condon's because
they were having a prime rib special and
I do love my prime rib!
I started with a Wedge Salad and I have to say
it was more like a Half Head Salad!
It was huge and so, so good.
There was the 1/2 head of iceberg lettuce and it was
covered with cucumbers, bacon, blue cheese crumbles
tomatoes and green peppers
 All covered with Blue Cheese Dressing,
which is my favorite!
It was fabulous, but I had to take 1/2 of it back
to the fridge in our room for a late night snack.
Dave had She-Crab Bisque
and as you can see in the picture, 
he loved it!
I can't believe I didn't take a picture of my prime rib!
It was very good and came with a baked potato and
green beans.
Dave got Shrimp and Grits, which he always tries
to have when in Charleston.
Those green beans on his dish don't belong there,
but I don't like green beans, so he took them.
He did love the dish, but it was a little
spicier than expected,
hence, the tear in his eye.
He isn't much for spicy, but he ate it all to
the last bit.

Now I have to tell you a little tidbit about
the carriages in Charleston.
There are many horse drawn carriages in the city,
and there is not much you can do about a horse
that has to....ummm.... relieve himself.
When the horse does this, the driver will drop this little
pink flag on the ground.  There is a weight on the bottom
of the flag, then they radio that they need a clean up.
Someone comes along, within minutes and cleans
the area with disinfectant and water.
I can't imagine what the historic district would smell
like if they didn't do this.
Sure makes walking around the area more pleasant.

Well, that's it for now.
Next C/C post will be
 "Back to Charlotte"
Thanks for visiting with me today.
See you  next time!

Monday, September 14, 2015

Ribbon and tissue Fix #6

Welcome crafty people!
In today's post, I have 2 frames to show you.
Unfortunately, I was remiss in my picture taking duties,
and I didn't take any pictures of the process
for either of these frame fixes.
But, that being said, they were both easy enough to 
tell you about.
Remember this frame, from way back at the beginning 
of the frame fix series?
The one I used for this next fix is the same kind of frame,
but it's a bigger one this one is a 5x7.
This was a simple frame to fix. I simply took a ribbon that
I liked and wrapped the frame with it.
I didn't have enough of the ribbon that I originally 
wanted to use, but I loved this plaid too.
I used my ATG gun to apply double sided tape to the front
of the frame as well as the inside of the opening of the frame.
As I wound the ribbon around the frame, I made sure
that it was securely stuck to the frame.
The corners were a little tricky, but with some effort
they turned out nice.
This picture is of my Mom, my daughter, Kelsie and son, Jaryd.

This next frame was truly something else!
I guess for a little girl picture it might have been okay,
but not for my son's picture wall.
Picture pink and purple with fat butterflies and flowers
and you have this frame.  
I really wish I had a picture of it
before I fixed it!
Here are the little flowers that I popped off the frame.
I'm sure you get the idea of how awful this frame was,
but it was really cheap and that's what counted,
because I could fix it!
The first thing I did was find a light colored card stock
and cover the front of that frame with it.
As usual, I brushed on the Mod Podge and stuck it to 
the card stock.
I then used a craft knife to cut off the excess and some
fine sand paper to smooth the edges.
I then covered the front with Mod Podge and laid it onto a 
piece of tissue paper.
I was fully prepared to have to "rip and stick" this paper,
but it turned out great.
I had to be very careful on the edges and corners,
as you can imagine how fragile the tissue paper was
once it was wet with glue.
I covered it with more Mod Podge to be sure it had
a nice even finish.
I made the paper flowers and glued them onto the corner.
I will do a post one day soon on how to make these flowers,
they are easy as pie, well even easier, unless you just 
buy your pie at the bakery and open the box!
This picture is of me and my friend Lisa.
Remember Jaryd's best buddy from the other posts?
Lisa is his Mom and she is Jaryd's 2nd Mom.
Had to have a picture of Mom #2 on his wall.

I'm glad you stopped by today and hope you'll 
come again soon. 
 I'm nearing the end of my 
fixed frames series and you don't want to miss the 
big reveal now do you?

See you next time!

Wednesday, September 9, 2015

C/C trip #2 farther south we go.


Day #2 of our C/C trip we were up early and on our way 
to Charleston. 
We arrived at the Days Inn, where we usually
stay.  It is right on Meeting Street in the historic area of Charleston.
We arrived early so couldn't get into a room,
but they did let us check in so we'd be sure to have
a room on the first floor.
There is a lot to do in the Charleston area,
check out all the brochures in the lobby of the Inn.
We were only staying for a couple days, 
and planned to just do a bit of exploring in the city.
Here's Dave in the entryway to the
City Market.
Here is a closer picture of that table behind Dave in the 
picture above.  This is only one of the many vendor tables
that can be found in the market.  
This one is selling Sweetgrass Baskets.
Sweetgrass basket are one of the oldest handcrafts
in the USA of African origin.
Originally baskets were made as sieves to separate
the rice seed from its chaff.
Since the Colonial Era these basket have been 
hand woven from sweetgrass that is harvested locally
for this purpose.  
Most times the artist who makes the baskets is sitting in 
their space working on items between sales.
Each artist has their own style and they are all beautiful.
This art form has been passed from generation to generation
for many many years.
Sweetgrass baskets are very popular with both locals
and visitors.  They have many functional uses as well
as being very decorative.
These baskets and their artists can be found in 
places other than The Market.
You'll find them set up on steps 
sidewalks throughout the city.

Many people call it the Slaves Market 
and often misunderstand this name.  
It was NOT named this because slaves were sold here!  
NO slaves were EVER bought or sold in this market.  
The reason it is sometimes called 
The Slaves Market is because it is where the slaves went to
purchase things for the homes of their owners.
In 1788  Charles Cotesworth Pinckney
donated the land to the city of Charleston for
the express purpose that it become a public market
and would always be used as such.
It has gone through many changes over the years, 
 due to disasters such as tornado, fires, hurricanes
and more. Some changes have been made due to 
economic demands.
The Market was always rebuilt and made better.
In 1973 it was placed on 
The National Register of Historic Places.
Here is a picture of the "front end" of the Market
from across the street.
It's a beautiful building, the upper floor is now a museum,
the entrance to the actual market is at street level
and the market extends for 4 city blocks.
If you visit Charleston, a walk through
The City Market is a must!
This isn't the only place to shop though.
There are many shopping opportunities in Charleston.
One of our favorite shops is
"One of a Kind"
This is an Art and Fine Crafts store,
located right across the street from the Market.
We always visit this shop with no specific purpose,
but we always find something we love and need
along with so much more that we love, 
it's a great place to do a bit of Christmas shopping.
  This year we found a piece of art that we considered for our
newly redecorated bathroom.
While we were thinking about the measurements of the space we had,
I spotted the cutest bird.
He would be perfect for next to the picture we have in the bathroom!
Then we spotted some fish by the same artist.
After much hemming and hawing over colors,
we left the shop with 3 fish and a bird.
Here is our cute sandpiper.
And our Mama and baby fish.
We love how they look with 
which is one of my husband's photos.
Another one of our favorite shops is
Market Street Sweets!
OH MY!
You can't walk past without stopping for a free
sample of their pralines.
And once you've tried them, you'll be hooked
They have other kinds of candies also, but we've never
gotten anything but the pralines.
And we always have to bring some home for the kids,
well, and some for us too.
Our first day we just picked up one,
I'd never had the chocolate covered pralines before.
Oh was it good!
Also had a sample of the chocolate fudge pralines,
My, my!
But I think I still like the originals best.
If you don't want to fall in love with these sweet treats,
don't even go near the shop!

Thanks for coming by again to "hear" about
our trip.
Come again soon, never know what you'll find here on
Kristie Kreates.

Next post about my C/C trip, I'll tell you a bit more about 
eating in Charleston and walking around the city.
See you soon!