My Other Pages

To make it easier to read about our trip to Ireland, I have made a page that is just for that. There is a tab above for Ireland Trip 2014 or click on the Home tab to read my other posts. I have also created a new page for My Weight Loss Journey if you are interested in that, click on the tab above.

Tuesday, January 31, 2017

Wine About It!

Hi All!
I have a friend who loves her wine.
Actually, I don't think she drinks as much 
as it sound like on facebook.
Anyway, I found these huge wine glasses
at Michael's on clearance,
which worked out perfectly.
Our Christmas Crop at 
My Happy Place
was a Clearance Rack Christmas theme.
You could spend up to about $10,
but whatever you bought had to be on clearance.
This glass is huge and actually holds 
a bottle of wine.
I added the words with black vinyl that
I cut on my Silhouette Cameo
in the Jokerman font.
It turned out really cute,
that white card inside is just so you 
can see the writing on the glass.
She loved it and when she found out 
I had done the vinyling myself, she loved
it even more.

Thanks for stopping in today,
come again soon.
Until then, 
Happy Crafting!

Sunday, January 29, 2017

Puppy scarf


Hello friends!
I have an adorable God daughter and she loves 
her little 'stuffies' 
For Christmas I decided to make her a cute scarf.
I started with a stuffed dog and much to my 
husbands dismay, I cut the little guy in half.
I removed a little bit of the stuffing and added
a long piece of fleece as the scarf.
I simply folded over the fleece, put the ends into the
head and back end of the dog and sewed it shut.
I think it turned out pretty cute and I think
Andrea liked it too.
It was a pretty quick and easy gift to make for her.

Thanks for stopping by today,
I hope you'll visit again to see
what I'm up to.
You never know what you'll find on 
Kristie Kreates.


Friday, January 27, 2017

Anthony and Andrea

Hello everyone!
Today, I have a couple Christmas gifts that I made to show you.  
As you can see, the one for Andrea, is much like this one for Sienna
For Andrea's I used a 9" x'12" canvas board.
I used the same process to make this one.  
Andrea loved her dancer and asked Daddy to put a nail in the wall
in her bedroom so she could hang it up right away.
Anthony is Andrea's older brother and he is very into
Pokemon.  In fact his room will soon have a Pokemon theme,
so this was perfect for him.
This was a little more complicated than Andrea's
since it was layered.
I got the file from 
and it was the first time that I created with this
many layers.
But I think it turned out pretty good.
I also made them ornaments which I will 
show y'all in another post..

Thanks for stopping by,
I hope you'll come again soon.
Until then,
keep smiling and have some fun!


Wednesday, January 25, 2017

Gifts for Mom and Dad

Hi!  Hope you're having a lovely day.
Today I'm showing you the gifts our kids made
for us for Christmas.
I figured I'd be getting a canvas, as Kelsie was working like
crazy on them, but I had no idea that I would love them so much.
The little one says "I get it from my Mama"
For the larger one she searched for a Celtic symbol for 
Mother and Daughter and copied that.
I love the sentiment!
My husband and I love Ireland and Celtic designs
and this was perfect.  These will both be hung in my 
craft room.
Kelsie also made one for her Dad.
They have always said
"I love you!" and the other would say
"Love you more!"
She found a Celtic symbol for him too, which
is for Father and Daughter.
I think she did a great job on our gifts and we will
cherish them forever.

Kelsie is not the only one that made Christmas gifts
for us.
Our son, Jaryd, and his girlfriend, made some sweatshirts
for us too.  I don't have a clue how they did this, but they 
learned how to do screen printing at home.
This is what is on my sweatshirt.
The average person isn't going to understand, but I
got it right away.
At My Happy Place, where we do scrapbooking and crafting,
I am affectionately known as 
Scrap Queen Kristie.
This is perfect for me!
Don't you think?
My husband is a real Trekkie so there was no question
about his. They made him a sip up hoodie.
 This is on the back of it,
and this is on the front.
I think they did a great job on these gifts.  
Perfect for us both.

So glad you stopped today, so I could show off my 
Christmas gifts from the kids.
I hope you're inspired in some way
and will come back again soon.
Until then,
Happy Crafting!


Monday, January 23, 2017

Canvases and Washclothes

Hi blog friends!
Today I'm showing you some of the gifts my kids
made for Christmas.
I've shown some of the canvases that my daughter
made before and here are a couple more.
Here is my daughter with my Mom and the canvas 
Kelsie made her for Christmas.
Here's a close up of that canvas.
Mom has it in her room at the assisted living center
and everyone loves it.
This is another one that Kelsie made for her friends.
This is my son with G-Ma, as he calls her, on Christmas.
He knitted some nice soft wash clothes for her.
I knew he could crochet, but now he knows how to knit too.
Talented kids I have there, eh?

Thanks for stopping in today,
I hope you are having a creative day!
Come again soon!


Saturday, January 21, 2017

Jars for Greats

Good day friends!
If you've been following me for a while,
you probably know that I have a 92 yr old Mom
who is living in an assisted living center.
She is on a tight budget, but still wants to give
Christmas gifts.  So I find something every year
so she can do that.
Last year, after Christmas, I found Mason jar drink
mugs on clearance for a very cheap price.
Of course I picked up a whole bunch of them.
This Christmas she gave all the great grandchildren
personalized mugs.
Here they are in family groups.
I found a font that I felt went with each
great's personality.
And where I knew favorite colors, I tried to match
them up.
Don't think I always got the favorite color right,
but I tried and I don't think they cared.
These 2 aren't  brother and sister, but are both only children
so I put them together for the picture.
Here they all are together.
I also had Christmas ornaments that I had picked up
at a very reasonable price.
Each mug had an ornament hanging from the straw.

I think the greats loved their gifts.
With a little forethought and planning, you can
work with a small budget.
With purchasing on clearance way ahead of time,
these gifts ended up costing less than $1.00 each.
Pretty good deal, if I say so myself.
And, by the way, all the vinyl I used for the names,
were scraps, so that was even a bargain.

Thanks for stopping by today,
I hope you've been inspired in some way.
Maybe to check out that clearance rack and
think ahead to what you need for the future.

Until next time,
think outside the box!

Wednesday, January 18, 2017

Kelsie's canvases

Hi All!
This year my daughter decided to make canvases as 
Christmas gifts.
I helped her a bit with them.
We used my Silhouette Studio Design program to 
created the files and printed them from my printer.
She learned how to use the program pretty quickly and
did almost all the designing herself.
She then traced the design onto the canvases and painted
them with acrylic paints.
I think she did a great job.
These 3 canvases were for her best friends.
They love their dog, so this was perfect.
Pat and Amanda both are big into music.
I love this quote.
These are for their kitchen.
Their house is mostly in grays and blues,
so they fit in perfectly.

Thanks for stopping by today.
I hope you are inspired to think outside
the box and try something different
that you've not tried before.
Until next time,
Happy Crafting!

Saturday, January 14, 2017

Gift Ball

Hello!
Want a fun game for a party?
Here is what we did with my greats at our family
Christmas party
(greats is what I call my great nieces and nephews)
These are some of the things I got together for the 
gift ball.
If you know how to shop, you can get off pretty cheap
for this game.  I am a couponer, so I got the candy
for free in the end.  I bought little things
at the Dollar Tree, packages with multiples work great. 
I also had things around the house that I added to the 
gifts, microwave popcorn, a box of crayons, a box
of markers.
I bought 3 rolls of plastic wrap at the Dollar Tree to
use as wrap for the ball.
With a sharp knife I cut one roll in half, to
give me narrower rolls to wrap with at the beginning.
For the center I had a clear plastic ornament,
the kind in 2 pieces, that I put a couple dollar
bills into.  I started wrapping the plastic wrap around
the ornament and as I went I put in different "prizes"
I wrapped and wrapped and wrapped adding things all
along the way.
You can wrap things close together or as sparingly as you
like.  I ended up using 2 whole rolls of plastic wrap for my 
gift ball.
Here is how it looked when I finished wrapping.
Here's another shot, you can see that I wrapped a box of markers
into the ball.  You can add whatever sized items that you have,
just keep going around the ball until it's covered.

At the party, we only had 5 of my greats there and they
ranged in age from 5 to 14.
They sat in a circle on the floor and as one person 
unwrapped as fast as they could, the person to their right 
rolled a die until they got a 6.
Then the ball and the die were passed to the right and
it went on until it was unwrapped.
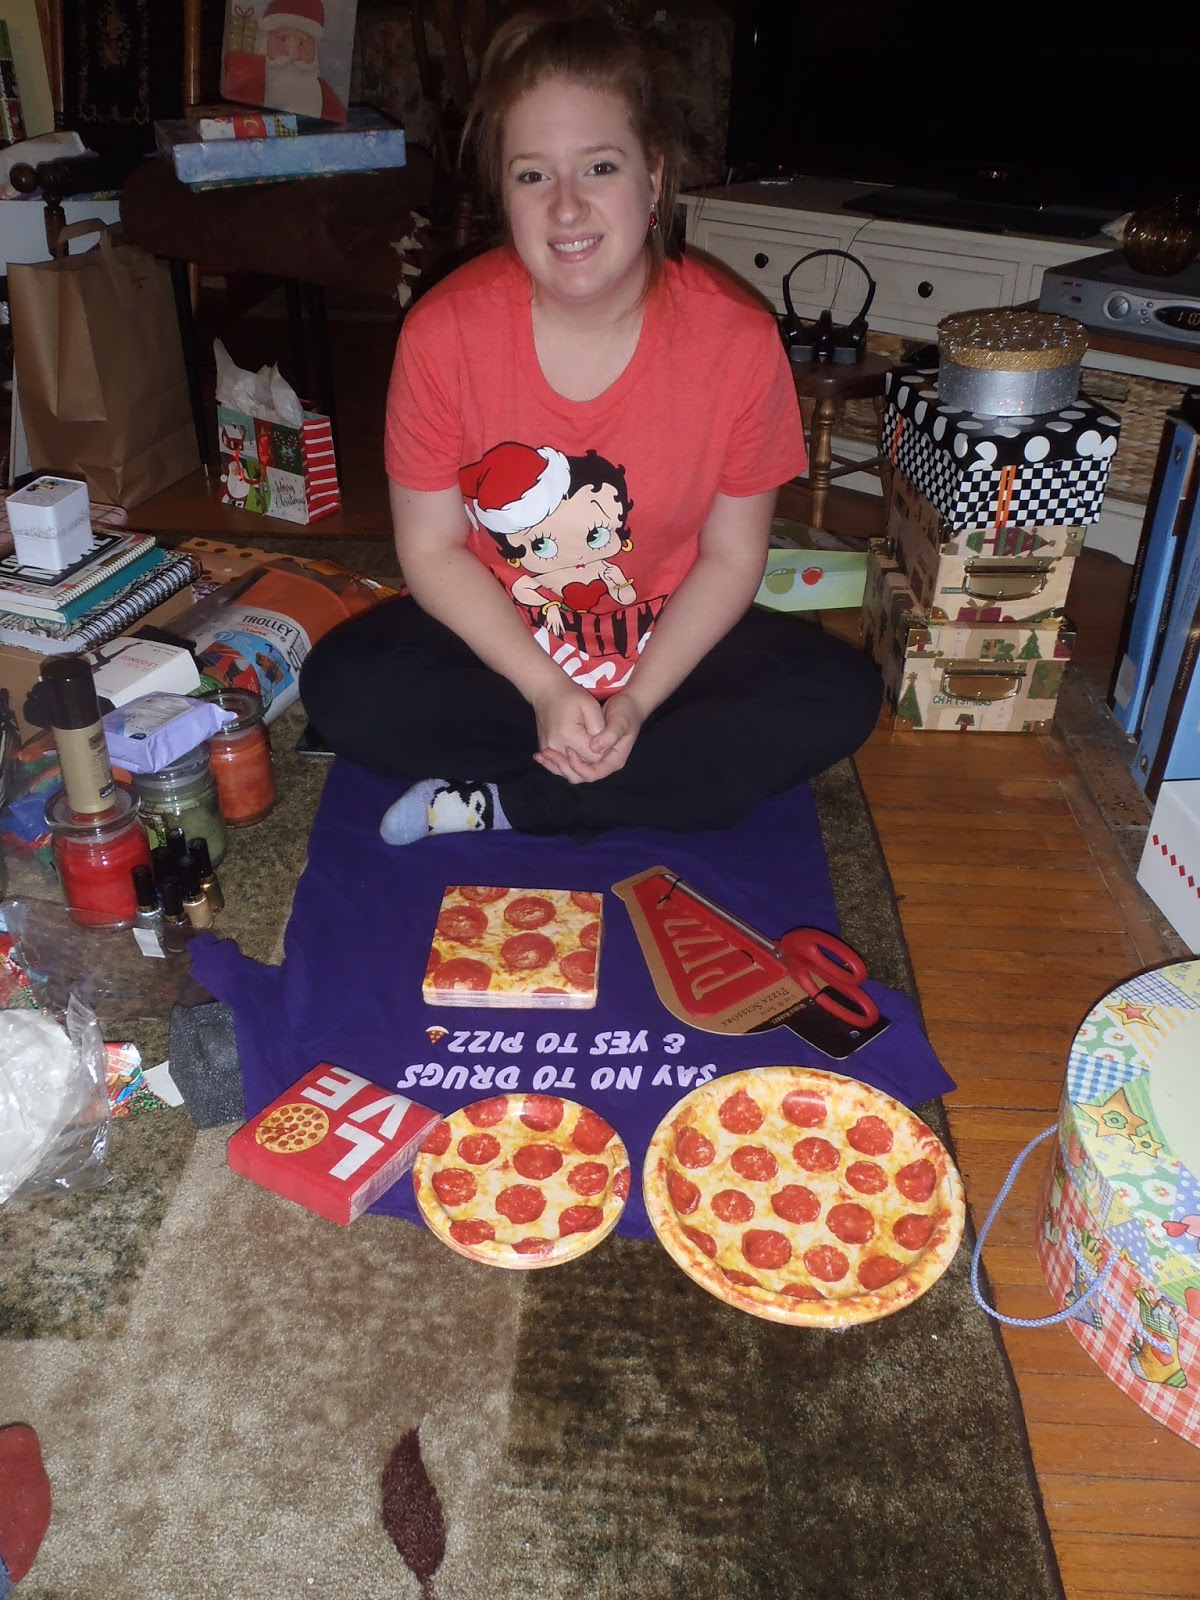
The kids were great and had a ball playing this game.
After they were finished, they had fun trading
gifts.  The boys traded the nail polish with 
the girls for candy etc.
We'll be doing it again next year,
I'll be looking for little things all year that
I can find on sale or clearance to put into the ball.

A friend of my son's brought a gift ball to their 
Christmas party, they played that you had to get doubles
on a pair of dice and they had wrapped it tighter with pieces of 
plastic wrap, so a new end would have to be found when one
ran out.  He said they had a lot of fun with it too.

All in all, this made for a very fun party, everyone loved it.
The greats had a blast playing it and the adults loved watching 
and cheering them on.

Thanks for stopping by today,
I hope you'll try this gift ball idea at a party some time.
I only spent about $10 on the items for mine,
you can spend whatever you like, it's fun no matter what's in 
the ball.
Hope to see you soon!

Tuesday, January 10, 2017

shirts

Hello, blog friends!
I hope you had a lovely holiday season and
a happy new year.
I wish you all a very happy and healthy
2017.
Now that Christmas is past, I can give you 
a look at some more of the gifts I made.
These are the shirts I made for my kids.
My daughter is obsessed with pizza,
and this shirt was prefect for her.
I used my Silhouette Studio program to design it.
I created the slice of pizza myself and put her favorite 
topping on it, mushrooms.
Here's a closer look at that pizza.
She loved it!
Here she is with her pizza goodies that we
gave her. 
This is the one I made for my son.
He thought it was pretty funny.
I got this idea from my crafty friend Cheryl, thanks!
Here's Jaryd with his shirt.

If you're looking for a fun gift for someone,
and have any means to cutting shapes and 
letters, try a shirt.
Heat Transfer Vinyl is easy to use and it's a 
fairly inexpensive way to make a fun gift.

Thanks for stopping by, I hope you'll
come again soon.
Until then, try something new!


Thursday, January 5, 2017

Sienna' Gift

Hi everyone!
I have the most adorable :"greats"  
that's what I call my great nieces and nephews!
Today I'm showing you what I made for one
of my greats.
I used a 5x7 canvas board, that I picked up at 
I mixed some red and white 
to make pink paint and 
painted the entire board with the pink.
I cut a ballerina with my Silhouette from black vinyl.
I used one of the dancers from the
"Ballerina Border" which I purchased from
I also cut her name using the
Segoe Print font.
I used transfer tape to apply the vinyl to the painted
canvas board.
I then made a 'dress' for the ballerina.
For the dress, I used a strip of lace
and a piece of pink ribbon,
I doubled the lace to give it a bit of fullness.
I layered the pink ribbon on top of the edge of the
doubled lace and used a running stitch with white
thread along the length of the lace and ribbon.
I then pulled the thread to gather the top edge 
and secured it with a few stitches.
I tied a small bow with the same pink ribbon and 
to glue the bow to the dress.
I also used the Multi Medium to glue the dress
to the dancer on the board.
I used the same glue to adhere 3 flowers to the 
hair of the ballerina
I framed it in a black frame.
I think this turned out adorable.

I hope Sienna loves this as much as I do.
I enjoyed creating it for her.

Thanks for stopping by today.
Come again soon.
Until then, I hope you'll 
create something.


Note the links are only to give a reference so you can
see what the products are.
I didn't necessarily purchase from these sites,
except where specified,
and you may find better prices elsewhere,
I am in no way promoting any particular site.


Monday, January 2, 2017

Sophia's Craft Stuff

Happy New Year!
Wishing you a very happy, healthy and crafty
2017!
Today I'm showing you a gift I put together for my
great niece.  What little girl wouldn't love a box of
craft stuff?
That is exactly what we gave Sophia for Christmas.
I found this great storage container at Michael's on sale
for 60% off, so, of course, I had to get it.
Then I went about picking up other deals to put inside
the container.
a 6x6 pad of glittered card stock,
a roll of pink feather boa, 
all those good kinds of things.
Now what good is a container that isn't 
personalized?
So I used my Silhouette to cut 
the words and the shadows from 
vinyl and applied them to the side of the box.
No mistaking who this belongs to.
The font I used is called 
Jokerman
I think it's perfect for a craft box,
don't you?
I'm writing this before we give this to Sophia,
but I'm sure she'll love it.
Thanks for stopping by today
to see my project.
I hope you'll come again soon
as I have more Christmas
gifts to show you.
Until then,
Happy New Year!