My Other Pages

To make it easier to read about our trip to Ireland, I have made a page that is just for that. There is a tab above for Ireland Trip 2014 or click on the Home tab to read my other posts. I have also created a new page for My Weight Loss Journey if you are interested in that, click on the tab above.
Showing posts with label Color Box Chalk Ink. Show all posts

Friday, October 30, 2020

Halloween Cards

Hello!
I'm not a huge Halloween fan, but there are a 
few kids I send cards to every year.
Today I'm showing you the 3 cards I made this year.

I stamped this image and sentiment with brown
Color Box Chalk Ink
and colored it with Arteza Colored Pencils

For this card I sketched out the goards and colored them
with colored pencils.
Inside I wrote I can't believe it's Halloween already!

I drew and colored this zom-bee with 
colored pencils and made the wings with
vellum.
I think the kids I send these to will get a kick
out of them.

Thanks for stopping by today,
I hope you'll come again soon.
Happy Halloween!


Note the links are only to give a reference so you can
see what the products are.
I didn't necessarily purchase from these sites,
except where specified,
and you may find better prices elsewhere,
I am in no way promoting any particular site.


Friday, October 6, 2017

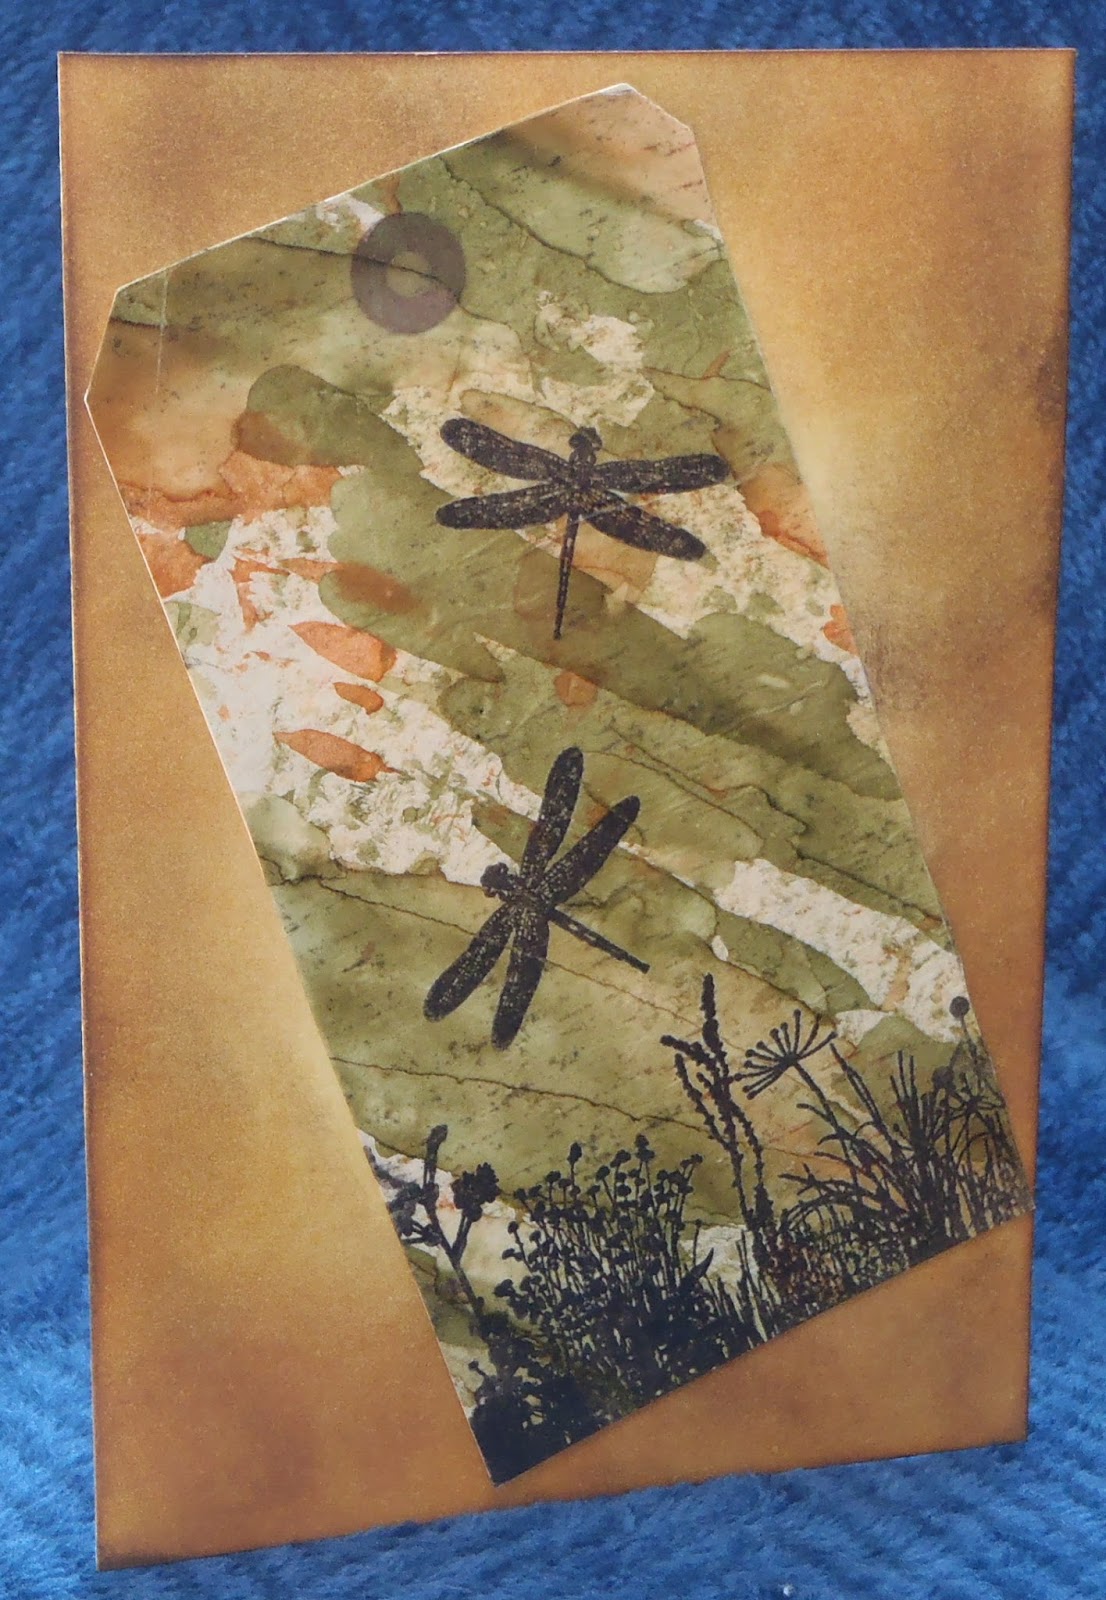
Firefly tag card

Hello crafty people.
Today I have another project to show you
from my stash of unused "stuff"
Quite a while ago I made this tag, but never used it.
I used alcohol inks and deli paper to make the
background paper, then glued it to a manila tag.
I then stamped the images with Versafine Onyx Black Ink
and then the tag sat for a long time.
I decided I wanted to make it into a card.
I used Distress Inks to give a white card base
a different color, then simply adhered the tag
to the card base.
I stamped this so long ago, that I have no idea
about the names of the stamps or even what company 
they are from.
My friend, Jen, absolutely loved this tag
so I decided to make it a card for her.
I stamped this sentiment inside the card with
Color Box Chalk Ink and it wasready to go. 
This sentiment is True Friends and can be purchased
I also made an envelope for this card with my 

Thanks for stopping by today,
I hope you have been inspired in some way.
Maybe you'll dig into your stash of
"stuff" and come out with something
that you started and never finished.
Until next time,
Be Creative!


Note the links are only to give a reference so you can
see what the products are.
I didn't necessarily purchase from these sites,
except where specified,
and you may find better prices elsewhere,
I am in no way promoting any particular site.


Tuesday, September 12, 2017

Smooched background

Hello crafting friends!
This past Saturday I decided to work on making some 
birthday cards.  I always seem to fall short when I need them
unexpectedly.  I also wanted to use some of the pieces that I had
in my stash.  This is one of the cards I made. 
I had this background in my stash from a couple months ago
when I was making some "smooched" background pieces.
I taped a piece of watercolor paper to a board,
then I smooched Distress Inks onto a piece of acetate,
sprayed it with a bit of water then laid it onto the 
paper and let it sit for just 15-20 seconds.
When I picked up the acetate, this was what I was left with.
And I LOVE how it turned out.
All I needed to do was adhere it to a piece of brown card stock,
then to a white card base and add a sentiment.
The Happy Birthday sentiment is from 
stamped with brown Color Box Chalk Ink onto
white card stock, trimmed out and adhered with 
foam tape.
Simple card, but I think it turned out great.

Thanks for stopping in today, I hope you'll 
come again soon.
Until then,
try something new!


Monday, November 14, 2016

Autumn Greetings

Happy Autumn!
I'm not crazy about the fall time,
I don't like the cooler weather,
but I do love the colors of fall.
The trees are so beautiful and the leaves on the
ground are so pretty.
The card I have today is kind of a mash up of a
 cards that I saw on blogs.
This is kind of how inspiration works for me.
I see different techniques and designs and end up 
combining them into something that I like.
For this card, I started with a piece of white card 
stock.  I used different colors of Distress Inks to 
cover the front of the card stock.
I then found all the leaf stamps that I had,
 and stamped them onto the 
colored card with brown Color Box Chalk Ink.
I used 2 rectangle layering dies to cut the
 window in the card.
The outside was adhered to the card base.
The frame was layered with craft foam and card stock
 cut with the same dies to give dimension to the frame
around the window.
I used the frame as a guide to adhere the inside piece
to the back of the window.
I used a piece of acetate that was from some packaging
that I saved to cover the frame and adhered the 
colored frame piece on top of it.
I used a variety of sequins in the shaker window
as well as a few acorns and leaves that I stamped and fussy
cut.  I then stamped the sentiment and fussy cut that
and adhered it to the front of the shaker area.
For the sentiment inside I used a stamp that I borrowed 
from a friend.  Sorry there was no company name anywhere
on the stamp.
Thanks for stopping by today,
I hope you are enjoying the beauty of autumn.
See you again soon.

The supplies I used are:
Eureka Stamps


Note the links are only to give a reference so you can
see what the products are.
I didn't necessarily purchase from these sites,
except where specified,
and you may find better prices elsewhere,
I am in no way promoting any particular site.


Monday, October 3, 2016

Give Thanks

Hello all!
Today I have a fun technique to show you and 
a couple cards I made using it
I started by covering a piece of card stock with 
double sided tape.
Here you can see where I have removed the top half of 
the release paper and still have 2 pieces covered.
I had chosen 4 different fall colors and cut strips of
card stock in different widths.
Once I removed all the release papers, I started by laying
down one of the strips on an angle.
I then laid down more of the strips.
I decided to follow a pattern with the colors and 
continued applying the strips until the entire piece of 
card stock was covered.
And at this point, my camera died.
So I will have to explain the rest without pictures,
but I think you'll understand what I did when you look at
the finished cards.
Once the card stock was covered, I turned it over and
trimmed the extras off the edges.
I then used a die to cut out the pumpkin with orange
patterned paper and embossed it with a matching 
embossing folder.
I did the same thing with a piece of green paper,
then I cut the stem and leaf off and glued it to the 
pumpkin.
I also used Distress Inks to add a bit of shading and
highlighting to the pumpkin and the leaf.
Then I used the same die to cut the pumpkin out of the 
center of the striped piece.
I used the same technique with the leaf die.
I used foam tape to adhere the striped panel to the card
base.  I then put glue on the back of the pumpkin and leaf
and glued them to the card bases through the die cut opening
on the striped panel.
Here you can see from the side that the leaf is sitting 
down inside the die cut space.
I stamped the
"Give thanks"
onto a coordinating color with
and fussy cut it and adhered it over the
pumpkin and leaf with foam tape.
The give thanks is part of the 
Give thanks stamp (#34109) from Biblical Impressions
The entire sentiment reads
"Give thanks 
to the Lord"
I masked off the part of the sentiment
that I didn't want and stamped the part I needed.
I love how these 2 cards turned out,
I think they will make great Thanksgiving cards.

Thanks for stopping by today,
I hope you will give this technique a try.
You can use any kind of paper to make the stripes,
plain colors or patterned papers, you'll be surprised
how easy it is and how great it turns out.
Come again soon,
until then have some fun trying something new.

Note the links are only to give a reference so you can
see what the products are.
I didn't necessarily purchase from these sites,
and you may find better prices elsewhere.
I am in no way promoting any particular site.

Tuesday, August 16, 2016

Washi Tape Card

Hello crafters!
The other day I was crafting and was having a tough time
figuring out what to make.  I picked up my notebook
that is full of pictures of cards and layouts that I like.
I never copy a card or layout as it is shown
in a picture, but I use it for inspiration.
I found this picture from
I loved the idea of using Washi tape like this
on a card.  So I used that for inspiration,
dug out the tape I had with me and got to work.
Here is what I came up with
It's the same concept, but a totally different look.
to stamp the heart in the center and
Distresss ink for the rest of the panel.
Sorry I don't have the stamp set here, 
so I can't tell you what company they are from.
I'm okay with how it turned out, 
but not crazy about it.
I know it would be much better if the colors of
the tape I had were lighter and brighter..
I will definitely be using this technique again.

Thanks for stopping by today,
I hope you've been inspired to give this
technique of using Washi tape like this a try.

Until next time, Happy Crafting!

Note the links are only to give a reference so you can
see what the products are.
I didn't necessarily purchase from these sites,
and you may find better prices elsewhere.
I am in no way promoting any particular site.


Friday, November 20, 2015

SSS prize

Hello crafty friends!
In October on
I love a good blog hop, so I hopped along
and commented on all the blogs.
There was some wonderful inspiration and fabulous
 ideas, techniques and tips.
A few days after the hop was finished, 
I was surprised to find that I had won one of the 
prize packages.
This is what I received in the mail a week or so later.
It's one of their card kits.
I was thrilled to win this kit and knew I'd be able to put
all these goodies to good use.
There is an "inspiration sheet" that comes with the kit
that shows 6 cards that Kristina Werner made with the
supplies in the same kit.
How could I go wrong?
A kit from a company I love and 
inspiration from one of my favorite designers!
The other day I made a couple cards and barely put a dent
in the supplies.
I used strips of various papers to make this
pretty card.  
"What A Beautiful Day" was stamped
Some of the strips were adhered with foam tape 
to give a little dimension to the card.
This second card is very clean and simple.
With the beautiful papers in the kit,
I couldn't go wrong,
a few thin strips of paper and the
"Just a note" stamp made for a quick and
easy card.

Thanks to 
Simon Says Stamp
for the great prize they sent me!
If you aren't familiar with them,
pop over to their blog linked above or to there 
where you'll find just about anything you will need 
for paper crafting and more.

I'm glad you stopped by today,
I hope you will come again soon.
Until next time, Happy Crafting!


Monday, September 16, 2013

Color Inspiration Challenge

Time for another challenge from the
Eureka! Stamps Blog
This week is a "Color Inspiration" challenge
Use the colors in this photo for inspiration to create something lovely.
I chose to use
"Leaf Background" (#26901)
"Lg Tree" (#15302) from
I stamped the Leaf Background with brown
Color Box Chalk Ink and colored it with
water color crayons.
I stamped the Tree with the same brown ink.
I used Distress Ink and sponged over the image to color the sky.
I then fussy cut the tree and added it to the card with foam tape.
 
I hope you'll be inspired to join in our challenge.
All the particulars are on the
 
Thanks for stopping by today,
hope to see something you created linked up to the
Eureka! Stamps Challenge.
Come again soon.
 
Until next time, Happy Crafting!