My Other Pages

To make it easier to read about our trip to Ireland, I have made a page that is just for that. There is a tab above for Ireland Trip 2014 or click on the Home tab to read my other posts. I have also created a new page for My Weight Loss Journey if you are interested in that, click on the tab above.

Friday, April 29, 2022

Rolly Pollies

Hello!
Welcome to Kristie Kreates.
I haven't shown you a scrapbooking layout for quite a while,
so I thought I'd show you this one today.
Our little granddaughter, Marie,  was enrolled in Rollie Pollies
and just loved it.
Once a week, she and, usually Daddy, would go to the gym for some
time together and she got some great time to
jump, run, do summersaults and more.
I was lucky enough to take her a few times and had so much fun 
with her.
These are some of the pictures from the first time I went with her
and Jaryd.
Unfortunately, she isn't going anymore, as they have bought
a house and it's too far to drive to be able to go.
She did get a good start and loves to do "gymnastics" on her own
or with some of us.  She's pretty fearless and believe me,
she can sure walk a balance beam a lot better than I can.

Thanks for stopping in today,
I hope you have been inspired in some way.
Come again soon.
Until then,
try something daring!


Monday, April 25, 2022

Recipe Box

Good day!
I hope your day is going well.
Today I'm showing you the beautiful recipe box
my brother made for my daughter for her bridal shower.
Each guest wrote out a favorite recipe for Kelsie and 
brought it to the shower.
I thought it would be nice to have a recipe box to put them
into, so I requested that my brother make her one.
I gave him the size I needed and off he went, 
designed it and made it.
These are the pictures he sent me when he had it finished.
I think he did such a beautiful job.  I never knew he had 
this talent, because he never had the time to do any woodworking
before he retired.
My sister in law got the dividers for the box, so it
would be ready to go.
He even has his own brand to mark his work with.
One of the amazing things is that all the wood that he's
been working with is his old privacy fence from his yard.
Several years ago they needed a new fence and he kept 
a lot of the wood to use "someday, for something"
Now he has the time and is making beautiful things with it.
Amazing what you can do if you have a little vision.
Here is a picture of Kelsie at her 
"virtual gift opening"
showing her recipe box and thanking
her Uncle.
I'm sure she will enjoy and use this box for years
to come and it will be handed down to the
next generation.

Thanks for joining me today for a while.
I hope you enjoyed seeing my talented
brother's work.
Come again soon,
until then;
have some vision!


Thursday, April 21, 2022

It Was Written in the Stars

Hello blog friends!
Today I have the invitations for my daughter's
bridal shower to show you.
There theme is
It was written in the stars,
so that's what I went with on the invitations.
She and Brad are Pisces and Libra, so I used those
star symbols.
I love how they turned out and so did she.
In each invitation there was a recipe card for people
to give her their favorite recipe.
I put the star symbols on them too.
I think they made a nice little set.
She had a lovely shower and received
many great recipes.

Thanks for stopping by today to see what's going 
on in my creative world.
I hope you'll return again soon.
Until then,
have fun creating.


Sunday, April 17, 2022

Happy Easter

Hello and Happy Easter!
Today I'm showing you the Easter card I 
made for my sweet 98 yr old Aunt who lives
in a nursing home.
I knew she would love this little bunny,
so I stamped colored and fussy cut him and
adhered him to the front a a card with a 
Action Wobbler.
The background was inked with Distress Ink and
a home made cloud stencil.
I made this a 3D card and added the stamped,
colored and fussy cut flowers to the front.
The grass was just free hand cut from green 
glitter card stock.
If you are interested in learning to make this
type of 3D card you can see how 
Jennifer McGuire does it in
It's really quite easy to make and you 
can even make it with 2 different layers.
It folds flat to easily send in an envelope.

Thank you for coming by today and I hope
you have a blessed Easter.
Come again soon.
Until then,
watch a video and try something new.


Wednesday, April 13, 2022

Leaf Embroidery

Hello crafty people!
Today I have something very different to show you.
In March we had quite a wind storm, I took the dog out and
when I came back in, some leaves blew in with me
When I picked them up to throw them away, I was surprised
to find that this one was not brittle, but fairly pliable.
I have seen pictures of leaves that have been embroidered,
but have never tried it.
So I gave it a try.
I just pulled out a needle and some
embroidery floss and got to work.
I just free handed this and I don't think it 
came out too bad for a first try, with no
instruction, pattern or idea of what I was doing. 
The next day when I took the dog out again,
I found this leaf and brought it in.
I don't know what I'll do with it, 
or if I'll get around to embroidering on it,
but I know sometime I'd like to make some 
more embroidered leaves.
Have you ever embroidered on a leaf, or
something else that is out of the ordinary?
I'd love to hear about it if you have and see what
you made.

Thanks for spending some time with me today,
I hope you have been inspired in some way and will
come again soon.
Until then,
see possibilities in everyday things.

Saturday, April 9, 2022

Birthday Cards from Self Challenge

Hello everyone!
My last post was about a self challenge,
this is a continuation of that challenge.
I had these poppy images colored and just
waiting for the right time to use them.
And I found it.
I fussy cut this image with a small white boarder and
adhered it to a blue card base.  
The sentiment was heat embossed with white
This Happy Birthday sentiment is from a 
Kelly Creates set
The card didn't look complete until I used a 
to add the dash lines around the card.
For the sentiment I used this one from 
Impression Obsession Stamps, but 
I couldn't find it sold anywhere online.
Next I fussy cut this image and made a card with it.
I love the colors on this card and poppies are one of 
my favorite flowers.
Again I use a Happy Birthday sentiment for this card
and the same sentiment inside the card.
I think these were the two easiest cards that I made
while doing this challenge.  What could be easier than 
using a beautiful image that I had already colored?

Thanks for coming by today, I hope you have been 
inspired in some way and will come again soon.
Until then,
use your stash!


Note the links are only to give a reference so you can
see what the products are.
I didn't necessarily purchase from these sites,
except where specified,
and you may find better prices elsewhere,
I am in no way promoting any particular site.


Tuesday, April 5, 2022

I Challenged Myself

Welcome blog friends!
One day I wanted to craft and didn't really 
have any set plans for what to do.
I decided to challenge myself to make some 
cards with images and backgrounds from my
stash.  These are three of the cards I made.
I had this image all colored and in my stash for a
long time.  It's not my usual style of image, but
I like it a lot, so I fussy cut it.
Then I went to my box full of backgrounds
that I have made and picked out this one. 
It was made with alcohol inks.  I simply adhered
the image to the inked panel and then added
it to a card base and I had it done.
Next I found this poppy image, which is one of my
favorite flower images.  I fussy cut it leaving a bit of a
white border around the image.  I think this really helps
set it out from the background.
I chose this background, which was also made 
with alcohol inks.  It's hard to see, but it also
has areas of gold foiling.  While the ink was still a
little bit sticky, I pressed the foil to the ink and then pulled 
it off.  This leaves the foiling anywhere that it could 
stick to the ink.  
I used foam tape to adhere the flower to the background panel,
then adhered it to a card base.
For this card, I pulled out a tag and 
covered it with the alcohol inked background
piece.  I had a totally different idea in mind,
but then the silver and pink flocked animal 
print caught my eye and I added that.
I then used a stamp and 
Alcohol Lift Ink
to stamp the sentiment.
If you haven't ever used 
Alcohol Lift Ink, I encourage you to
give it a try.  I love using it.
Now I had a tag, but what to do with it?
I actually tried a couple other things and ended
up taking them apart, nothing seemed to be working
for me with this.
Then I decided to mount the tag on a piece of 
silver card stock, then black, then a card base.
As you can see, I trimmed each layer out as I went.
I really love how this turned out in the end.

I'm glad and grateful that you stopped by today.
I hope you have learned something or been inspired
in some way and will come back again.
Until then;
challenge yourself in some way.


Note the links are only to give a reference so you can
see what the products are.
I didn't necessarily purchase from these sites,
except where specified,
and you may find better prices elsewhere,
I am in no way promoting any particular site.


Friday, April 1, 2022

Easter Eggs

Hello crafty people!
Today I'm showing you a bit of our Easter egg
coloring from 2021.
Marie colored her own eggs and we had 
an egg coloring contest.
We each colored and decorated an egg in 
whatever way we wanted, then I put pictures up on
Facebook and the judging commenced.
See below for the final eggs and the winner.
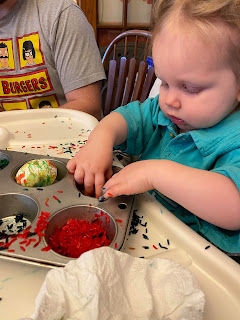
For Marie to color eggs, Sara put food coloring in
rice in cup cake tins.
Marie had fun rolling the eggs in the colored rice
and making her own eggs.
Another fun way she got to color eggs,
was to have food coloring in whipped topping.
You can see she had lots of fun doing this activity.
Here are most of our eggs.
Our contest entries and results below.
Brad 24 votes 
the clear winner!
Brad's response:
"Wow! I'm really not much of a bragger, but I'll give it a shot...
first time dying eggs and I beat an entire family of artists?! 
Better luck next year!"
Jaryd received 4 votes
He tried a technique with putting wax on
the egg and coloring it, then a different layer
and coloring again. 
Kind of a batik method.
Didn't come out like he hoped.
But it was a nice try.
Kelsie 7 votes
Kelsie and Brad both love the universe, stars
and planets.
Marie 13 votes
A pretty good job for a 1.5 yr old.
Sara 2 votes
Sara went simple with a colored egg and stickers.
Kristie 17 votes
I colored mine and then painted it.

We had so much fun doing this and having the 
facebook contest that we plan to make it a
yearly family activity.
Which egg would you have voted for?

Thanks for stopping in today.
Come again soon.
Until then:
have fun with a family activity!