My Other Pages

To make it easier to read about our trip to Ireland, I have made a page that is just for that. There is a tab above for Ireland Trip 2014 or click on the Home tab to read my other posts. I have also created a new page for My Weight Loss Journey if you are interested in that, click on the tab above.
Showing posts with label Distress inks. Show all posts

Sunday, April 17, 2022

Happy Easter

Hello and Happy Easter!
Today I'm showing you the Easter card I 
made for my sweet 98 yr old Aunt who lives
in a nursing home.
I knew she would love this little bunny,
so I stamped colored and fussy cut him and
adhered him to the front a a card with a 
Action Wobbler.
The background was inked with Distress Ink and
a home made cloud stencil.
I made this a 3D card and added the stamped,
colored and fussy cut flowers to the front.
The grass was just free hand cut from green 
glitter card stock.
If you are interested in learning to make this
type of 3D card you can see how 
Jennifer McGuire does it in
It's really quite easy to make and you 
can even make it with 2 different layers.
It folds flat to easily send in an envelope.

Thank you for coming by today and I hope
you have a blessed Easter.
Come again soon.
Until then,
watch a video and try something new.


Wednesday, November 4, 2020

Smile and Congratulations

Hello and welcome!
Today I have a couple more 2 for 1 cards.
For these two cards I embossed some white card stock with 
the Octogon Embossing Folder from Darice.
I then used Mustard Seed and Carved Pumpkin
Distress Inks to color the embossing with an ink
I cut the embossed piece into two pieces and used one for 
this card.
I used this sentiment inside the card,
(sorry I can't find a direct link)
For this card I used the other half of the embossed piece
and a congratulations from my stash of stamps.
For both cards, I cut down some scrap pieces of coordinating 
card stock and added little strips to finish off the card.
I'm happy with how these cards turned out.

Thanks for stopping today, I hope you have been
inspired in some way.
Come again soon.
Until then,
try something new.


Note the links are only to give a reference so you can
see what the products are.
I didn't necessarily purchase from these sites,
except where specified,
and you may find better prices elsewhere,
I am in no way promoting any particular site.


Sunday, July 5, 2020

Graduation Cards

Hello Blog friends!
Today I have a couple cards to show you.
My hubby wanted a graduation card to send
to the son of one of his artist friends, so he asked
me to make one.
Here is what I came up with.
I started with the Abstract Triangle stencil from 
Simon Says Stamp and used Distress Inks and applied them
with blending brushes, I use make up brushes and they work great.
(Weathered Wood, Stormy Sky, Blueprint Sketch)
I then cut the panel down to size and adhered it to
a white card base.
The sentiment is from my stash.
I followed the same procedure with this card, but used
a stencil from Heidi Swap, I can't find a name on it or
anywhere on her site.  Sorry.
For this one I used Stormy Sky and Blueprint Sketch
Distress Inks.
Inside I stamped this sentiment.
It's an old stamp from my stash and I have no
idea where I got it.  
I did a little stamp surgery on this one.
Originally it says something like
"If you love what you do"
above  "the whole world"
I just cut them apart and if I want
to use the whole thing I'll just piece it
back together again to stamp it.
I love this sentiment for a graduation card.

Thanks for stopping by today,
I hope you'll come again soon.
Until then:
Happy Stamping!


Note the links are only to give a reference so you can
see what the products are.
I didn't necessarily purchase from these sites,
except where specified,
and you may find better prices elsewhere,
I am in no way promoting any particular site.

Tuesday, June 2, 2020

Hello Cards

Hello Blog friends!
I hope y'all are doing well and staying healthy.
Today i have a couple cards to show you that
I made from my stash.
They are both very simple cards made to send to
friends during the COVID lockdown.
This was a piece that I had made by inking
over a stencil with Distress Inks.
This piece was made using paints on my
gelli plate.
Did you make and/or send cards to anyone
during the lockdown, just to say hi and brighten
someones day?
Thanks for stopping for a visit,
I hope you are having a bright day.


Wednesday, February 12, 2020

Unicorn Birthday Card

Hello everyone!
I hope you're having a fabulous day.
Today I'm showing you a card I made for our 
Goddaughter for her birthday.
She does love her unicorns, so of course, it had
to be a unicorn card.
When Pat Catan's, in the Toledo, Ohio area, was 
closing they had a great deal on some foam stamp sets.
Of course I picked up every kind they had and one set
was mythical creatures.
I stamped this unicorn with silver and gold 
I used make up brushes as blending brushes to 
apply Distress Ink for the background
I scattered some sequins around to finish it off.
Inside I stamped a simple 
At the top of the inside I added a joke,
"What do unicorns call their Dad?"
I wrote the answer and covered it with 
I stuck a penny next to the scratch off area,
so she could scratch it off right away.
Answer?....... Popcorn.  lol

So glad you stopped by today and hope
you'll come again soon.
Until then:
try something a little different.


Note the links are only to give a reference so you can
see what the products are.
I didn't necessarily purchase from these sites,
except where specified,
and you may find better prices elsewhere,
I am in no way promoting any particular site.


Monday, February 3, 2020

Party Poopers Birthday Card adn a Fishy Envelope

Hi Everyone!
Today I have a card to show you.
Recently a mom in a group I'm in on Facebook
posted that he twins are turning 6 yrs old and that they
love opening mail.  She asked if anyone would be
willing to send them cards for their birthday, just so they
would have them to open from the mail.
Being a card maker, I was happy to help out.
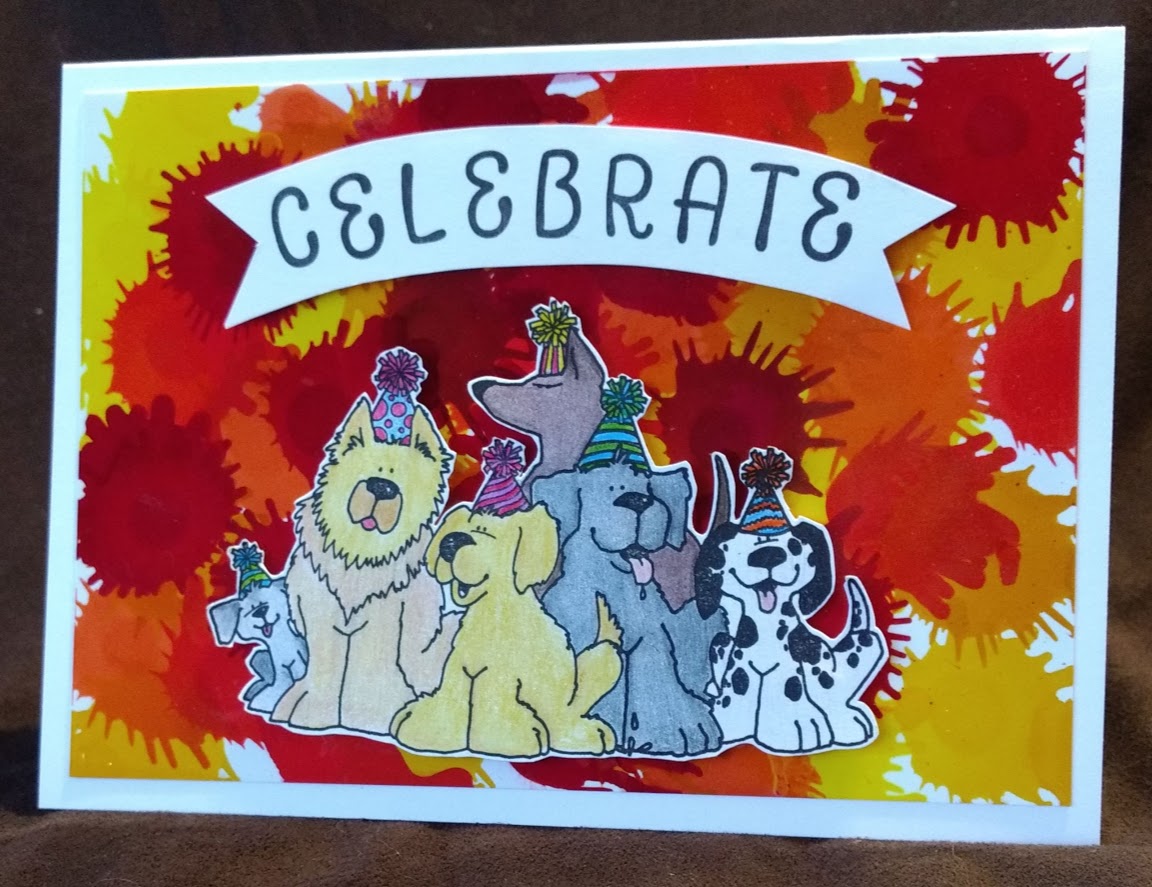
This is the card I made for her little guy.
The background piece was made with alcohol inks 
I thought it was a great background for a celebration.
The dogs are Party Poopers
I stamped the image with 
and colored them with colored pencils.
I fussy cut the image and adhered it to the background
with foam tape to give it a little dimension.
I stamped the Celebrate with an alpha stamp set
from my stash, I have no idea what company they are from.
I then fussy cut around it to make a banner shape.
The whole thing was then adhered to a white card base.
Inside I simply stamped "Happy Birthday"
I made the envelope with my
and decided to decorate it.
I stamped the fish onto the envelope, then stamped them 
onto scrap paper and fussy cut them to make a mask.
I put the mask over the fish (Sm Fat Fish & Lg Fat Fish)
and used Distress Inks to 
apply the 'water' to the envelope.
After taking the masks off the fish I colored them with 
colored pencils.
I covered the colored areas with 
which is a glaze that makes it water resistant, 
so the inks and coloring won't be ruined if they get wet.
I think the little guy will get a kick out of receiving 
this in the mail.

Thanks for spending time with me today,
I hope you have enjoyed it here at
Kristie Kreates 
and will come again soon.
Next up, the card I made for the other twin.


Note the links are only to give a reference so you can
see what the products are.
I didn't necessarily purchase from these sites,
except where specified,
and you may find better prices elsewhere,
I am in no way promoting any particular site.

Sunday, April 28, 2019

Challenge Swap

Hello crafting friends!
I have a group of friends that have a facebook group,
all of us are crafters that have mostly met online.
We decided to do a challenge swap and I'm loving it.
Our first theme was cats and/or dogs.
I made this bookmark for my friend Lisa.
I used backgrounds from my stash of handmades 
for the yellow base piece as well as the mat around 
the image of the cat.
The cat was stamped onto white card stock and colored
with colored pencils.
The glass lenses were first covered with 
Wink of Stella and then with 
No photo description available.
This is the little card I included with the bookmark when
I sent it.
This was stamped with Black Onyx VersaFine ink
and colored with colored pencils and Distress Inks.
Our next challenge theme is "Friendship"
I will post a picture of what I made for that swap,
after the recipient receives it.

Thanks for stopping by and spending time with me today.
I hope you've been inspired in some way.
Have you ever participated in a crafting challenge
and/or swap?
Until next time, challenge yourself in some way.


Saturday, March 30, 2019

Tags - Flowers

Welcome to Kristie Kreates!
Here are a couple more tags that I made
for my tag swap.
These were very simple to make.
I stamped a 2 layer image of the flowers
 onto white card stock,
with Distress Inks and fussy cut them.
As you can see, one of them I stamped polka dots,
I used a background stamp for this.
One of the flowers is adhered directly to the tag,
the other is adhered with foam tape to give a little
dimension to the tag.
Last I stamped the sentiment.
2 quick and easy tags, ready for use.

Thanks for stopping in today,
I hope you have been inspired in some way.
See you again soon!


Note the links are only to give a reference so you can
see what the products are.
I didn't necessarily purchase from these sites,
except where specified,
and you may find better prices elsewhere,
I am in no way promoting any particular site.


Thursday, March 14, 2019

Tags - Plaid

 Hi!
Today is tag series day.
I really enjoyed making these tags.
I have a stamp set that I got used, I don't even remember
where or when.  It has different styles of stripes, so I decided
to try my hand at making some plaids and these are what
I came up with.

I used different combinations of the stripes and
colors to create different looks
and I love how they turned out.
I wanted to make some tags that were a little more
masculine and I think these fit the bill.
I used Distress Inks and my
MISTI Stamping tool as each of
those stripes is stamped separately.
They didn't really take long with the
help of the MISTI.
These were all stamped on manila tags
 and I use a bit of jute twine for the tie.

Thanks for stopping by today to
see what I'm up to,
I hope you'll stop by again soon.
Until then stretch yourself and
think outside the box.


Note the links are only to give a reference so you can
see what the products are.
I didn't necessarily purchase from these sites,
except where specified,
and you may find better prices elsewhere,
I am in no way promoting any particular site.

Wednesday, March 6, 2019

Tags, Leaves

Hello, I hope you're having a lovely day.
Today is tag day and I have 2 similar,
but different tags to show you.

I used a polka dot background stamp
and Distress ink on white card stock,
then cut them to size.
The leaves were then stamped with
the same ink, but double stamped to
give a darker image.
Last the sentiment was stamped
with VersaFine Onyx Black ink,
which gives a nice crisp image.

This tag was done with the same technique,
I stamped the leaves, then used the same ink to
stamp the veins of the leaves.
I used a little dot cluster stamp to create the bunch of
berries in the center, I think this gives the tag
a nice little pop.

I'm glad you stopped in to spend a little time
with me today, I hope you are too.
I hope you'll come again soon.
Until next time,
happy crafting!


Note the links are only to give a reference so you can
see what the products are.
I didn't necessarily purchase from these sites,
except where specified,
and you may find better prices elsewhere,
I am in no way promoting any particular site.

Tuesday, February 12, 2019

Tags - Alcohol Ink and Foil

Good day crafty people!
I have a group of friends that are
crafty people.  We are in different areas
of the US and most of us know each other online.
I am close friends with some of them in real life
and I hope to meet the rest of them in person
one day. But for now we are close online friends.
Some of our group decided to have a
Tag Swap.
We have done this at Christmas before,
but this time decide to do other tags.
We needed to make 5 tags for each person
in the swap.  There were only 5 of us participating,
so I needed to make 20 tags for the other ladies.
I will be posting about these tags over the
 next couple weeks.  These are
the first tags in this series.

I knew I wanted to use some of my
alcohol ink pieces for the tags, so I looked
through my stash and found some of the ones
I liked the best.
This one I used alcohol inks on silver metallic
card stock.  I put the ink onto a felt blending tool
and pounced it onto the card stock.
The alcohol inked piece flips up on each
of these tags, you'll see that below.
I made a "messy nest" of silver thread
and topped it with a silver thread bow to
finish it off.

This one was made by dripping alcohol inks
onto white glossy card stock and blowing through
a straw to spread the inks.  I also pounce with
ink and blending solution to create this beautiful
design.  I added a few buttons for interest.

I had an inked tag that matched beautifully
with the alcohol inked piece, so I used that
for the tag base. I inked this tag with
Distress Inks then flicked water onto the tag
and picked it up with a paper towel, creating the
lighter areas.
For all of the tags, I used small strips of
clear acetate packaging to make the hinges.

These next two tags were done on one larger
piece of glossy card stock and cut down. 
I used alcohol inks
and when they were not quite dry, and still a little
tacky, I applied gold Deco Foil to them, then pulled it off.
Where ever the ink wasn't dried the gold foil stuck,
that's where you see it on the tags.
I love this technique, you never know
what you'll end up with, it's always different.
To finish one off, I wound gold thread around
the tag and tied a bow on the front.

This one I simply tied a bow with gold thread
and glued it to the front of the tag on top
of a messy nest of thread.

This is what the insides of the tags
look like.

I think my crafty friends will like
the tags I made, each of them will get one of these.
Next post I'll show you some other tags I made for the swap.

Thanks for stopping by today,
until next time, have fun
crafting something.


Note the links are only to give a reference so you can
see what the products are.
I didn't necessarily purchase from these sites,
except where specified,
and you may find better prices elsewhere,
I am in no way promoting any particular site.

Thursday, November 8, 2018

Practice Hair

Practice hair,
Have you heard of it?
Today's layout is about going for "practice hair"
Most of the girls had never had the hair stylist that
Sara uses to have their hair done.
So one day we all went to have April do their hair,
and see if they liked what she did.
Here are the 4 girls from the wedding party,
with their hair done.
For each girl I wanted to do something a little different
for their pictures and layout.
To see the pictures better, click on them and they
will enlarge for you.
Bride
Sara had a practice session too, since she doesn't 
wear her hair up, ever!
Her background piece is made using alcohol inks
on silver card stock.
The embellishment along the sides, I designed
and cut with my Silhouette.
Her sister, Maid of Honor
This background was made with alcohol inks on
deli paper. the border and the heart embellishment,
were cut on my Silhouette.
And that layout isn't as crooked as it looks,
sorry about the bad picture.
My daughter
Best Lady
For this background I used some embossed paper.
I used an ink blending too to add Distress Ink 
to the raised areas.  I cut out some of the flowers
from the inked paper as embellishments.
Bridesmaid
This background is 2 different papers that I cut into
strips and then wove together.
For the embellishments I cut the vines, leaves and flowers
with my Silhouette to mimic the flowers in her hair.
Bridesmaid
And finally, one of my favorite techniques.
I stamped and heat embossed with clear embossing powder,
then used Distress Ink to ink over the embossing.
Buffing with a clean cloth helps remove any ink on
the embossed areas, so they show up nice and white.
I cut pieces from the same pattern to 
use for embellishments.
I'm very happy with how these layouts turned out.
I had a lot of fun doing the different techniques for 
each layout.
I hope you've enjoyed these layouts and are inspired in
some way to try something new and different.
Thanks for coming by and spending time here.
Come again soon!
Until next time,
Think Outside the Box!


Note the links are only to give a reference so you can
see what the products are.
I didn't necessarily purchase from these sites,
except where specified,
and you may find better prices elsewhere,
I am in no way promoting any particular site.


Monday, November 20, 2017

Thanksgiving 3

Hello blog friends.
Are you almost ready for Thanksgiving?
At least my cards are, but I'm not sure about everything else.
Today I have post #3 in my Thanksgiving card series.
This cute guy is 
Eureka Stamps, sold though Stamp On It.
I stamped this image with 
and colored it with my 
This image is Large Cornucopia from Biblical Impressions
sold through Stamp On It
Stamped with Fluid Chalk Ink and colored with
colored pencils.
Inside this card I used
Leaf Stamp from QKR Stampede,
sold through Stamp On It.  I used the rubber stamp, but
apparently they only sell digital of this now.
I did second generations stamping of these leaves.
I inked up the stamp, stamped onto scrap paper
then stamped onto the card. This gives a much more
subtle impression.
For this card I used
from Eureka Stamps,
sold through Stamp On It.
I colored the image with 
Fantasia Colored Pencils
and the sky and ground with 
The Happy Thanksgiving is a sticker that I 
found in my stash.


Note the links are only to give a reference so you can
see what the products are.
I didn't necessarily purchase from these sites,
except where specified,
and you may find better prices elsewhere,
I am in no way promoting any particular site.


Saturday, November 18, 2017

Cards for Card Drive 5

Hi!
Here are a few more Christmas cards that I made for the
These 2 were both stamped with VersaMark ink
and embossed with silver embossing powder.
The card on the right was done on black card stock,
the one on the left was done on white card stock that
I used Distress Inks to color.
I like the one with the Distress Inks better,
I think it's a little more natural looking with the
different shades and colors I used, rather than 
a totally black sky. I also liked that the bottom of the
scene looks like snow.
For this card, I has some scraps of paper
that had the trees on it, I fussy cut them and 
adhered them in different layers to give dimensions
to the card.

Thanks for coming to check in and see what I've been up to.
Come again soon, you never know what you'll find on 
Kristie Kreates.


Note the links are only to give a reference so you can
see what the products are.
I didn't necessarily purchase from these sites,
except where specified,
and you may find better prices elsewhere,
I am in no way promoting any particular site.


Friday, November 17, 2017

Thanksgiving 1

Thanksgiving will be here soon, so I got busy and 
made some Thanksgiving cards to send out.
Here are the first 2 that I'm going to show you.
For both of them I used 
Large Skeleton Leaf from Biblical Impressions,
sold through Stamp On It
I stamped them with 
to color them.
The "Happy Thanksgiving"
is a stamp I borrowed from a friend.
I left the inside blank to write a personal note
to those I send them to.
So glad you stopped by today.
I hope you're having a wonderful day.
What are you thankful for?


Note the links are only to give a reference so you can
see what the products are.
I didn't necessarily purchase from these sites,
except where specified,
and you may find better prices elsewhere,
I am in no way promoting any particular site.