My Other Pages

To make it easier to read about our trip to Ireland, I have made a page that is just for that. There is a tab above for Ireland Trip 2014 or click on the Home tab to read my other posts. I have also created a new page for My Weight Loss Journey if you are interested in that, click on the tab above.
Showing posts with label metallic card stock. Show all posts

Tuesday, February 14, 2023

Valentine Cards 2023

Happy Valentine's Day!
Today I'm showing you the cards I made for my grandchildren
for Valentine's Day this year.
This one was made for Marie.  She loves pretty things and her
favorite color is pink, so I thought it was perfect for her.
The wreath was cut with a
from silver metallic card stock.
For the heart I used vellum that I had colored with 
areas where the ink was still damp.
The vellum was adhered to card stock to give it 
more stability and punched with a 
The I Love You was heat embossed with
 silver embossing powder with a stamp from my stash.
The card still needed something more, so I cut thin
 strips of the metallic silver card stock and adhered them
to the sides of the card and that finished it off perfectly.
Inside I stamped and embossed a simple greeting and a 
couple XOs.
For Asher, I made this cute kitty card.
The stamps were from an old set that is in my stash,
but I'm not sure what company. 
I stamped, colored and fussy cut the cat.
The heart was punched from plain white card stock, stamped
with the sentiment and XOs and I added dash lines to finish
off the heart and the card front both.
I think this is Purr-fect for Asher.
As with Marie's card, I stamped a simple greeting inside.

Thanks for stopping by today. 
I hope you are having a lovely Valentines Day with those
 you love.
Come again soon,
until then,
Love On!


Note the links are only to give a reference so you can
see what the products are.
I didn't necessarily purchase from these sites,
except where specified,
and you may find better prices elsewhere,
I am in no way promoting any particular site.


Sunday, December 18, 2022

Congrats Card with Mulberry Paper

Hello!
Today I have a very simple, but beautiful card to show you.
I love the look of torn mulberry paper.
To tear mulberry paper, use your wet finger or a
wet paint brush and run it along where you want to
tear it.  Once it's wet just pull it apart,
this will give it the feathery edges like on this card.
The 'congrats' was heat embossed with white 
embossing powder onto gold metallic card stock.
I simply layered the mulberry paper onto some metallic
gold card stock, added the greeting and adhered it to
a card base and the card was done.
So quick and easy and any greeting could be used
on this type of card.
You can make it masculine or feminine, whatever
you are in need of.

Thanks for stopping by today and checking what I've
been up to lately.
I hope you will come again soon.
Until then,
experiment with different kinds of paper.


Monday, January 3, 2022

Engagement Party Shirts and Decorations

Hello everyone, I hope 2022 is starting of great for you..
Ours is.  Kelsie's bridal party held a
"Ring In The New Year" engagement party
for a few people on New Year's Eve.
I have a few things to show you that I created
for the event.
The party was very casual, pajamas, leggings, tee shirts,
what ever we wanted to wear.
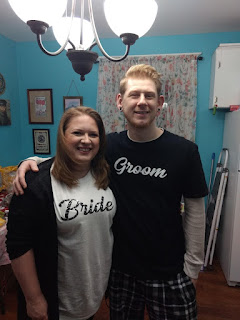
I made these shirts for Kelsie and Brad.
I cut them with my Silhouette Cameo from some
HTV that I got for my birthday.

Here are a couple close up pictures, so you can see
the stars. (click on the pictures to make them larger)
This HTV was very easy to work with
and has some nice shine on the stars.
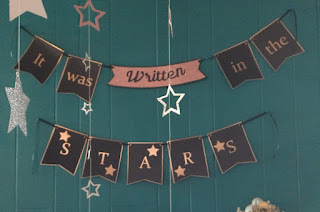
The theme for their wedding etc. is
"It was written in the stars"
so this was perfect for their shirts.
Sara and I made the decorations together.
I created a multi-sized file to cut the stars in my 
I cut the stars from a couple different colors of 
Once they were all cut, we strung them together
using a fine thread and hung them from the ceiling.
I also made the banner, cutting it out of black card stock
and backing it with metallic card stock.
We strung that with black ribbon.

I love how the banner turned out.
Since the theme was 
It was written in the stars
we thought it would be cute to have
their names hanging in the stars.
I used holographic vinyl and shadowed them with 
black card stock.
Here's a picture of the happy couple with
their shirts on that I made for them.
We were all very happy with how the
shirts and decorations turned out.
And the party was a big success.

Thanks for visiting today,
I hope you were inspired in some way.
Come again soon,
until then,
create!


Note the links are only to give a reference so you can
see what the products are.
I didn't necessarily purchase from these sites,
except where specified,
and you may find better prices elsewhere,
I am in no way promoting any particular site.


Monday, December 6, 2021

Art Swap Christmas Card

Greetings!
I belong to an Art Swap Group, it's a group 
of ladies who met years ago on a stamping 
message board.  We now have our group on Facebook.
Each year we do a swap at Christmas time.  This year
we are doing a card swap with one other person in
the group.
Some of us are from the US, some from Canada
and some from Australia.
I always look forward to seeing what everyone does
for their swap.
I decided to do a card with an inlaid technique.
I had this star design in my library of my
Silhouette Design Studio Software
and love it.
I cut it out of metallic textured card stock
and gold glitter card stock.
The holly leaves, berries and ribbon are cut from
plain colored card stock.
I adhered double sided tape to the back of the star
and then went about placing the pieces into the star
cut out.
I was really loving this card, but it needed a little something.
I think the white dash lines around the card 
give it a finishing touch.
I hope the gal that I'm sending this to likes it
as much as I do.
Have you made any different Christmas cards this year?
The one I make for this swap is always different
than the others I make.

I'm glad you came to spend a little time with me today,
I hope you enjoyed your time here and will come again
soon.
Until then,
have a happy holiday season!


Friday, August 21, 2020

Painting With Leaves

Hello blog friends!
Welcome back, I'm glad you've stopped in today.
Today I'm showing you a card I made with some scraps
from a background that I made.
I gathered some leaves and used them like stamps with 
paints.  I simply painted the leaves, then pressed them onto some
white card stock, then lifted the leaves.
The background turned out beautifully, I used it for a larger
project that I will show in a future post.
I'm so glad I kept the scrap pieces, as they really made a 
beautiful card.
I used metallic gold card stock to accent the gold in the
leaf prints and I love the effect.
The metallic look of the gold paint and card stock
doesn't show up in the pictures, but in real life it's beautiful.

I hope you have been inspired in some way today,
maybe to use something different or out of the ordinary 
as a stamp, or maybe just to use your scraps.
Come again soon,
until then: 
Try something new and different!


Wednesday, November 6, 2019

100 yr old Vet Card

Hello fellow crafters!
Today I'm showing you a card that I made
for a gentleman who was turning 100 in
early October.  I saw the story on facebook and
since I'm a big sucker for these kind of things,
I decided that I'd send him a card.
I'm sure he received well over 100 cards
and I was glad mine was one of them.
I'm sorry this picture isn't better,
it's very difficult to get a good picture
I heat embossed the star pattern with 
metallic card stock, this creates a pretty cool
look, which doesn't really show in the picture.
I used purple embossing powder for the 
sentiment.
Inside I embossed a simple 
happy birthday greeting.
I made an envelope and decorated that too.
I hope he enjoyed my card and that it added
some smiles to his special day.
Have you ever sent a card to someone
you don't know?

Thanks for stopping in today and spending
time here.
I hope you have been inspired in some way.
Until next time,
spread some handmade kindness!


Note the links are only to give a reference so you can
see what the products are.
I didn't necessarily purchase from these sites,
except where specified,
and you may find better prices elsewhere,
I am in no way promoting any particular site.


Tuesday, February 12, 2019

Tags - Alcohol Ink and Foil

Good day crafty people!
I have a group of friends that are
crafty people.  We are in different areas
of the US and most of us know each other online.
I am close friends with some of them in real life
and I hope to meet the rest of them in person
one day. But for now we are close online friends.
Some of our group decided to have a
Tag Swap.
We have done this at Christmas before,
but this time decide to do other tags.
We needed to make 5 tags for each person
in the swap.  There were only 5 of us participating,
so I needed to make 20 tags for the other ladies.
I will be posting about these tags over the
 next couple weeks.  These are
the first tags in this series.

I knew I wanted to use some of my
alcohol ink pieces for the tags, so I looked
through my stash and found some of the ones
I liked the best.
This one I used alcohol inks on silver metallic
card stock.  I put the ink onto a felt blending tool
and pounced it onto the card stock.
The alcohol inked piece flips up on each
of these tags, you'll see that below.
I made a "messy nest" of silver thread
and topped it with a silver thread bow to
finish it off.

This one was made by dripping alcohol inks
onto white glossy card stock and blowing through
a straw to spread the inks.  I also pounce with
ink and blending solution to create this beautiful
design.  I added a few buttons for interest.

I had an inked tag that matched beautifully
with the alcohol inked piece, so I used that
for the tag base. I inked this tag with
Distress Inks then flicked water onto the tag
and picked it up with a paper towel, creating the
lighter areas.
For all of the tags, I used small strips of
clear acetate packaging to make the hinges.

These next two tags were done on one larger
piece of glossy card stock and cut down. 
I used alcohol inks
and when they were not quite dry, and still a little
tacky, I applied gold Deco Foil to them, then pulled it off.
Where ever the ink wasn't dried the gold foil stuck,
that's where you see it on the tags.
I love this technique, you never know
what you'll end up with, it's always different.
To finish one off, I wound gold thread around
the tag and tied a bow on the front.

This one I simply tied a bow with gold thread
and glued it to the front of the tag on top
of a messy nest of thread.

This is what the insides of the tags
look like.

I think my crafty friends will like
the tags I made, each of them will get one of these.
Next post I'll show you some other tags I made for the swap.

Thanks for stopping by today,
until next time, have fun
crafting something.


Note the links are only to give a reference so you can
see what the products are.
I didn't necessarily purchase from these sites,
except where specified,
and you may find better prices elsewhere,
I am in no way promoting any particular site.
Tuesday, February 14, 2017

Valentine's Cards

Hello!
Happy Valentine's Day!
I don't always send/give Valentine's Day cards,
but this year I am.
I saw this idea on Kristina Werner's blog and
was inspired to try it.
I cut pieces of watercolor paper into squares.
I then taped them down to a board.
This helps prevent warping of the paper when
it is wet.
I cut thin strips of tape to make the "cross bars"
You can use masking tape, painter's tape or Washi tape.
Just be sure that it isn't too sticky and you'll be able to 
remove it easily without tearing the paper.
I then used Distress Inks to paint them.
I smooched some ink, in the colors I wanted to use,
onto an acrylic block and mixed with some water.
Once they were completely dry I removed the tape
and cut the pieces down to the size I wanted.
This watercolor piece I embossed 
Swirl Heart from Biblical Impressions
with silver embossing powder and matted
it with a silver metallic paper that I found
I printed all the sentiments for the insides of these
cards from my computer.
I matted the sentiments to mimic the outside of the
cards.
I love these mini crazy birds from
Tim Holtz.  I colored them all with 
colored pencils and cut them with the matching dies.
The heart was hand cut and I wrote 'Love You' 
on it with black pen.
I cut a slit in the birds beak to hold the heart.
This one was heat embossed with 
and mounted onto 
shiny metallic silver card stock
that I got at Hollo's
I used "I Love You" from Eureka Stamps
for these next 2 cards.

This card I watercolored the entire piece with one 
color and embossed "You're Huggable" onto the 
panel and added that adorable bird.
I simply stamped this heart, fussy cut it
and put it through a slit in the bird's beak.
I heat embossed this "Scribble Heart" from
Biblical Impressions onto a watercolored panel,
then layered it onto Matte Silver Metallic Card Stock
from Hollo's

This final card I used a piece of card stock for 
the front panel, added the crazy birds and heart,
it needed a little something more and the gold ribbon
worked perfectly to pull it all together.
I love how these Valentine's cards turned out
and I hope the recipients like them as much as I do.

Thanks for stopping by today,
if you come again soon, you will see
what I made for Valentine's treats to go with
some of these cards.
Until next time,
make something fun!


Note the links are only to give a reference so you can
see what the products are.
I didn't necessarily purchase from these sites,
except where specified,
and you may find better prices elsewhere,
I am in no way promoting any particular site.