My Other Pages

To make it easier to read about our trip to Ireland, I have made a page that is just for that. There is a tab above for Ireland Trip 2014 or click on the Home tab to read my other posts. I have also created a new page for My Weight Loss Journey if you are interested in that, click on the tab above.

Saturday, January 29, 2022

You Make Me Giggle

Hello crafters!
Today I'm sharing a layout with you that I created a little
while ago.  
This layout makes me happy.
One page is my son with my granddaughter and one page is  
my daughter in law with her.
They are so good with her and can always seem to make
her smile and laugh.  
She is the sweetest little girl ever
and she is the light of our lives.
Thanks for stopping by today,
I hope this layout made you smile.
Come again soon,
you never know what you'll find on 
Kristie Kreates.


Tuesday, January 25, 2022

Unicorn

Hi All!
For my birthday in November, my son, daughter in law
and granddaughter gave me this book.
Do you think it was a hint?  LOL
Crochet Cute Critters is a fabulous book!
There is an animal with crochet directions for every letter
 of the alphabet.  Apparently my little Marie was quite
taken with the unicorn right off the bat.
So I decided to make it for her for Christmas.
I generally don't make things with a lot of pieces
that have to be sewn together, but for Marie
I'll do it, and I found that I really enjoyed making it.
This is the unicorn in the book. I used some 
creative license and used the colors of
yarn that I had in my stash.
Here is the unicorn I made for her.
She isn't perfect, but I learned a LOT
from making this one.
I learned that you really do need a 
worsted weight yarn.  I used a lighter
yarn and it worked okay, but there was space
between the stitches where you could see the stuffing.
I learned that I should have sewn the legs on
before I put the head on, would have been a
lot easier that way.
I made the number of curls that they recommended,
but her 'hair' is much thicker than what I see in
the pictures.  But that's okay, I like it!
And somehow her horn isn't as pointy as it is
in the pictures in the book, I couldn't figure that
one out, but if I make another one, I will.
Now that I've told you all the things wrong with it
let me say that she really is cute and I love how she 
turned out and so did everyone when I gave it
to Marie.
If I make another one with the lighter weight yarn,
I will definitely use a smaller crochet hook to keep
the gaps between stitches from happening.

Thanks for stopping by today,
I hope you like my little unicorn and will come
again soon, I did make another animal from
the collection in the book and I'll be posting 
it one day soon.
Until then,
love what you do and 
do what you love.


Note the links are only to give a reference so you can
see what the products are.
I didn't necessarily purchase from these sites,
except where specified,
and you may find better prices elsewhere,
I am in no way promoting any particular site.


Friday, January 21, 2022

Handfasting Frame

Hi crafty people!
If you've been following me for a while, you
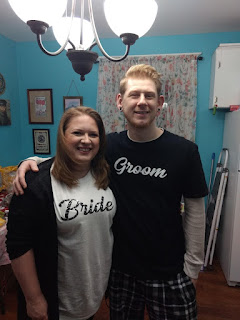
probably know that my son got married 3 yrs ago in
September.  Since then Sara's bouquet has been at our
house.  I dried it with Silica, but we never did anything
more with it.  I decided to do something for
 them for Christmas.
I had the idea in my head and happened across 
a frame that was perfect when I was shopping at 
Scrap Creative Reuse in Ann Arbor, Michigan
The frame was pretty much like this one.
Just needed to get it cleaned up and transformed.
First I had to take it apart and remove the tassle
and the piece holding it.
I then printed a picture from the wedding
that showed the handfasting.
I printed the picture with my ink jet printer and
printed it lighter than normal to use for the background.
I checked to see about placement with part of the
frame to be sure I like the sizing.
I used 3 in 1 glue and glued the picture
to the back of the frame.  I trimmed the excess with
a craft knife.
Now my background is ready.
The flowers were very dry and brittle, so
I needed to be very careful with them.
I took all the ribbons from the handfasting
and tied them in an eternity knot.
This was tough with so many pieces of ribbon, but
I think I got it done pretty nicely.
I positioned it and adhered it to the background
with the 3 in 1 glue.
Once the glue was dried, I trimmed off the ends of
the ribbons and added some of the flowers from her 
bouquet.  Unfortunately, the roses were too big for the
frame, it was just not deep enough to be able to 
use them.
Once everything was trimmed I put the glass and the frame
on the piece and it was ready to go.
I love how it turned out and when Sara opened it
she was thrilled with it and totally surprised.
Jaryd was just as happy as she was and they found a place to
put it right away.
I'm so glad I did this for them,
it's taken a while to figure out what to do, but 
what I decided on turned out to be perfect.
Now I'd like to find a deeper shadow box frame that I can
do something with the other flowers.

Thanks for stopping by today,
I hope you have enjoyed seeing this project and
will come again soon. 
Until then,
create something new and different.


Note the links are only to give a reference so you can
see what the products are.
I didn't necessarily purchase from these sites,
except where specified,
and you may find better prices elsewhere,
I am in no way promoting any particular site.

Monday, January 17, 2022

The Ring

Hello fans!
Today I have a story to tell you that is near and dear
to my heart.
This is my Mom. She was one of the sweetest
people I have ever known.  She passes away 3 1/2 yrs
ago at the age of 93.
Since I am the only daughter, I inherited her 
jewelry.
This is her wedding set.
I've had it for a long time, she hadn't been able
to wear it for several years before she passed.
We knew that my daughter would be getting engaged,
but we didn't know when.  We absolutely love Brad
and decided that I would give him Mom's rings to use 
how he wanted for Kelsie's ring.
He took them to a wonderful jeweler that we know,
along with Jaryd and Sara, my son and daughter in law,
to decide on a design.
They got engaged on November 7th, which 
happens to be my birthday.
They used the band and diamonds on the side
of the ring and he chose a new diamond for the center.
Mom's band was yellow gold and Kelsie likes
white gold, it also needed a little gold to be added
to "stabilize" it, as it was quite worn, since it was 
given to Mom in the mid 1940s.
The band was covered with white gold.
The original diamond and the wedding band were given
back to me.
This ring turned out so beautiful and Kelsie
will always have her G-Ma with her.
We are so happy for them.

The happy couple!
Her friend and maid of honor gave her 
this ornament just after they got engaged.
And also took these engagement pictures.


What about the rest of the rings?
Well, here's what I did with them.
I took what was left back to the jeweler
and had a necklace made for her to wear 
at her wedding.
She wants rose gold for her wedding jewelry,
so that's what I had him use for this necklace.
The larger diamond is Mom's engagement diamond
and the smaller ones are from her wedding band.
I was thrilled with how it turned out and 
so was Kelsie.
I gave it to her for Christmas with a tag that
it was from G-Ma.
She loved it and does plan on wearing it for her wedding.
I know this isn't something I made myself,
but I wanted to share this story and 
what we created together to make something
very special for my daughter.
I'm sure you'll be in for some posts about her wedding, 
as we do have some project planned for us to work
on together with her mom in law and wedding party.
Thanks for stopping in today,
come again soon,
until then,
think about how you can 
recreate something special.


Thursday, January 13, 2022

Zoo Time Layouts

 Hello blog fans!
Today I'm going to bring a little bit of summer
into your day.
Here are a couple layouts of visits to the Buffalo Zoo
with our granddaughter.
Jaryd and Sara gave us Grandparent memberships for
Christmas last year and we love having time with 
Marie seeing the animals.

These pictures are from a couple visits.
One when Dave and our friend Zoe took Marie
and one when Dave and  Sara took her.

This layout is from when Jaryd, Sara and Marie
went to the zoo with friends
Garth, Hilary and Aiden.
I am very happy with both the layouts.
There are always fun pictures from the zoo.

Thanks for stopping in today,
I hope you will come again soon.
Until then,
remember summer isn't really that far away.


Sunday, January 9, 2022

Shot Glasses

Hi everyone!
I hope you're having a wonderful day.
Today I want to show you some etched shot
glasses that I gave my future son in law for Christmas.
He has a shot glass collection and loves the
Marvel characters.
I started by asking my local Buy Nothing Group if anyone
had clear shot glasses they no longer wanted.
(I've linked to the Buy Nothing Project site so you can
learn more about this and see if there is a group in
your area)
I got response from a couple people.  I only needed one
at the time, but it turned into a bigger project.
These weren't all what I was expecting, but I think they
will work out for a later project.
I did use the green one for this gift.
I also received these 6 glasses from another member.
They were perfect for what I was planning.
Using my Silhouette Cameo I cut stencils with 
vinyl, then applied the stencils to the glasses.
This one is the Captain America logo.
On the other side of the glass,
I etched the character's name.
Once the vinyl stencil was applied
It's simple to use, just follow the instructions
on the jar.
Here is the Avengers Logo.
And their name.  Sorry these pictures aren't
great, it's very difficult getting photographs of
etching on glass and the size of the names 
makes it difficult, but you get the idea.
Hulk is Brad's favorite character and the
green shot glass was perfect for that character.
These 2 pictures show the HULK 
that is etched on the back of the glass.
Brad was thrilled with this little gift,
even more so because I made them for him.

I'm glad you stopped by today, I hope you are too. 
 Come again soon,
until then,
give something new a try and
check on a Buy Nothing Group
in your area.  I highly recommend 
being involved in one of these groups.


Note the links are only to give a reference so you can
see what the products are.
I didn't necessarily purchase from these sites,
except where specified,
and you may find better prices elsewhere,
I am in no way promoting any particular site.


D&D Bag

Good day!
My son, Jaryd, is into Dungeons and Dragons
and plays with his group of friends on a regular
basis. For Christmas my daughter, Kelsie, got him
some D&D items.  She wanted to have a storage bag 
to put all the items into for him to keep them together.
I, being the saver that I am, have many canvas bags of the
type she wanted.  I had several sizes, luckily, the blue one 
was just the right size and what she needed.
I hope no one is offended by the language on this bag,
but this was the order that I received from her.
software and cut it from silver heat transfer vinyl 
I used a Harry Potter font, as this has a D&D kind of feel to it.
I applied the vinyl to the bag with my heat press
and it was done.
Kelsie and Jaryd were both thrilled with how it turned
out.  I'm sure he'll be using it for years to come.

Thanks for stopping by today,
I hope you have learned something and/or somehow
been inspired.
Come again soon,
until then,
play a fun game.


Note the links are only to give a reference so you can
see what the products are.
I didn't necessarily purchase from these sites,
except where specified,
and you may find better prices elsewhere,
I am in no way promoting any particular site.


Wednesday, January 5, 2022

Picture Folder

Hello blog fans!
I'm glad you're here today.
Today I'm showing you a little gift I made for my
98 yr old Aunt Marilyn.
Here's a picture of my sweet Aunt Marilyn.
Looks great and wouldn't guess she's 98 yrs. old.
She lives in a nursing home in North Carolina
and I haven't been able to see her for over 2 yrs.
She loves having pictures of our family, so 
I made this little folder to send her some 
family pictures in.
I started with 2 envelopes.
These are 5 3/4 x 8 3/4 so I would be able to send
5x7 pictures.  You can make this with any
sized envelope you have.
I then slid one flap inside the other envelope and 
sealed the one on the back outside.
Don't seal the one going inside the envelope,
you can, however glue that flap in place if  you want to.
Once they are together, all you need to do is 
decorate your folder.
I decided to cut away part of the inside to make it easier 
for Aunt Marilyn to pull the pictures out.
The piece inside is simply a sheet of light weight
card stock, slipped in.  No gluing needed for that piece.
I think it turned out great and it makes a nice 
safe place to keep photos and/or letters.
Here's one of the pictures of the family that I sent 
to her.  This was taken on St. Patrick's day 2021.

Thanks for stopping in today and spending a little time
with me.  I hope you'll give this little project a try, it makes
a nice little holder for any pictures you want to give someone.
And it's quick and easy to make.
Come again soon,
until then,
share some memories with someone
you haven't seen for a while.

Monday, January 3, 2022

Engagement Party Shirts and Decorations

Hello everyone, I hope 2022 is starting of great for you..
Ours is.  Kelsie's bridal party held a
"Ring In The New Year" engagement party
for a few people on New Year's Eve.
I have a few things to show you that I created
for the event.
The party was very casual, pajamas, leggings, tee shirts,
what ever we wanted to wear.
I made these shirts for Kelsie and Brad.
I cut them with my Silhouette Cameo from some
HTV that I got for my birthday.

Here are a couple close up pictures, so you can see
the stars. (click on the pictures to make them larger)
This HTV was very easy to work with
and has some nice shine on the stars.
The theme for their wedding etc. is
"It was written in the stars"
so this was perfect for their shirts.
Sara and I made the decorations together.
I created a multi-sized file to cut the stars in my 
I cut the stars from a couple different colors of 
Once they were all cut, we strung them together
using a fine thread and hung them from the ceiling.
I also made the banner, cutting it out of black card stock
and backing it with metallic card stock.
We strung that with black ribbon.

I love how the banner turned out.
Since the theme was 
It was written in the stars
we thought it would be cute to have
their names hanging in the stars.
I used holographic vinyl and shadowed them with 
black card stock.
Here's a picture of the happy couple with
their shirts on that I made for them.
We were all very happy with how the
shirts and decorations turned out.
And the party was a big success.

Thanks for visiting today,
I hope you were inspired in some way.
Come again soon,
until then,
create!


Note the links are only to give a reference so you can
see what the products are.
I didn't necessarily purchase from these sites,
except where specified,
and you may find better prices elsewhere,
I am in no way promoting any particular site.