My Other Pages

To make it easier to read about our trip to Ireland, I have made a page that is just for that. There is a tab above for Ireland Trip 2014 or click on the Home tab to read my other posts. I have also created a new page for My Weight Loss Journey if you are interested in that, click on the tab above.
Showing posts with label Simon Says Stamp. Show all posts

Sunday, July 5, 2020

Graduation Cards

Hello Blog friends!
Today I have a couple cards to show you.
My hubby wanted a graduation card to send
to the son of one of his artist friends, so he asked
me to make one.
Here is what I came up with.
I started with the Abstract Triangle stencil from 
Simon Says Stamp and used Distress Inks and applied them
with blending brushes, I use make up brushes and they work great.
(Weathered Wood, Stormy Sky, Blueprint Sketch)
I then cut the panel down to size and adhered it to
a white card base.
The sentiment is from my stash.
I followed the same procedure with this card, but used
a stencil from Heidi Swap, I can't find a name on it or
anywhere on her site.  Sorry.
For this one I used Stormy Sky and Blueprint Sketch
Distress Inks.
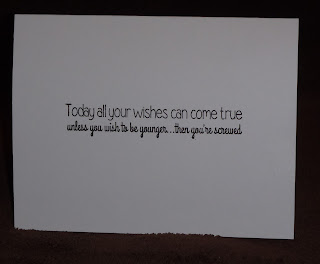
Inside I stamped this sentiment.
It's an old stamp from my stash and I have no
idea where I got it.  
I did a little stamp surgery on this one.
Originally it says something like
"If you love what you do"
above  "the whole world"
I just cut them apart and if I want
to use the whole thing I'll just piece it
back together again to stamp it.
I love this sentiment for a graduation card.

Thanks for stopping by today,
I hope you'll come again soon.
Until then:
Happy Stamping!


Note the links are only to give a reference so you can
see what the products are.
I didn't necessarily purchase from these sites,
except where specified,
and you may find better prices elsewhere,
I am in no way promoting any particular site.

Wednesday, May 31, 2017

Awesome Gears

Hi!
My last post was showing a card I made to share kindness.
Today I have a few more cards that I made for that purpose.
I wanted to make some cards that were a bit more masculine and I
decided to use the
"Cogs and Gears" stamp set from 
Inkadinkado
I arranged the stamps on my MISTI stamping tool
and stamped the images with VersaMark ink.
For the card on the left I only used the VersaMark,
which gives a watermarked image.
For the other 2 cards I stamped with the VersaMark
then brushed on some Perfect Pearls powder
which gives color and shine and only adheres where there
is the sticky VersaMark ink.
The banner was cut with the 
The sentiment is one from the 
also from Simon Says Stamp
This picture shows a little bit of the shimmery shine that the
Perfect Pearls gives.
I also used a little of the Perfect Pearls around the edge of the 
white card bases and the banners on 2 of the cards.

I love how these cards turned out,
I hope you like them too.
I hope you'll stop in again soon,
Father's Day isn't too far away and I have a series of
Father's Day cards to share with you.
Until then,
Create!


Note the links are only to give a reference so you can
see what the products are.
I didn't necessarily purchase from these sites,
except where specified,
and you may find better prices elsewhere,
I am in no way promoting any particular site.


Sunday, May 28, 2017

Birds

Hello crafting friends!
Today I have a card that was inspired by 
After seeing Jennifer's post I decided that I needed to make a few cards
that I could use for sharing kindness.
This is one of those cards.
These little birds are from a set I found at ACMoore
in a clearance bin for only $1.00!
Aren't they adorable?
They are from Inkadinkado.
Unfortunately I can't find them anywhere that I can link to.
Simon Says Stamp
The sentiment is from
also from Simon Says Stamp.
I colored the birds with my Lyra and Neo-Color II
Watercolor crayons
and fussy cut them.
The inside is blank so I can write or stamp a sentiment
when I decide who it is going to.

Thanks for stopping by today,
I hope you'll be inspired to share some kindness today.
Come again soon.  
Until then,
Happy Crafting!


Note the links are only to give a reference so you can
see what the products are.
I didn't necessarily purchase from these sites,
except where specified,
and you may find better prices elsewhere,
I am in no way promoting any particular site.


Friday, February 24, 2017

Bird Crazy

Hello everyone!
I have several birthday's in February, so I decided
to get moving one day and made the cards I needed
for the month.
I absolutely LOVE these mini crazy birds
from Tim Holtz.
I bought the set of 3 stamps and dies 
one day at Michael's
and I've never seen that set again
and haven't been able to find it online either.

This card is just an extra that I made while I was 
at it.  Love this sentiment.
This card I left blank inside so I can add a
sentiment when I need it.

I don't remember who I addressed each of these
cards too, but I think this one work well 
for anyone you want to give a smile too.

I thought this was a cute sentiment.

I'm sure this one is going to one of
my OLDER brothers.

This one is going to my other OLDER brother.
I think they'll get a kick out of them.

I made the backgrounds using a stripe from the
from Simon Says Stamp
I used these stamps sets from
 Cas-ual Fridays Stamps
for the sentiments:
and stamped them in

Thanks for stopping by today,
I hope you'll come again soon.
I have decided that this year 
I will get better about sending out cards
to family and friends.
So I will probably be posting a lot
of cards in the future, so be sure to pop 
in and see what I've been creating.
Until next time,
Happy Crafting!


Note the links are only to give a reference so you can
see what the products are.
I didn't necessarily purchase from these sites,
except where specified,
and you may find better prices elsewhere,
I am in no way promoting any particular site.


Saturday, August 20, 2016

Inklipse Blog Hop


Hello crafty people!
Welcome to my blog and to the 
Inklipse Blog Hop!
Simon, has set up a fun blog hop
to bring inspiration from crafters you may not
have known before.
There are some wonderful, generous sponsors
for this hop. Please consider visiting their
online stores and showing your love to them.
have generously provided prizes for this hop.
To be entered to win you will need to:
Subscribe to Simon's blog
Leave at least 3 comments throughout the blog hop
Now that all the particulars are out of the way,
on to my projects.
I have 2 projects to share with you.
The first is a gift card holder/birthday card.
Since I don't have the equipment for a video,
this post is very heavy on pictures.
But hopefully you'll find it worth your time.
Starting with a piece of red card stock  11" x 4 1/4"
score along the long side at 2", 7 1/4" and 7 3/8"
The insert piece is white card stock cut to 6 1/2" x 3 3/4"
score along the long side at 1 3/4" and 6"
Burnish all the score lines.
(If you click on the picture,you can see that there are
actually 2 folds very close together.)
punch a notch 1" from each side on the smaller flap.
Use Washi Tape along the bottom of the small flap,
close to the fold.
The tape should go all the way around the card.
This is not only decorative, but it holds the flap closed.
I used 2 pieces of Washi Tape on my card I think it
gives it a bit more security and also looks more finished.
Place strong adhesive along the small flap of the 
insert piece of card stock.
I used Score Tape, but use whatever works for you.
Line up the edge of the insert right along the 7 3/8" fold.
Use Glue Dots at the corners of the flap that makes
the pocket.  This will make a pocket for the gift card.
The insert can now be slid into the pocket,
the card front will stay closed when 
tucked behind the center flap of the pocket.
To decorate the front of my card,
I cut 4 Happy Birthday sentiments with my 
Silhouette Cameo out of white card stock.
I ran them through my Xyron sticker machine
and layered them on top of one another.
I then coated them with VersaMark ink ,
covered them with silver embossing powder
and heat set them.
The Happy Birthday was adhered directly to the front
of the card.  I also cut some stars and
embossed them, they were adhered with foam tape.
On the inside of the card, I stamped
"Celebrate" which is from a very old
Scrappy Cat  stamp set.
You can see, when you open the card,
the pocket with the gift card pulls out.
Here is a side shot showing how the 
gift card goes down into the pocket.
I think my son will like this card,
I made it for him, we'll be celebrating his
birthday on Sunday.

Now for my 2nd project.
Did you know that you could stamp and use
Distress Crayons on canvas.
This is my first time doing this and I know
I'll be doing more of this technique.
This canvas is very small, only 2 1/2" x 3 1/2"
First it needs to be prepped with Gesso.
The Distress Crayons blend out much better
when it has the base of Gesso.
I used a sponge paint brush,
but you can use whatever is available to apply
the Gesso, or whatever base you might like best.
Since this canvas is mounted on a wood frame,
I had to fill in the back with pieces of cardboard.
This gives a firm surface to stamp onto.
I used my Mini MISTI
to stamp one of the birds from 
onto the canvas with VersaFine Onyx Black Ink
It did take a couple stampings since it was onto canvas.
(The set I have is not this same set, it is one that
I found that has 3 birds, 3 matching dies, a few 
word stamps and an embossing folder.
The set is called Bird Talk.)
I used the Distress Crayons and laid down a little
color around the sides of the bird.
Using my water brush I blended out the crayon.
This is what it blends out to with a little bit of water.
I then added another color and blended that out.
I dried the crayon between layers and continued to 
add color until I was satisfied with how the bird looked.
These are the colors I used for the project.
As you can see I colored some "dirt" under my bird
and "sky" on the rest of the canvas.
The sentiment are words from the 
Bird Talk set.
I did use the fine tip of a black Prismacolor Marker 
to go over the lines of the bird,
as the crayons did dull it a bit.
I'm very happy with how my little painting
turned out, especially for a first time effort.
I hope you have enjoyed my projects and are
inspired in some way.
Thanks for sticking with me through this long post.
Please leave a comment to be entered to win
one of the fabulous prizes on this hop.
Now it's time to hop on to
 blog and see what he has to show us.

Here is a list of all the blogs on the hop.
Kristie Kreates That's me!
Be sure to comment at all the blogs,
leave a little love for the
artists/crafters.
The more blogs you comment on the
more chances you have to win
one of the wonderful prizes from our
generous sponsors.

Thanks for stopping by,
I hope you'll come again soon.
You never know what you'll find on
Kristie Kreates!

Friday, August 12, 2016

woven background

Hello all!
Today I'm showing you a card that I made for my Mom.
I was going out of town for a couple weeks and wanted
her to know that I was thinking of her while
I was away.  I made this card and sent it
while I was visiting a friend in Ohio.
For a tutorial on how to make the woven background
hop over to 
where you'll find a step by step tutorial.
.
I used "Flower Basket"(#24608) 
I colored it with water color crayons,
fussy cut it and adhered it right to the 
stamped background.
from Simon Says Stamp,
to make the banner and stamped
the sentiment with the coordinating
stamp set.
I used a little distress ink to give it a little color.
The inside was left blank and I wrote a note
to my Mom before sending the card.
I know she loved receiving this card
and I enjoyed making it.
Thanks for stopping by today
and be sure to pop over and check out
the tutorial on 
Until next time, have fun crafting!

The links on this post are not necessarily the brand
I used or the site
 I bought my supplies from.
They are just a reference for you.
You may find supplies at better prices 
than the ones in the links.
The stamps and dies, however are exclusive 
to the companies they are linked to.


Friday, November 20, 2015

SSS prize

Hello crafty friends!
In October on
I love a good blog hop, so I hopped along
and commented on all the blogs.
There was some wonderful inspiration and fabulous
 ideas, techniques and tips.
A few days after the hop was finished, 
I was surprised to find that I had won one of the 
prize packages.
This is what I received in the mail a week or so later.
It's one of their card kits.
I was thrilled to win this kit and knew I'd be able to put
all these goodies to good use.
There is an "inspiration sheet" that comes with the kit
that shows 6 cards that Kristina Werner made with the
supplies in the same kit.
How could I go wrong?
A kit from a company I love and 
inspiration from one of my favorite designers!
The other day I made a couple cards and barely put a dent
in the supplies.
I used strips of various papers to make this
pretty card.  
"What A Beautiful Day" was stamped
Some of the strips were adhered with foam tape 
to give a little dimension to the card.
This second card is very clean and simple.
With the beautiful papers in the kit,
I couldn't go wrong,
a few thin strips of paper and the
"Just a note" stamp made for a quick and
easy card.

Thanks to 
Simon Says Stamp
for the great prize they sent me!
If you aren't familiar with them,
pop over to their blog linked above or to there 
where you'll find just about anything you will need 
for paper crafting and more.

I'm glad you stopped by today,
I hope you will come again soon.
Until next time, Happy Crafting!


Sunday, June 1, 2014

Poppy card

Hello crafty friends!
Have you ever not known what to make, 
what to stamp, 
what to do?
That's how I was feeling yesterday.
I wanted to work on something and didn't have any direction,
so I got out this stamp, which I love, and stamped it onto a page from an old book.
I colored it with water color crayons and loved how it looked.
Not knowing what I'd do with it, I cute it down.
I knew I wanted to put it on a card and from there it just kind of happened.
I inked the edges, just took my blending tool and used what was on the brown pad.
I had a scrap of card stock that matched nicely, so I put it onto that and used my
Perfect Layers Mini tools and my Perfect Cutting Mat from
to cut a perfect mat.
Then I eyed the pieces of hand made paper that I had gotten from an art show.
I adhered it to that and just tore around the edges.  
Loved it!
Now for the sentiment.
I pulled out a set of stamps that I got from Simon Says Stamp
and decided on Praying for You
then I spotted a scrap of the hand made paper that I had torn off the
image piece and stamped it onto that.
Adhered it all to a kraft card stock card base 
and was done.
And I love it!
Funny how sometimes the cards that have no plan,
no forethought,
no direction
end up being the ones that you love the most.

Thanks for stopping by today.
I hope you have been inspired in some way.
As always if you follow my link to 
and use my code at check out
Kristie5%
you will receive 5% off your order.

Until next time, Happy Crafting!