My Other Pages

To make it easier to read about our trip to Ireland, I have made a page that is just for that. There is a tab above for Ireland Trip 2014 or click on the Home tab to read my other posts. I have also created a new page for My Weight Loss Journey if you are interested in that, click on the tab above.
Showing posts with label Misti. Show all posts

Friday, July 14, 2017

Jason's Birthday Card

Hello everyone.
Do you struggle with masculine cards?
I know I do and I have decided that I'm going to overcome
this problem.  I needed a birthday card for my daughter's boyfriend
and I wanted to do something a little different.
I put my mind to it and this is the card I created.
I started out with a die cut circle in a piece of card stock and 
a few coordinating colors of Distress Inks.
After some trial and error, I finally decided on these 3 large 
 intersecting circles.
I simply moved the circle "stencil" around and inked it with 
the Distress Ink and an ink blending tool.
Once they were the color I liked, I fussy cut them leaving a small outline around
them.  The Happy Birthday sentiment is 
and I stamped it with Timber Brown Staz On Ink
using my MISTI stamping tool, to be sure I got a clear, crisp impression.
The tag behind the circles is a manila tag covered with a piece of 
deli paper that I used alcohol inks to create. 
I used ATG tape to adhere the tag to a brown piece of card stock,
then trimmed the extra from the sides.
The circles were adhered on top of that piece and it was all 
adhered to a white card base.
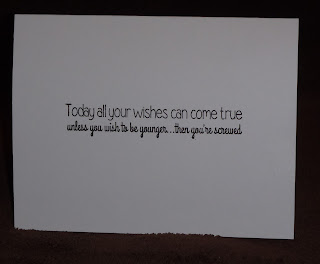
The sentiment is from the 
from CAS-ual Fridays Stamps.
I stamped it with the same brown Staz On Ink as the sentiment on the front
of the card.

I hope you have enjoyed your visit to my blog today,
and that you'll come again soon.
Until next time,
Happy Crafting!


Note the links are only to give a reference so you can
see what the products are.
I didn't necessarily purchase from these sites,
except where specified,
and you may find better prices elsewhere,
I am in no way promoting any particular site.


Wednesday, June 14, 2017

Father's Day Gears

Hello!
Today is the last post in my
Father's Day Car series.
For these cards I used the
I used my MISTI stamping tool and positioned the stamps on the tool.
Using the MISTI makes it so easy to stamp more than one card and have 
them all positioned  and stamped perfectly.
I stamped with VersaMark ink then brushed on Perfect Pearls Powder
To give the shine to the images.

I layered the panel with the images onto card stock then onto
white card bases. The card on the left I used shiny silver card stock
for the mat, you can see the shine of the silver in this picture.
I stamped Happy Father's Day from the
Here is a picture that shows the shine from the Perfect Pearls.
Here are the other 2 cards I made with this design.
The sentiments are a variety of techniques,
plain stamping with VersaFine ink,
I enjoyed making these cards and making each one a little bit
different from the others.

Thanks for stopping in and I hope you have enjoyed
my Father's Day Card series and have been inspired in some way.
Father's day is going to be here soon, I hope you've made a card or two.
Until next time,
have fun making something!


Note the links are only to give a reference so you can
see what the products are.
I didn't necessarily purchase from these sites,
except where specified,
and you may find better prices elsewhere,
I am in no way promoting any particular site.


Wednesday, May 31, 2017

Awesome Gears

Hi!
My last post was showing a card I made to share kindness.
Today I have a few more cards that I made for that purpose.
I wanted to make some cards that were a bit more masculine and I
decided to use the
"Cogs and Gears" stamp set from 
Inkadinkado
I arranged the stamps on my MISTI stamping tool
and stamped the images with VersaMark ink.
For the card on the left I only used the VersaMark,
which gives a watermarked image.
For the other 2 cards I stamped with the VersaMark
then brushed on some Perfect Pearls powder
which gives color and shine and only adheres where there
is the sticky VersaMark ink.
The banner was cut with the 
The sentiment is one from the 
also from Simon Says Stamp
This picture shows a little bit of the shimmery shine that the
Perfect Pearls gives.
I also used a little of the Perfect Pearls around the edge of the 
white card bases and the banners on 2 of the cards.

I love how these cards turned out,
I hope you like them too.
I hope you'll stop in again soon,
Father's Day isn't too far away and I have a series of
Father's Day cards to share with you.
Until then,
Create!


Note the links are only to give a reference so you can
see what the products are.
I didn't necessarily purchase from these sites,
except where specified,
and you may find better prices elsewhere,
I am in no way promoting any particular site.


Friday, February 24, 2017

Bird Crazy

Hello everyone!
I have several birthday's in February, so I decided
to get moving one day and made the cards I needed
for the month.
I absolutely LOVE these mini crazy birds
from Tim Holtz.
I bought the set of 3 stamps and dies 
one day at Michael's
and I've never seen that set again
and haven't been able to find it online either.

This card is just an extra that I made while I was 
at it.  Love this sentiment.
This card I left blank inside so I can add a
sentiment when I need it.

I don't remember who I addressed each of these
cards too, but I think this one work well 
for anyone you want to give a smile too.

I thought this was a cute sentiment.

I'm sure this one is going to one of
my OLDER brothers.

This one is going to my other OLDER brother.
I think they'll get a kick out of them.

I made the backgrounds using a stripe from the
from Simon Says Stamp
I used these stamps sets from
 Cas-ual Fridays Stamps
for the sentiments:
and stamped them in

Thanks for stopping by today,
I hope you'll come again soon.
I have decided that this year 
I will get better about sending out cards
to family and friends.
So I will probably be posting a lot
of cards in the future, so be sure to pop 
in and see what I've been creating.
Until next time,
Happy Crafting!


Note the links are only to give a reference so you can
see what the products are.
I didn't necessarily purchase from these sites,
except where specified,
and you may find better prices elsewhere,
I am in no way promoting any particular site.


Tuesday, February 7, 2017

Kelsie's Card

Hello!
Today I have a card to show you that my daughter made.
She wanted to make a card for her boyfriend's father
for his birthday.
First she made the striped background with my 
and 
She then stamped the cupcakes onto white card stock
The cupcakes are an old set from Inkadinkado
and I can't find them anywhere to link to.
She fussy cut the cupcakes, adhered them to the 
striped panel with foam tape 
and adhered that to the card base.
Inside she simply stamped 
'happy birthday' 
from 
stamp set.
She then made an envelope to go with the card 
I think it turned out great.
We had a nice time and I got to teach her some new things
which I know she will use again for future cards.
Thanks for stopping by,
have a wonderful day
and learn something new.


Note the links are only to give a reference so you can
see what the products are.
I didn't necessarily purchase from these sites,
except where specified,
and you may find better prices elsewhere,
I am in no way promoting any particular site.


Saturday, December 24, 2016

Our card

Merry Christmas!
Today I'm showing you the card that I decided
on for our Christmas card this year.
I decided on something simple and easy to
replicate.
I found this paper at Tuesday Morning
They have the best deals on card stock and papers.
This is double sided card stock, 25 sheets of 12"x12" 
for only $1.99.  How could I go wrong with that.
There was another that I picked up, but decided to 
use this one for my cards.
I used my MISTI to stamp all my sentiments
I cut them into banner shapes and
layered them onto white card stock 
to give them a little pop.
I made about 70 of these cards.
So all in all, with the cards for 
The Caring Hearts Card Drive and all,
I made almost 200 cards this year,
you can see why I wanted a simple design for
these.
I always have good intentions to start my cards
very early, but it never seems to happen as early
as I plan. 
Maybe next year, right?

I'm glad you stopped by today,
I hope you have enjoyed all the Christmas cards
I have posted over the last month or so.
I would like to wish you all a very 
Merry Christmas
and a happy and healthy
2017!
Until next time,
Peace to you all!


Note the links are only to give a reference so you can
see what the products are.
I didn't necessarily purchase from these sites,
except where specified,
and you may find better prices elsewhere,
I am in no way promoting any particular site.


Wednesday, October 19, 2016

Caring Hearts Card Drive

This is the 7th year that Vera Yates and her crew
have organized the 
This card drive is near and dear to my heart.
This will be the 3rd year that I will be helping to 
distribute cards to 
Brothers of Mercy Nursing Home and Rehab Center
and 
Sacred Heart Adult Care Home
where my Mom lives.
Many people in nursing homes and assisted living
centers don't receive many cards and visitors.
This is one way to bring some cheer into their lives.
When Mom receives her cards, she has been thrilled
to show them to me and tell me where they came from.
They are always a big hit in the dining room where the
residents find them at their places.
They share them and compare them and are so 
excited to receive them
Be sure to follow the link above and see how
you can help with this card drive.
Here are some cards that I've made to send in for the
drive.
(click on the pictures to see them larger)
I stamped this cute snowman
onto white card stock and also a piece of 
Post It paper to use as a mask.
I covered the snowman image with the mask
and used my MISTI stamping tool to 
repeatedly stamp the Holiday Wishes sentiment
onto the card.
I'm sorry I don't know what set that sentiment
is from.
On this card I stamped 
from Biblical Impressions
and used the same process as above to 
from 
CAS-ual Fridays
This one I used 
a border stamp from 
I colored the images on all the cards with

Thanks for stopping in today,
I hope you will join me in donating to
this very special
card drive.
Come again soon,
you never know what you'll find on
Kristie Kreates.


Note the links are only to give a reference so you can
see what the products are.
I didn't necessarily purchase from these sites,
except where specified,
and you may find better prices elsewhere,
I am in no way promoting any particular site.

Friday, September 2, 2016

Real Beauty

Hello visitors!
Today I have a layout that I'd like to show you.
I happened to find some 12" x 12" watercolor paper a
few weeks ago and snatched that right up.
It is Master's Touch which is the
Hobby Lobby brand.
I have wanted to do some stamping and watercoloring 
on some scrapbook layouts, but hadn't seen any of the right 
sized watercolor paper.
I decided to do a layout of my beautiful daughter.
She is not only beautiful on the outside, but on the
inside also.
Here is the layout I made.
The pictures and the title are both matted with some
green paper from my stash, it matches nicely with the
ink I used ,which was
The rose stamp I used is
and were stamped with Versa Fine Onyx Black ink
which is water proof, so is perfect for watercoloring.
I colored all the roses with watercolor crayons.
I have 2 brands, Lyra and Neo-Colors
I love using watercolor crayons, they blend so beautifully.
The "baby's breath" is
I used my MISTI tool to do all the stamping
and it worked beautifully.
I hope you will try doing some stamping and/or watercoloring on 
your scrapbook layouts.
Thanks for stopping by today,
come again soon.
Until next time, try something new!

Saturday, August 20, 2016

Inklipse Blog Hop


Hello crafty people!
Welcome to my blog and to the 
Inklipse Blog Hop!
Simon, has set up a fun blog hop
to bring inspiration from crafters you may not
have known before.
There are some wonderful, generous sponsors
for this hop. Please consider visiting their
online stores and showing your love to them.
have generously provided prizes for this hop.
To be entered to win you will need to:
Subscribe to Simon's blog
Leave at least 3 comments throughout the blog hop
Now that all the particulars are out of the way,
on to my projects.
I have 2 projects to share with you.
The first is a gift card holder/birthday card.
Since I don't have the equipment for a video,
this post is very heavy on pictures.
But hopefully you'll find it worth your time.
Starting with a piece of red card stock  11" x 4 1/4"
score along the long side at 2", 7 1/4" and 7 3/8"
The insert piece is white card stock cut to 6 1/2" x 3 3/4"
score along the long side at 1 3/4" and 6"
Burnish all the score lines.
(If you click on the picture,you can see that there are
actually 2 folds very close together.)
punch a notch 1" from each side on the smaller flap.
Use Washi Tape along the bottom of the small flap,
close to the fold.
The tape should go all the way around the card.
This is not only decorative, but it holds the flap closed.
I used 2 pieces of Washi Tape on my card I think it
gives it a bit more security and also looks more finished.
Place strong adhesive along the small flap of the 
insert piece of card stock.
I used Score Tape, but use whatever works for you.
Line up the edge of the insert right along the 7 3/8" fold.
Use Glue Dots at the corners of the flap that makes
the pocket.  This will make a pocket for the gift card.
The insert can now be slid into the pocket,
the card front will stay closed when 
tucked behind the center flap of the pocket.
To decorate the front of my card,
I cut 4 Happy Birthday sentiments with my 
Silhouette Cameo out of white card stock.
I ran them through my Xyron sticker machine
and layered them on top of one another.
I then coated them with VersaMark ink ,
covered them with silver embossing powder
and heat set them.
The Happy Birthday was adhered directly to the front
of the card.  I also cut some stars and
embossed them, they were adhered with foam tape.
On the inside of the card, I stamped
"Celebrate" which is from a very old
Scrappy Cat  stamp set.
You can see, when you open the card,
the pocket with the gift card pulls out.
Here is a side shot showing how the 
gift card goes down into the pocket.
I think my son will like this card,
I made it for him, we'll be celebrating his
birthday on Sunday.

Now for my 2nd project.
Did you know that you could stamp and use
Distress Crayons on canvas.
This is my first time doing this and I know
I'll be doing more of this technique.
This canvas is very small, only 2 1/2" x 3 1/2"
First it needs to be prepped with Gesso.
The Distress Crayons blend out much better
when it has the base of Gesso.
I used a sponge paint brush,
but you can use whatever is available to apply
the Gesso, or whatever base you might like best.
Since this canvas is mounted on a wood frame,
I had to fill in the back with pieces of cardboard.
This gives a firm surface to stamp onto.
I used my Mini MISTI
to stamp one of the birds from 
onto the canvas with VersaFine Onyx Black Ink
It did take a couple stampings since it was onto canvas.
(The set I have is not this same set, it is one that
I found that has 3 birds, 3 matching dies, a few 
word stamps and an embossing folder.
The set is called Bird Talk.)
I used the Distress Crayons and laid down a little
color around the sides of the bird.
Using my water brush I blended out the crayon.
This is what it blends out to with a little bit of water.
I then added another color and blended that out.
I dried the crayon between layers and continued to 
add color until I was satisfied with how the bird looked.
These are the colors I used for the project.
As you can see I colored some "dirt" under my bird
and "sky" on the rest of the canvas.
The sentiment are words from the 
Bird Talk set.
I did use the fine tip of a black Prismacolor Marker 
to go over the lines of the bird,
as the crayons did dull it a bit.
I'm very happy with how my little painting
turned out, especially for a first time effort.
I hope you have enjoyed my projects and are
inspired in some way.
Thanks for sticking with me through this long post.
Please leave a comment to be entered to win
one of the fabulous prizes on this hop.
Now it's time to hop on to
 blog and see what he has to show us.

Here is a list of all the blogs on the hop.
Kristie Kreates That's me!
Be sure to comment at all the blogs,
leave a little love for the
artists/crafters.
The more blogs you comment on the
more chances you have to win
one of the wonderful prizes from our
generous sponsors.

Thanks for stopping by,
I hope you'll come again soon.
You never know what you'll find on
Kristie Kreates!