My Other Pages

To make it easier to read about our trip to Ireland, I have made a page that is just for that. There is a tab above for Ireland Trip 2014 or click on the Home tab to read my other posts. I have also created a new page for My Weight Loss Journey if you are interested in that, click on the tab above.
Showing posts with label Versa Fine Ink. Show all posts

Tuesday, December 6, 2016

Cards for the Card Drive #7

Hello! 
 I hope you've got all your Christmas cards
done and mailed or ready to go soon.
This is the last post in the
Caring Hearts Card Drive
series.
Today I'm showing you the last card style
I made for the drive.
A few years ago I found a great deal on this
patterned card stock and I love it.
I got it at Tuesday Morning,
25 sheets for something like $2.99.
I love it so much, but I don't use it a lot,
I guess I just don't want to run out of it.
I pulled it out and created this simple card.
I used a couple different colors of mats as well
as card bases.
I thought it needed a little extra pop so I heat embossed
the sentiment with clear embossing powder over the
to give it some shine.
If you haven't made your cards yet and want to,
this is a very simple design to make.
I did them in assembly line style,
cutting all the pieces at once, then stamping and
assembling all the sentiment pieces.
Having everything cut, stamped and ready make it go
very quickly and easily.
You can see I made quite a few of these style.
I ended up with 107 cards.
I had an extra panel and needed to use it, then I 
had an extra card base and had to use that, then there was
an extra mat and on and on.
So my 100 cards turned into 107,
but that's okay, I know they will bring smiles to someone's
face this Christmas season.
And here is what 107 cards all in envelopes looks like.
All packed up and ready to be sent out.
I can't wait to get the cards that I will deliver to 
"my homes"
Vera Yates
heads up this card drive every year.
If you want to be involved, be sure to 
keep an eye here next October for info
or follow Vera's blog
She usually posts the info in October and cards
can be mailed in during the month of November.
This is a huge undertaking,
last year these ladies collected and sent out
over 22,000 cards for delivery to nursing homes.
This year we are all hoping to top that,
they are collected and distributed in 
The USA,Canada, Australia and this year
they added the UK.

Thanks for stopping in to see my cards.
I truly enjoyed making each and every one of them.
Come again soon,
you never know what you might find on 
Kristie Kreates.


Note the links are only to give a reference so you can
see what the products are.
I didn't necessarily purchase from these sites,
except where specified,
and you may find better prices elsewhere,
I am in no way promoting any particular site.

Monday, October 10, 2016

More Inspirational Quote Projects

 Hello all!
My last post was about some inspirational quote projects
that I made for our scrapping/crafting studio.
Today I have a few more to show you.
This is one of the walls at My Happy Place.
The banner at the top says CREATE,
I made that banner quite a while ago and it was 
hanging in a different spot, so we moved that over on
this wall.
The background of this piece was created
 with watercolor crayons.  I colored a few colors onto
my craft mat, added water and 'smooched' the 
watercolor paper into the color to pick it up.
After it was dried I used my light box to 
trace the words and painted them with 
I adhered the project to a piece of matting and strung
the ribbon through holes around the sides and to make
the hanger.
This one was done by stamping the flowers onto
I love the smooth surface of this paper for coloring.
I used VersaFine Onyx Black ink for the stamping,
did the coloring with my Fantasia Colored Pencils.
The words were painted with pearlescent watercolors.
This last piece was the start of my whole
"journey" into making these projects.
It started with this inspiration
from Kristina Werner.
As I said in my last blog post,
It's all about 
Inspiration not Re-creation.
I'm not as talented as she is,
so I used my light box to trace 
the words that I had printed onto a 
piece of computer paper using
pearlescent watercolors.
(Can you tell that I love them?)
The background was made 
with the 'smooching' technique I 
mentioned above using Distress Inks.

Thanks for stopping by today to see what I've
been up to.
I hope you'll come again soon.
I have one more project to show you in this
"series" ..... well, until I get some more done that is.
I hope you are enjoying them and have gotten some 
inspiration from them.
Until next time:
Make Pretty Things!

Note the links are only to give a reference so you can
see what the products are.
I didn't necessarily purchase from these sites,
and you may find better prices elsewhere.
I am in no way promoting any particular site.


Saturday, September 24, 2016

Inspirational Quote Project

Hello crafty people!
Today my post is pretty photo heavy as I'm going to 
show you how I went about making this project
(click on any of the pictures to see them larger)
Recently I've been working on some pieces with 
inspirational quotes on them.
I'll be posting them as I get them done, I have
several in the works right now.
The first thing I did was decide which flowers I wanted
to stamp and color.
I stamped onto a 12"x12" piece of white card stock
and did all the coloring with colored pencils.
I stamped my first flower, which is an old one from 
Stampin' Up, into the upper corner of the page.
I also stamped it onto 
Inkadinkado Masking Paper, cut it out and used it as
a mask.
I had stamped the images I was going to use onto 
scrap card stock, colored them and roughly cut them out.
This way I could position the image and see where 
I wanted to stamp it.
I then laid the stamp over the cut out image and closed
the cover of my MISTI tool on the stamp to pick it up.
Placing the stamp over the cut out image also will prevent
any stray ink from getting where I don't want it.
As you'll see, most of the stamps were used more than 
once and that stray ink can ruin a project.
Here you can see where I used masking.
When I masked off a flower, then stamped over
it with another flower, then removed the mask,
the original flower appears to be in the front.
I just started coloring before I realized I hadn't taken 
a picture of the project with just the stamping on it.
Here it is, before I colored it.
I started by coloring a first layer of color.
This way I could plan out my colors then go back and
do any shading and intensify colors.
Here is what it looked like once I was finished
coloring the flowers.
Now it was time for the quote.
I printed the quote I wanted onto white card stock
from my computer.
I taped it to my light box and taped the project 
over it using Post It Tape.
Once I turn the light box on, I could see the lettering
and traced it.  Sometimes I put paints right to the
project, but since I wanted to use colored pencils, 
I felt it would be easier to trace it with pencil.
I traced all the lettering with a light hand.
Here is a close up of the traced quote.
Even though I used a light hand, I do wish I had 
used an even lighter hand.
Some of the pencil was a little darker than I needed,
it only had to be dark enough that I could see it to 
go over it with the colored pencil.
I think my project turned out nice.
I haven't decided how I will hang this project,
but I'll get that figured out soon and let y'all know.

Thanks for stopping in today to see what I've been up to.
I hope you'll let me know what you think of my project, 
and I hope you've learned something and/or been inspired
in some way.
Come again soon. 
Until then, make something pretty.

All the stamps are from my stash,
the ones I know are:
The flowers in the lower left corner 
"Poppy" from Our Daily Bread Designs
The roses in the lower right and upper left 
"Rose" from QKR Stampede
The 3 along the bottom
Anna Griffin Parrot Tulip Stamp
very old, I couldn't find a link for it.

Note the links are only to give a reference so you can
see what the products are.
I didn't necessarily purchase from these sites,
and you may find better prices elsewhere.
I am in no way promoting any particular site.

Friday, September 2, 2016

Real Beauty

Hello visitors!
Today I have a layout that I'd like to show you.
I happened to find some 12" x 12" watercolor paper a
few weeks ago and snatched that right up.
It is Master's Touch which is the
Hobby Lobby brand.
I have wanted to do some stamping and watercoloring 
on some scrapbook layouts, but hadn't seen any of the right 
sized watercolor paper.
I decided to do a layout of my beautiful daughter.
She is not only beautiful on the outside, but on the
inside also.
Here is the layout I made.
The pictures and the title are both matted with some
green paper from my stash, it matches nicely with the
ink I used ,which was
The rose stamp I used is
and were stamped with Versa Fine Onyx Black ink
which is water proof, so is perfect for watercoloring.
I colored all the roses with watercolor crayons.
I have 2 brands, Lyra and Neo-Colors
I love using watercolor crayons, they blend so beautifully.
The "baby's breath" is
I used my MISTI tool to do all the stamping
and it worked beautifully.
I hope you will try doing some stamping and/or watercoloring on 
your scrapbook layouts.
Thanks for stopping by today,
come again soon.
Until next time, try something new!

Tuesday, August 9, 2016

I'm Here For You!

Hi all!
Today's card was made with a couple stamp sets
that I picked up at a good price when I was shopping at
"Tuesday Morning"
I don't know if you have this store in your area,
but I'll tell you I just love it.
You never know what you'll find there and the prices
are great.
The sentiment stamp was in a pack of 6 small sets
at the price of $.99 for them all.
I found 2 of these packs and only had 2 or 3 duplicates.
For that price, how could I go wrong?
These little sets are usually at least $1.00 a piece,
and I got 12 for $1.98!
The chevron was from a different set and I 
stamped it onto a piece of white
card stock with 
onto water color paper.
The texture of the water color paper resulted in
the distressed look of the chevrons.
I used my MISTI stamping tool and I know
I could have made them more "uniform"
but I loved the distressed look,
I think it goes well with the look of the sentiment
that I used.
I cut the chevron piece down to fit the card and 
adhered it directly to the card front.
The sentiment says
"needed you to know I'm here for you"
and was stamped with VersaFine Onyx Black Ink
The inside is left blank to write a personal note.
I really love how this card turned out.
A nice clean and simple card.
Thanks for stopping in today,
now go check out what they have at 
Tuesday Morning,
you never know what you'll find there,
just like you never know what you'll find at
Kristie Kreates,
so come visit again soon.


Saturday, August 6, 2016

Kitty Cards

Hello everyone!
Today I have 2 cards I made, a little different,
yet mostly the same.
Someone very close to me was diagnosed with breast cancer
recently and I wanted to send a card letting her know
I'm thinking of her.
I made this "big hugs" card for her and wrote a personal
note inside.
The cat image is stamped with VersaFine Onyx Black  ink,
I colored the cats, on both cards, with 
colored pencils and blended with Gamsol.
The background was painted by scribbling some
water color crayon onto an acrylic block and 
mixing it with water, then painting it on with a
  I also made the envelopes since the cards are
not a standard size.  I used my
to make the envelopes for both cards.
This second card I made for my Aunt Marilyn who
will be 93 at the end of September.
She loves cats and I know she will get a kick out of this
card. I can hear her now, exclaiming how cute the cat is.
The cat image is
The sentiments are both 
I have linked many of the supplies I used,
I did not necessarily purchase them from the linked
sites. I only use them for reference for you to
see the supplies.
You may very well find these supplies at 
many other sites and maybe at better prices,
just do a little research.

Thanks for stopping by today,
I hope you have enjoyed my cards as 
much as I enjoyed making them.
Come again soon.
Until then, Happy Crafting!

Wednesday, March 30, 2016

Window Panel Cards #2 and Distress Crayons

Hi all!
Today I have a few cards to show you.
I love this window panel style of card.
This time I made a couple of them using some 
card stock that I had used 
Distress Crayons to create.
I first covered the card stock with Gesso,
then used the Distress Crayons to color sections
of the card stock, then 'smooshed' the color around 
with my fingers.
The colors are pretty creamy and blend best when 
there is a base coat, this is why I used the Gesso
from Eureka Stamps for the inside of the card.
I wanted something that fit nicely behind the clear
panel window and this was perfect.
I think it went well with the look of the overall card.
I stamped it with Chestnut Roan Color Box Ink.
This card can be used as a vertical or a horizontal card.
For this card I used another piece that I created with
Distress Crayons.  This one was made using the 
Distress Crayons directly to card stock, using no base 
coat of Gesso.  The crayons did blend, but not nearly as 
easily.  I used the same colors for both cards, you can
see the difference in the color, as without the Gesso,
the crayon kind of "soaked" into the paper.
I like how both turned out, but found the one with
the Gesso easier to work with.
I made this striped card stock panel with 
from Winnie and Walter
Biblical Impressions.
I stamped the image with Versa Fine Ink
and colored it with 
colored pencils.
The acetate I used for all these window 
panel cards, is simply packaging that I had kept
in my stash, knowing that I'd find a use for it.
I had a lot of fun making these cards
and I'm sure I'll be making more of this style card
in the future.
Thanks for coming by today,
I hope you have enjoyed my cards.
Have you tried the new Distress Crayons yet?
I love them and I'm sure you'll be seeing more
projects on my blog where I use them.
I hope you'll come again soon.
Now go make something fun.


Sunday, March 27, 2016

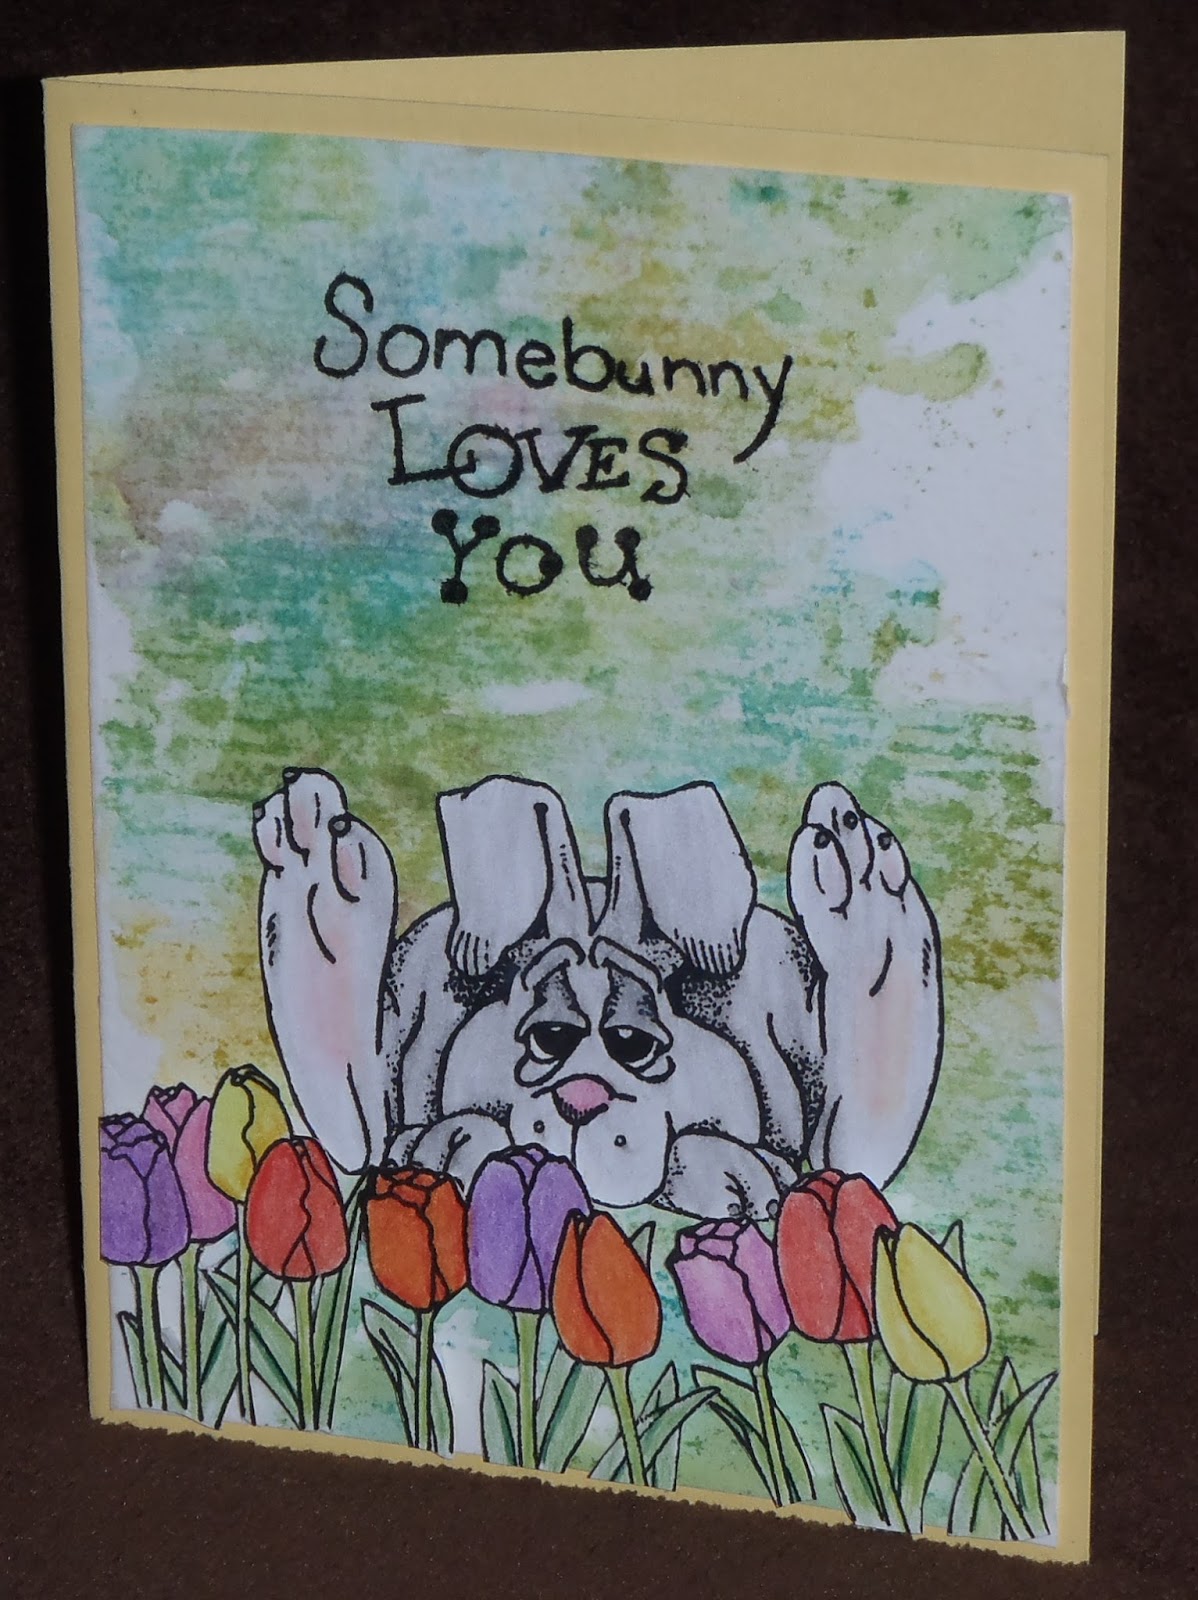
Somebunny Loves You

Happy Easter!
I wanted to make a cute card for my Mom
for Easter and here is what I came up with.
I used some of my deli paper and alcohol ink
background paper for the base panel.
I stamped and colored 
and
with colored pencils, 
fussy cut them and adhered the 
bunny directly to the background panel
with ATG tape.
I added the tulips with 
foam tape.
The sentiment is 
and is stamped with
Onyx Black Versa Fine Ink.
I'm sure my Mom loves her card.
I hope you have a beautiful and blessed
Easter.
Thanks for stopping by today,
see you again soon.


Monday, August 26, 2013

Sentimental Challenge

Hello blog fans!
It's time for another Eureka! Stamps Challenge.
This weeks theme is
"Be Sentimental"
I decided to use
"Tree Losing Leaves" (#34502) and
"When I see" (#34902)
 
I used water color crayons and an
water brush to create the background.
I then stamped Tree Losing Leaves
onto the background piece.
I used Onyx Black VersaFine ink,
but stamped it off once onto scrap paper,
as I wanted the tree to be a little lighter
and for the sentiment to be more prominent.
These were amongst the first images I got from
Eureka! Stamps and I still love them!
Thanks for stopping by today.
I hope you were inspired in some way.
I hope you'll pop over to the
 for all the details on the challenge and join in the fun.
 
Until next time, Happy Crafting!

Monday, May 27, 2013

Great Outdoors

The Great Outdoors!
This is the theme of the
Eureka! Stamps Challenge
this week. Be sure to check out the particulars on the
I decided to use 2 images from
"Lg Tree" (#15302) and
"Leaf Background" (#26901)
I used VersaFine ink for the background image.
I stamped it onto white card stock,
then stamped it again on another piece of card stock.
The second stamping is what I used on these cards.
I wanted it to be a little more subtle.
I then cut a circle from a piece of very light weight paper.
I laid the paper over the background image
and inked the circle with Distress ink. 
Then I stamped the tree image onto the circle.
This panel was then adhered to a card base
that had been inked with the same
Distress ink colors as the circle.

This second card I used the same technique,
but once I had inked the green circle,
I took away the mask and replace it
with the circle that had been cut out
and inked around the circle with yellow Distress ink.
I wanted to give a kind of bright yellow sunny feel to the background.
My daughter likes the second card better,
but I kind of like the first one.
What do you think?
Leave a comment and let me know.
I hope you have been inspired in some way.
Maybe to try a new technique,
try some inking
or just to participate in the challenge.
 
Thanks for stopping by today, come again soon.
 
Until next time, Happy Crafting!