My Other Pages

To make it easier to read about our trip to Ireland, I have made a page that is just for that. There is a tab above for Ireland Trip 2014 or click on the Home tab to read my other posts. I have also created a new page for My Weight Loss Journey if you are interested in that, click on the tab above.
Showing posts with label VersaFine Onyx Black Ink. Show all posts

Friday, January 13, 2023

Poppy Card

Hello from gloomy Western NY!
It's a typical January here as far as the sun.
It is out there every day, but we don't have any
real sunshine, lots of cloud cover and gloomy weather
lately.  But, it has been fairly warm for our area.
We did have a huge blizzard at Christmas, but a couple
days after Christmas it was in the upper 40s and into the 50s.
Thus is the crazy weather of the Buffalo, NY area.
I hope you are having nice weather in your area.
I thought I'd inject a little bit of summer and brightness
into everyone's day with this card that I made.
This is one of my favorite stamps.  It is from Stacy Stamps,
but I believe she is no longer in business, so I don't have a link
to this set.
The poppy stamp I used for this card is a single poppy.
I made a few masks, so I could layer the poppies.
I then stamped them with VersaFine onyx black ink,
and colored them with colored pencils.
Once I was happy with the coloring, I fussy cut
the image and adhered it to a blue card base.
I love the colors on this card, so bright and cheerful.
Inside I stamped this sentiment, sorry, I don't know 
what set or company this is from.
I love how this card turned out and hope it brings a little
summer brightness to your day.

Thanks for stopping by today to see what I've been 
up to lately.  I hope you will come again soon.
Until then:
bring some brightness to someone.


Monday, November 8, 2021

2 for 1 Birthday cards

Good day!
Today I'm showing you how I did a 2 for 1 set
of birthday cards.
I started by wetting a piece of watercolor paper
and adding watercolors at one side and let them 
run down the card.  I sprayed a little bit of water onto
the paper to encourage the colors to run down the
paper.
Once I had the background piece, I stamped
onto the painted paper with 
I cut the image down to the size I wanted
for my card and adhered it to a card base.
I stamped the greeting  and the card was done.
I still had a piece of the original panel left
and used that to make another card.
You can see here how the 2 pieces fit together.
This card would probably be considered a 
mini slimline card.
I love how they both turned out.
I tried something a little different this time
and I like how it worked.

Thanks for stopping in today,
I hope you have enjoyed your time here and
were inspired in some way.
Come again soon,
until then,
try something new and different
for you.


Note the links are only to give a reference so you can
see what the products are.
I didn't necessarily purchase from these sites,
except where specified,
and you may find better prices elsewhere,
I am in no way promoting any particular site.


Thursday, November 4, 2021

Happy Thanksgiving

Hello and welcome to Kristie Kreates!
Do you make and send Thanksgiving cards?
I don't usually send them, but this year I decided to
send a few.
I stamped these images from a set that I found in my stash.
I've had the set for years and I believe it found it at
Marshall's, but I couldn't tell you the maker.
and colored them with Arteza Colored Pencils.
The sentiment was also stamped with 
Onyx Black Ink,
the gold was stamped with 
Once they were colored it was simple to 
cut them to size and mount onto a coordinating 
card base.
Inside I stamped a simple 
Happy Thanksgiving.

Thanks for stopping by today,
come again soon.
Until then,
wish someone happy!


Note the links are only to give a reference so you can
see what the products are.
I didn't necessarily purchase from these sites,
except where specified,
and you may find better prices elsewhere,
I am in no way promoting any particular site.


Thursday, October 7, 2021

Wedding Card

Hello!
Welcome to Kristie Kreates.
Today I have a special wedding card to show you.
I have known Brian since he and my son, Jaryd,
were 3 yrs old and met in nursery school.
Our families have been close ever since and
Jaryd and Brian have been best friends since.
They were best man in each others weddings and
Brian is my #2 son.
He recently got married to a lovely young lady.
  I wanted to make a special card for them
and this is what I came up with.
I cut the 
"wedding couple and arch"
was cut on my Silhouette Cameo with a file
I bought from the Silhouette Design Store.
I then stamped the Poppies from Stacy Stamps
 onto terracotta colored
card stock with VersaFine Onyx Black ink.  
I shaded the images with Arteza colored pencils
and fussy cut them.
Their wedding colors were olive and terracotta, so
this combination worked our perfectly for their
card.
I used foam tape and 3 in 1 glue to adhere the flowers
to the card to give it some dimension.
For the inside of the card I wrote a personal note.
I absolutely LOVE how this card turned out
and I hope they did too.

Thanks for stopping by today.
I hope you like this card as much as I do
and have been inspired in some way.
Come again soon.
Until then,
create something outside your box.


Note the links are only to give a reference so you can
see what the products are.
I didn't necessarily purchase from these sites,
except where specified,
and you may find better prices elsewhere,
I am in no way promoting any particular site.


Wednesday, September 29, 2021

Happy Birthday Aunt Marilyn

Hello!  I hope you're having a wonderful day.
Today I have a birthday card to show you.
My Aunt Marilyn turned 98 today (Sept. 29th)
She lives in North Carolina and I haven't seen her
for quite some time now.
Covid has changed so much!
I wanted to make her something beautiful
so I used one of my favorite stamp sets.
onto white card stock with VersaFine Onyx Black
ink and colored them with my Arteza colored pencils.
I fussy cut them and adhered them to a card base.
The happy birthday sentiment is from 
Lawn Fawn Scripty Words set
also stamped with VersaFine ink.
Since this card was an odd size, I made
an envelope to send it in.
I think she'll be happy to receive a pretty 
card for her birthday.

Thanks for stopping in today,
I hope you'll come again soon.
Until then,
make someone smile.


Note the links are only to give a reference so you can
see what the products are.
I didn't necessarily purchase from these sites,
except where specified,
and you may find better prices elsewhere,
I am in no way promoting any particular site.


Wednesday, March 10, 2021

Pocket Birthday Card

Hello and welcome!
Today I'm showing you the card I made for
my hubby, Dave, for his birthday.
This is made from a business envelope with
a window in it.
I simply folded up the envelope so the window
was at the bottom of the pocket that it made.
I stamped the "happy birthday" on a piece of
white card stock with VersaFine Black Onyx Ink
and positioned it inside the envelope,
before I folded and glued it to make the pocket.
I covered the front of the pocket with some 
alcohol ink covered deli paper from my stash.
Then found some woven burlap type embellishment
in my stash and added that and glued the 
postage stamps on top of it.
We are big fans of  Ireland and castles,
so I thought these stamps were perfect for him.
I then made a small tag to go in the pocket.
I used white card stock and inked it with
a couple Distress Inks,
I believe they were 
Broken China
and
I wrote out a greeting in Gaelic
Go n-eiri an t-adh leat
which basically means
wishing you the best of luck
Slainte means cheers
and gra which means love.
I adhered the entire pocket onto
a piece of card stock.
He loved his card, it is sooooo
him!
Here is a link to a video showing how
to make this kind of pocket, there are 
other uses for these, I just chose to make mine
into a card.  She does a bit more elaborate design
in the video, but you'll get the idea anyway.

Thanks for stopping in today.
I hope you have been inspired in some way
and will return again soon.
Until then,
try something new and different!


Note the links are only to give a reference so you can
see what the products are.
I didn't necessarily purchase from these sites,
except where specified,
and you may find better prices elsewhere,
I am in no way promoting any particular site.


Tuesday, March 2, 2021

Baby Animals

Good day my friends!
I'm glad you stopped by for a visit.
Today I'm showing you what I made for my
daughter, Kelsie, for her birthday.
I was talking to Sara asking if she had any ideas
for her and she suggested I make a book for her
to have at her house for when Marie visited.
This is what I decided on.
The cover is covered with a piece of paper that I
had made with some of my ink sprays.
I used a stencil to add the elephant and a 
stamp to add the bird.
For the elephant I used 
Color Theory Clean Slate Ink
for the bird I used
This is the inside of the cover.
Here are a few of the pages.
I put the name of the animal and what they are
called when they are babies on each page.
to add the names to the pages.
Baby animals are so darn cute.
I learned a few things while doing this book.
Did you know that a baby platypus is called a puggle?
Each of these pages is laminated and then are on
a big ring, the pages can be taken off and rearranged
in any order they want.  I'm pretty sure Kelsie will love
it, she loves little animals, especially if they are babies.
Pretty sure Marie is going to love it too.

Thanks so much for coming by today,
I hope you like my little baby animal book.
Come again soon.
Until then,
create, create, create!


Note the links are only to give a reference so you can
see what the products are.
I didn't necessarily purchase from these sites,
except where specified,
and you may find better prices elsewhere,
I am in no way promoting any particular site.


Sunday, December 6, 2020

Zoo Animal Balloon Card

Hello Blog friends!
My beautiful granddaughter turned one
in November and I made this card for her
birthday,  I had a lot of fun with it and
I think everyone loved it.
has a whole line of these balloon 
stamps and holders. I got them all when
I was on the Eureka Stamps design team
years ago.
I stamped them all with VersaFine Black Onyx Ink
 and colored them with my Arteza colored pencils.
Then I fussy cut each one and adhered them to 
the background paper with foam tape.
Each balloon has a piece of twine attached
and held by the little girl.
I love how this card turned out,
we love taking Marie to the zoo,
so I thought this was a perfect card for her.

Thanks for stopping in today,
I hope all is going well with you and yours.
Come again soon,
until then;
Stay safe and stay healthy!


Note the links are only to give a reference so you can
see what the products are.
I didn't necessarily purchase from these sites,
except where specified,
and you may find better prices elsewhere,
I am in no way promoting any particular site.


Monday, September 21, 2020

Birthday Card For Jaryd

Hello, I hope you're having a good day!
My son recently had his birthday and I needed 
a card for him.  I had been doing some gelli plate
prints and had used a piece of card stock to
roll the excess paint off my brayer.
I loved the look of this piece, so I used it to make
his card.
I happened to have a couple strips of 
card stock that matched the colors nicely,
so I used those along the edges.
Then I stamped the happy birthday with
I love how his card turned out.
I wrote a personal message inside.
I think he liked the card too.

Thanks for stopping by today to see
what I've been up to, I hope you like what you 
found here and will come again soon.
Until then:
use something unexpected.


Note the links are only to give a reference so you can
see what the products are.
I didn't necessarily purchase from these sites,
except where specified,
and you may find better prices elsewhere,
I am in no way promoting any particular site.


Saturday, September 5, 2020

Happy Thoughts 2 for 1

Hi everyone!
Today I'm showing you a couple cards I made.
This is kind of a 2 for 1 deal.
I started by embossing white card stock with the
to color the panel.
I cut the panel into 2 pieces at an angle and adhered each piece
to a white card base.
I added a thin strip of black card stock and used
sentiment from the
Lovely Greetings stamp set from Cas-ual Fridays.
I'm sorry, I can't find a link to this stamp set.

Thanks for spending time with me today, 
come again soon.
Until then:
See if you can make some 2 of 1 projects.


Note the links are only to give a reference so you can
see what the products are.
I didn't necessarily purchase from these sites,
except where specified,
and you may find better prices elsewhere,
I am in no way promoting any particular site.


Tuesday, August 25, 2020

Giraffe Cards

Hi All!
The other day I decided I wanted to play with some 
embossing folders, so I pulled them out and started embossing.
Once they were done I made a bunch of cards.
I'm sorry I don't have the names of the folder or the 
stamp set I used for these cards.
and a blending tool to go over the embossed piece very lightly to 
color the embossed panel.
The giraffe and sentiment were stamped onto kraft card stock
I used the same distress inks to color the edges of them.
For this card, I had some scraps of animal print papers and used them on
the white card base and stamped the giraffe with 
VersaFine Onyx Black ink and the sentiment
with brown Color Theory ink.
I haven't used this stamp set before and I don't know why, because
I love it and I love how these two cards turned out.
Thanks for stopping by today,
come again soon.
Until then: 
use something from your stash that you
haven't used before!


Note the links are only to give a reference so you can
see what the products are.
I didn't necessarily purchase from these sites,
except where specified,
and you may find better prices elsewhere,
I am in no way promoting any particular site.


Thursday, August 13, 2020

Card/Photo Carrier

Hello and welcome to 
Kristie Kreates.
Today I'm showing you a card/photo carrier that I made
for my sweet Aunt Marilyn.
Aunt Marilyn lives in North Carolina and I haven't been able to 
see her due to COVID.
I hope this will cheer her up and give her some smiles.
I wrote a letter to put into it and enclosed some pictures of
our family.  She has never met my daughter in law or granddaughter,
so I thought some pictures would be very welcome.
I stamped the
 onto white card stock with 
then colored it with colored pencils.
The "card" itself is made from 2 envelopes.
The flap of one envelope was glued into the other envelope,
then the outside was covered with  the green paper
and the flower image was adhered on top.
I chose some colorful paper from my handmade background stash for the
inside.  Here you can see where the envelopes open in the center to put 
the pictures inside.
I'm sure that Aunt Marilyn will keep this right next to her chair and look 
at the pictures often.  I know they will make her smile.

Thanks for stopping by today,
I hope you have been inspired in some way.
Come again soon,
until then:
Make something pretty for someone.


Note the links are only to give a reference so you can
see what the products are.
I didn't necessarily purchase from these sites,
except where specified,
and you may find better prices elsewhere,
I am in no way promoting any particular site.


Sunday, May 17, 2020

No line coloring vs. stamped coloring

Hello, I hope you are having a good day!
I've been having quite a time being in the
house on lockdown for so long.
It's been weeks since I have been out and 
seen any friends or my family.
The only time I was out was one day
when I was pretty much force to go out,
as our refrigerator died on us, so we
needed to go buy a new one.  Luckily
everyone we saw at the appliance store was
wearing a mask and keeping their distance.
My creative motivation is down, but when
I do sit down to be creative, it helps a lot
and I do enjoy it.
Today I'm showing you a couple pieces I 
did, similar, but different techniques and
supplies.
I've always loved "no line coloring"
I'm not great at it, but practice makes perfect,
so I decided to give it a go with my watercolors.
I used a very light color, I believe Antique Linen, Distress
ink to stamp the images onto watercolor paper.
I then set about painting the images.
I think they turned out nice, but with practice
I should be able to do better.  
The point of this technique is to not have the 
stamped lines show as such.  All the ink is
blended into the painting and any outlining is
done with the painting.
This one was stamped with 
then colored with colored pencils.
This look is much smoother and cleaner.
It's much easier to control the color with this
technique.
I like both pieces, but the perfectionist in me
likes the second one better.
Have you ever tried no line coloring?
If you want to see how it's done check out
Kristina Werner's video here.
Kristina is one of my favorite artist/bloggers
and does beautiful no line coloring.
Thanks for stopping by today,
see you again soon.
Until then;
Try something new.


Note the links are only to give a reference so you can
see what the products are.
I didn't necessarily purchase from these sites,
except where specified,
and you may find better prices elsewhere,
I am in no way promoting any particular site.


Wednesday, March 4, 2020

Using Embossing Folder with Ink

Hi All!
Welcome to my blog.
Today I have a card to show you that I absolutely
love.
I used an embossing folder, sorry I can't give you the name
of it, as I don't have the packaging for it.
I inked the inside of the folder with 
then ran it through the Cuttlebug.
This embossed it and left the ink 
 around the embossed areas.
I cut the birds with a set of dies that I have,
added that one to the card and made an envelope
for the card and used the others on that.
I used a silver mat, then adhered the panel to a
white card base.
I love how this card turned out.
Very clean and simple.

Thanks for stopping by today.
I hope you'll try inking up your embossing
folders and see what kind of impression you get.
Just remember to clean them after inking them, 
so you don't ruin the next piece you emboss.


Note the links are only to give a reference so you can
see what the products are.
I didn't necessarily purchase from these sites,
except where specified,
and you may find better prices elsewhere,
I am in no way promoting any particular site.


Friday, February 7, 2020

Dorky Bird Card and Cool Cat Envelope

Hello and welcome back!
My last post was a card I made for a little guy
turning 6.  Today I have the card I made for his twin 
sister.
I again used an alcohol ink background.
I stamped "Dorky Bird" with 
and colored it with colored pencils and 
fussy cut the image.
I stamped the Hello and cut it into a banner
and adhered the images with foam tape.
For the envelope I stamped
"Cool Cat" 
and colored him with colored pencils also.
I love how this card and envelope turned out
and I think the little gal they are going to will
like them too.

Thanks for stopping by,
I hope you have been inspired in some way.
Hope to see you again soon,
until then,
Happy Crafting!


Note the links are only to give a reference so you can
see what the products are.
I didn't necessarily purchase from these sites,
except where specified,
and you may find better prices elsewhere,
I am in no way promoting any particular site.

Monday, February 3, 2020

Party Poopers Birthday Card adn a Fishy Envelope

Hi Everyone!
Today I have a card to show you.
Recently a mom in a group I'm in on Facebook
posted that he twins are turning 6 yrs old and that they
love opening mail.  She asked if anyone would be
willing to send them cards for their birthday, just so they
would have them to open from the mail.
Being a card maker, I was happy to help out.
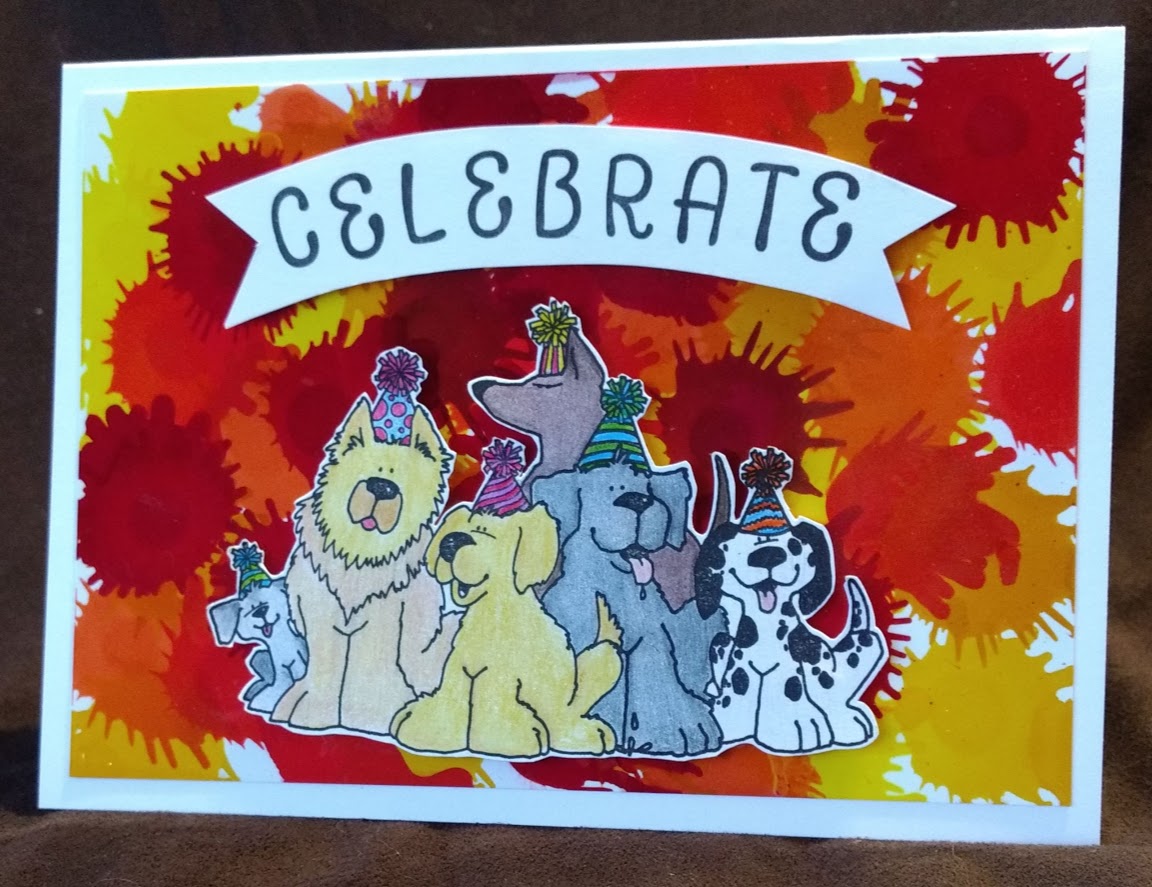
This is the card I made for her little guy.
The background piece was made with alcohol inks 
I thought it was a great background for a celebration.
The dogs are Party Poopers
I stamped the image with 
and colored them with colored pencils.
I fussy cut the image and adhered it to the background
with foam tape to give it a little dimension.
I stamped the Celebrate with an alpha stamp set
from my stash, I have no idea what company they are from.
I then fussy cut around it to make a banner shape.
The whole thing was then adhered to a white card base.
Inside I simply stamped "Happy Birthday"
I made the envelope with my
and decided to decorate it.
I stamped the fish onto the envelope, then stamped them 
onto scrap paper and fussy cut them to make a mask.
I put the mask over the fish (Sm Fat Fish & Lg Fat Fish)
and used Distress Inks to 
apply the 'water' to the envelope.
After taking the masks off the fish I colored them with 
colored pencils.
I covered the colored areas with 
which is a glaze that makes it water resistant, 
so the inks and coloring won't be ruined if they get wet.
I think the little guy will get a kick out of receiving 
this in the mail.

Thanks for spending time with me today,
I hope you have enjoyed it here at
Kristie Kreates 
and will come again soon.
Next up, the card I made for the other twin.


Note the links are only to give a reference so you can
see what the products are.
I didn't necessarily purchase from these sites,
except where specified,
and you may find better prices elsewhere,
I am in no way promoting any particular site.