My Other Pages

To make it easier to read about our trip to Ireland, I have made a page that is just for that. There is a tab above for Ireland Trip 2014 or click on the Home tab to read my other posts. I have also created a new page for My Weight Loss Journey if you are interested in that, click on the tab above.

Friday, March 26, 2021

Placecards Make a Dinner More Special

Hello everyone!
Today I have some place cards to show you.
For St. Patrick's Day we had the kids over for 
corned beef and cabbage dinner.
At the last minute, about an hour or so before they 
were to arrive, I decided to make place cards.  I saw
this little game online and thought I'd use it.
Well sort of.  Since many of the names would be the same
I used it in a different way than the instructions say.
I use first letters of the first names and middle names.
Kelsie, Brad, Me, Dave
Jaryd, Sara, Marie
Turned out that all 3 of them have the same middle initial.
I know we're after St. Patrick's Day,
but I think place cards are nice and make any dinner
a little special.  I usually only do them for holidays,
but they could be done at any time.
They are a quick and easy addition to a special meal.
After dinner we did a couple family pictures.
Back Kelsie, Brad, Jaryd
Front Sara, Marie, Me Dave and Molly
Here are Kelsie, Jaryd, Sara and Marie in the
shirts I made them for St. Patrick's Day.
They love how they turned out.

Thanks for stopping in today,
I hope you have enjoyed this post and have
been inspired in some way.
Come again soon,
until then,
do something different and unexpected.


Monday, March 22, 2021

Marbled Paper with Shaving Cream and a 15 month Old

Hello all!
Sara recently suggested we have a crafting time
with Marie to make some Easter decoration
and what fun we had!
We decided to do some paper marbling with
shaving cream and craft paints.
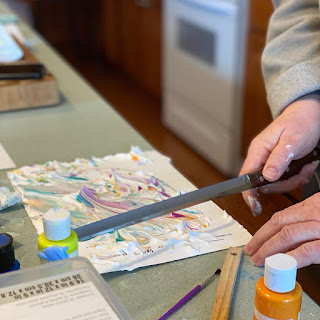
I spread some shaving cream on an old cookie sheet.
Then Marie picked her colors and I put some on top of the
shaving cream and swirled it around with a stick.
Next we laid a piece of card stock on top of the cream,
although Marie was more interested in lifting it up to get
to the shaving cream.
Then I lifted the paper off and scrapped off the shaving 
cream.  We did a couple with those colors then cleaned
up the cookie sheet and did some other colors.
Marie was really into the shaving cream.
She played with it and squished it in her hands.
Sara has learned to give her a pacifier when she is
painting etc. this way she doesn't stick it into her mouth.
Mushing it around with your hands is so much fun.
"What do you mean G-Ma, that you want to
make some pretty papers?  I like making pretty 
hands!"
I had printed out eggs on the card stock sheets
and cut them out once they were dry,
this is how they turned out.


And we made one bunny.
Looks like a Buffalo Bills Bunny to me!
These are some of the pages we got
that I will be using to make some cards
for Marie to send out for Easter.

After she played for a while in the shaving cream,
the colors got pretty mixed together and we ended up
with a very gray print.
I'll still use it to make something though.
I also have a bunch of left over scraps that
I can use.  We'll see what we can do with them.


All in all we had a lot of fun doing this project.
I did cut out some sponge shapes to stamp with,
but Marie was a little over stimulated to give that a try.
We'll do that another day.
I have plenty of crafty ideas for her.

Thanks for stopping in today,
I hope you have enjoyed your time here and got inspired
in some way.
Come again soon.
Until then,
craft with a kid!


Thursday, March 18, 2021

Watercolor and Doodle Card

Welcome to my blog!
Today I'm showing you a birthday card I
made for my daughter, Kelsie.
You may have seen this watercolor piece before, 
as I've had it in my stash for quite a while and 
I'm sure I showed it when I made it.
I put down some colors on a piece of water color paper
and doodled onto it with a black pen.
I haven't done a lot of this kind of artwork, but I do love
how it turned out.  I've been saving this piece for just
the right occasion. And Kelsie's birthday was
the perfect time to make a card with it.
I think she loved it and I know she'll have it 
on display somewhere.
Since it was an odd sized card at 
6"x6 1/2"  I made my own envelope for it with 
some paper from my stash.  She loves
animal prints and I thought this paper had
an animal-ish look to it.

Thanks for coming by today to see what I've
been up to lately!
I hope you have enjoyed your time here and
will come back soon.
Until then,
use something from your stash that you
forgot about.


Sunday, March 14, 2021

St. Partick's Day Shirts

Hello and Happy St. Patrick's Day
I know it's a couple days early, but 
I wanted to give you a look at the shirts
I made for the kids.
Sara requested these and they were really a
breeze to make.
She ordered all the shirts and the HTV and
it was delivered to me from Amazon.
Sara is Irish and we do have some Irish in 
our background, so celebrating St. Patrick's Day
is in the blood.
This is the one I made for Marie.
She ordered larger shirts for her and Kelsie, 
as what do you do with it after the holiday?
Wear it for pajamas, right?  And bigger is better
for that.
Jaryd gets a hoodie.
And last but not least, is Kelsie's.
Here is a look at them all.
I used Chameleon vinyl from Vinyl Frog
This chameleon HTV is pretty cool and
changes color, depending on the lighting.
You can see some of the color change on 
Jaryd's hoodie.  I used the same vinyl on
all the shirts, but you can see different colors
on his and also in the lower corner of the picture.
I used the same type of vinyl, but a different 
brand for the Christmas gifts I made.
Be sure if you use any HTV that you check the
directions.  This brand calls for a cold peel,
the one I used at Christmas calls for a hot peel.
They are both easy to use, just have to be sure you
are using it correctly.
I will say that the cold peel is a bit harder to peel and
it leaves it a little wrinkled, to "fix" that, I pop the item
back into the heat press for a few seconds and
it looks great. Be sure there is always something covering
the vinyl in the heat press or when you iron it.

Thanks for stopping in today and I hope you'll come again 
soon. You never know what you'll see on
Kristie Kreates!


Note the links are only to give a reference so you can
see what the products are.
I didn't necessarily purchase from these sites,
except where specified,
and you may find better prices elsewhere,
I am in no way promoting any particular site.


Wednesday, March 10, 2021

Pocket Birthday Card

Hello and welcome!
Today I'm showing you the card I made for
my hubby, Dave, for his birthday.
This is made from a business envelope with
a window in it.
I simply folded up the envelope so the window
was at the bottom of the pocket that it made.
I stamped the "happy birthday" on a piece of
white card stock with VersaFine Black Onyx Ink
and positioned it inside the envelope,
before I folded and glued it to make the pocket.
I covered the front of the pocket with some 
alcohol ink covered deli paper from my stash.
Then found some woven burlap type embellishment
in my stash and added that and glued the 
postage stamps on top of it.
We are big fans of  Ireland and castles,
so I thought these stamps were perfect for him.
I then made a small tag to go in the pocket.
I used white card stock and inked it with
a couple Distress Inks,
I believe they were 
Broken China
and
I wrote out a greeting in Gaelic
Go n-eiri an t-adh leat
which basically means
wishing you the best of luck
Slainte means cheers
and gra which means love.
I adhered the entire pocket onto
a piece of card stock.
He loved his card, it is sooooo
him!
Here is a link to a video showing how
to make this kind of pocket, there are 
other uses for these, I just chose to make mine
into a card.  She does a bit more elaborate design
in the video, but you'll get the idea anyway.

Thanks for stopping in today.
I hope you have been inspired in some way
and will return again soon.
Until then,
try something new and different!


Note the links are only to give a reference so you can
see what the products are.
I didn't necessarily purchase from these sites,
except where specified,
and you may find better prices elsewhere,
I am in no way promoting any particular site.


Saturday, March 6, 2021

Easy Peasy Crocheted Mittens

Hello crafty people!
A little while ago I got a message from Sara
asking how long it would take for me to make
a pair of mittens.
She and Jaryd had plans for an outdoor 
outing with friends and she could only find one glove.
So, Mom to the rescue!
I happened to have a pair of mittens 3/4 done, but 
didn't have the pattern to finish them.
I went online and found the same pattern and finished
them up that evening for her.
These are crocheted mittens and I made them
double thick by making 4 mittens and putting one 
inside the other and stitching them together at the 
opening.
I got this picture from Jaryd after he took them
home to her.  They are nice and warm for any outdoor
activity.
I also made a pair for Marie, but didn't double them up,
I think doubled would be a bit on the bulky side for
her.
The mittens were such a big hit with 
their friends that Sara told me that Kelsey
would love a pair in olive green.
Since Kelsey is my #2 son's fiance,
how could I not make a pair for her?
After all she's going to be my #2 
daughter in law!
She and Brian came and picked them
up the other day and she was thrilled with them.
Now I'm working on a pair for myself.
These are the easiest mittens to make,
they work up very fast and even with
one layer are very warm.
One skein of worsted weight yarn
can make 2 pair of adults mittens or
one double thick pair.
AND if you make them double thick,
they can be reversible.
If you know how to crochet,
you can make these mittens,
they are easy peasy!
For the pattern in 
all different sizes,

Thanks for stopping by today,
I hope you'll give these mittens a try
and come visit me again soon.
Until then,
keep warm!


Tuesday, March 2, 2021

Baby Animals

Good day my friends!
I'm glad you stopped by for a visit.
Today I'm showing you what I made for my
daughter, Kelsie, for her birthday.
I was talking to Sara asking if she had any ideas
for her and she suggested I make a book for her
to have at her house for when Marie visited.
This is what I decided on.
The cover is covered with a piece of paper that I
had made with some of my ink sprays.
I used a stencil to add the elephant and a 
stamp to add the bird.
For the elephant I used 
Color Theory Clean Slate Ink
for the bird I used
This is the inside of the cover.
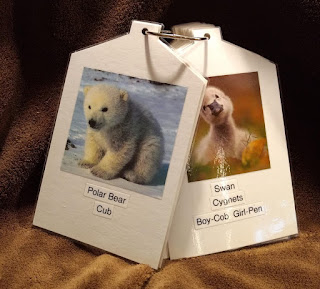
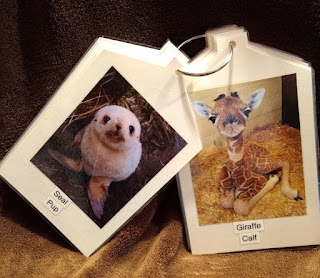
Here are a few of the pages.
I put the name of the animal and what they are
called when they are babies on each page.
to add the names to the pages.
Baby animals are so darn cute.
I learned a few things while doing this book.
Did you know that a baby platypus is called a puggle?
Each of these pages is laminated and then are on
a big ring, the pages can be taken off and rearranged
in any order they want.  I'm pretty sure Kelsie will love
it, she loves little animals, especially if they are babies.
Pretty sure Marie is going to love it too.

Thanks so much for coming by today,
I hope you like my little baby animal book.
Come again soon.
Until then,
create, create, create!


Note the links are only to give a reference so you can
see what the products are.
I didn't necessarily purchase from these sites,
except where specified,
and you may find better prices elsewhere,
I am in no way promoting any particular site.