My Other Pages

To make it easier to read about our trip to Ireland, I have made a page that is just for that. There is a tab above for Ireland Trip 2014 or click on the Home tab to read my other posts. I have also created a new page for My Weight Loss Journey if you are interested in that, click on the tab above.

Tuesday, October 31, 2017

Happy Halloween!

Happy Halloween!
I hope you are enjoying your Halloween.
My children are adults now, so I don't 
have the chance to dress them up anymore
and we don't get trick or treaters at our house
so I don't get a chance to enjoy the kids from our
area either, but I hope you are having some 
Halloween fun.
Here is what I did for some Halloween fun.
I got a wine glass at the Dollar Tree and
used some of my acrylic craft paints to paint this
cute tea light holder.
It took a few coats of each color or paint,
but it went on fairly easily.
I just needed to be sure the paint was really
dried between coats. If not the other layers
can pull up and create a mess.
Don't ask how I know this.
Live and learn!
The hardest part for me was deciding on 
what kind of face to paint on it.
I love how the little vines look like 
little wisps of hair.
Once it was painted and dried,
I coated it with a layer of Mod Podge to 
seal it.  If you don't the paint can scratch off
easily and who wants that when you've put 
time and effort into it.
And the Mod Podge gives it a nice finish.
This is a gift and I sure hope they like it as much
as I do.
Thanks for stopping in today.
I hope you'll try painting something a little
different.  I think there are a lot of cute things you could
do with glasses like this for Christmas, or any occasion
for that matter.
See you again soon!


Friday, October 27, 2017

Cards for Card Drive 1

Hello all!  
It's that time of year again.
Time to be making cards for the
Caring Hearts Card Drive
This card drive is near and dear to my heart.
I've been making cards for it for several years now and
this year will be my 3rd year of helping to deliver cards.
All the cards donated to the card drive go to residents of
nursing facilities.  Although it started in the US and this is the
largest area of recipients, they are also distributed in
Canada, Australia and the United Kingdom.
One of the places I deliver to is Sacred Heart Home,
where my Mom lives.  She and her friends love receiving
the cards and comparing where they have come from.
If you are interested in donating to this card drive,
check out the link above.
I'm late posting about this, the cards need to be in 
by November 17th, so check it out soon.
Here are a few of the cards I have made for the card drive.
I will be posting more in the next few weeks.

One of the things I like about this design, is that I can use
a lot of scrap papers for them.
They are a quick and easy card to make and I think they
turn out great every time.

Thanks for stopping by to see what I've been up to.
I hope you'll come again soon.
Until next time,
try using up some of your scraps! 

Monday, October 23, 2017

Place Mats Into Bags

Hi all!
Today I have something a little different for you.
My friends and I decided to host a weekend scrapbooking crop
this fall.  Our theme is Birthday Bash 
to celebrate the 9th birthday of
My Happy Place Scrapbooking and Crafting Studio
and everyone's birthday.
I got the idea of using place mats to make bags
that can be used for storing and carrying crafting
supplies and/or tools.  I love to repurpose things and
this seemed like a good chance to do so.
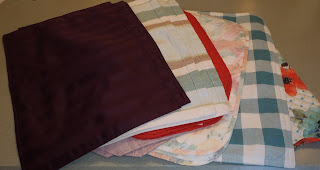
I went to a few thrift stores and picked up place mats
very inexpensively.
This is what I started with.......
and this is what I ended up with.
I simply folded them and sewed them up the sides.
Then folded the other end over to close them.
This is the one I made for myself,
isn't it pretty?
Here it is opened.
I think these little bags could have a lot of uses.
They would be great to carry cosmetics, or hair care items,
or maybe some lingerie while traveling.
Maybe to store your curling iron or scarfs.
Everyone that attends our crop, including my friends 
who planned it with me, will receive one of these
little bags with some goodies in it.
Here is what they will get as their goodie bag.
The bag with 10 - 6x6 birthday themed papers,
a package of birthday themed sticker, a pencil,
candy, a little candle and pretty holder, really you can't have 
a birthday with out candles, right?
And some tickets to win some prizes.
I wrapped up all the gifts with colorful tissue
paper and ribbon and tied a cute wooden tag to the ribbon.
They will be on each 
crafter's table when they arrive for the crop.
I hope they like their little goodie bag as much as
I liked making them and finding the goodies to go 
into them. They will also receive some 12x12 
birthday themed paper, but that doesn't fit into the 
bag.
Thanks for stopping by today,
I hope you've been inspired to 
reuse, recycle or repurpose something.
Come again soon,
until then
Happy Crafting!


Thursday, October 19, 2017

Halloween Envelopes

Hello and welcome!
My last post was about my Halloween cards,
today's post is about the envelopes I made for those cards.
I started by making the envelopes with white card stock
I then stamped images onto the envelopes
and colored them with my Fantasia Colored pencils
This is "Pumpkin Vine Stamp"
QKR Stampede
I drew the banner freehand and added Mom's name.
This is done with 
"Ghost" Eureka Stamps
"Halloween Border"  Eureka Stamps

My friend loaned me this stamp, I don't know
what company it is from.


My friend also loaned me this stamp.
The background with the clouds doesn't show very well
in the pictures, but in real life it turned out pretty cool.
This one I didn't realize that I hadn't colored the 
owl or broom until I took the picture.
I may just leave it white like this, or maybe color the 
broom and leave the owl white.
I have never done any artwork on envelopes before,
but I was inspired by Kristina Werner in 
Kristina is one of my favorite artist and bloggers,
she does a mail art video every month and I've wanted
to give it a try.  This was the perfect time and I loved
the way they all turned out.  I'm sure I'll be doing more
mail art in the future.
If you haven't checked out Kristina's blog you should
do so, she's really quite wonderful and talented.

Thanks for stopping by today,
I hope you were inspired in some way.
Maybe you'll give mail art a try, I hope so.
See you next time, you never know what you'll find on 
Kristie Kreates!


Note the links are only to give a reference so you can
see what the products are.
I didn't necessarily purchase from these sites,
except where specified,
and you may find better prices elsewhere,
I am in no way promoting any particular site.


Monday, October 16, 2017

Halloween Cards

Hello crafters!
It's October, so time to get those Halloween cards ready.
I usually don't send Halloween cards, but
as I've said before, this year I'm trying to send more
cards.  So I decided to make and send some Halloween cards.
Not only to a couple kids, but to adults too.
Here is what I made.
I heat embossed this Sm. Witch 
by Eureka Stamps, sold through 
For the moons, I punched a circle out of card stock
laid it over the black card stock,
smushed the VersaMark Ink pad over the circle hole,
then added gold embossing glitter and heat set it.
On some of the cards I stamped and heat embossed
"Flying by" on the outside,
inside I stamped "to say" with the same silver 
embossing powder and
"Happy Halloween"


For this card I added some 
Ghosts also from Eureka sold through 
Stamp On It.
I attached the witch with an Action Wobble
For this card I used the same Ghost stamp
for the night sky and added some water droplets
to give it a little texture.
I cut the curve on the bottom of the front of the card
For this card I used
from QKR Stampede
sold through 
Stamp On It.
All coloring was done with my 

I'm pretty happy with how these cards all 
turned out and I hope the recipients like them too.
Thanks for stopping by today
I hope you'll come again soon.
My next post, I'll show you the envelopes
I made for these cards to be sent in.
Until then,
Have fun crafting!


Note the links are only to give a reference so you can
see what the products are.
I didn't necessarily purchase from these sites,
except where specified,
and you may find better prices elsewhere,
I am in no way promoting any particular site.


Friday, October 13, 2017

Engagement Card

Hello Friends!
Many of you know that my son, Jaryd, recently got engaged.
He and Sara will be getting married September 29, 2018.
I made this card for them to celebrate their engagement.
The image is
from Eureka Stamps now sold by
I stamped the heart design onto white 
card stock with VersaMark Ink and 
heat embossed it with silver embossing powder.
I then used Distress Ink and an ink blending tool
to cover the entire image with ink.
Once that was done I buffed off any ink that was 
on the silver embossing.
I fussy cut the image leaving a small border 
around the image.
For the background panel, I used a piece of
silver card stock and ran it through the 
Cuttlebug in a heart embossing folder.
I adhered the panel to a white card base and
used foam tape to adhere the Knot Heart to 
the panel.
I love the way the card turned out,
it is perfect for Jaryd and Sara,
as Sara is Irish and Jaryd is part Irish and has
visited Ireland a couple times.
Purple and gray will be their wedding colors.
I think they will like it.

Thanks for stopping by today,
I hope you're having a creative day.
See you next time.


Note the links are only to give a reference so you can
see what the products are.
I didn't necessarily purchase from these sites,
except where specified,
and you may find better prices elsewhere,
I am in no way promoting any particular site.


Tuesday, October 10, 2017

Crazy Dog Card

Hello friends!
Today is another card from my 
unused stash of goodies.
I love the dogs from the 
They are just so darn cute and bring a smile to 
my face, they have such personality!
I colored this card using my 
watercolor crayons for the dog as well as the
sky and grass.
Inside I stamped this sentiment from the 
from Cas-ual Fridays Stamps.
I added a little Glossy Accents to his nose and tag
to give a little shine.
I also made an envelope, since it is a square card,
Did you know square cards cost more to mail?
I made the envelope a bit larger than the card, in 
a rectangular shape to avoid the extra postage.

Thanks for stopping by to see what I've been up to,
I hope you have a wonderful day and 
create something fun.


Note the links are only to give a reference so you can
see what the products are.
I didn't necessarily purchase from these sites,
except where specified,
and you may find better prices elsewhere,
I am in no way promoting any particular site.


Friday, October 6, 2017

Firefly tag card

Hello crafty people.
Today I have another project to show you
from my stash of unused "stuff"
Quite a while ago I made this tag, but never used it.
I used alcohol inks and deli paper to make the
background paper, then glued it to a manila tag.
I then stamped the images with Versafine Onyx Black Ink
and then the tag sat for a long time.
I decided I wanted to make it into a card.
I used Distress Inks to give a white card base
a different color, then simply adhered the tag
to the card base.
I stamped this so long ago, that I have no idea
about the names of the stamps or even what company 
they are from.
My friend, Jen, absolutely loved this tag
so I decided to make it a card for her.
I stamped this sentiment inside the card with
Color Box Chalk Ink and it wasready to go. 
This sentiment is True Friends and can be purchased
I also made an envelope for this card with my 

Thanks for stopping by today,
I hope you have been inspired in some way.
Maybe you'll dig into your stash of
"stuff" and come out with something
that you started and never finished.
Until next time,
Be Creative!


Note the links are only to give a reference so you can
see what the products are.
I didn't necessarily purchase from these sites,
except where specified,
and you may find better prices elsewhere,
I am in no way promoting any particular site.


Monday, October 2, 2017

Kitty card

hello!
This card I'm showing you today is one I made for 
my Aunt Marilyn.  Aunt Marilyn is my Mom's best friend.
They have been friends for well over 80 yrs.
Aunt Marilyn just turned 94 and I wanted to make a card for her.
She loves cats and this is perfect for her.
If you don't know Jennifer McGuire, you need to go to her
blog and check out her videos.  She is amazing and knows more
techniques than anyone I've ever seen.
I learned this technique from her blog.
I believe she calls it "double embossing"
I used a piece of black card stock, covered it with 
VersaMark Ink then embossed it with clear embossing 
powder.  Next I stamped the cat 
 in VersaMark and embossed it
with silver embossing powder, the same with the hello.
When the second embossing is done over that clear embossing,
the silver kind of sinks into the clear and creates a very cool look.
It doesn't look or feel like 2 layers.
For the inside of the card, I used a set of individual 
tiny letter stamps to stamp 
"peeking in to say' 
from Stamp On It
I wanted the sentiment to pop so I matted it onto
black card stock.
I know my Aunt will love this card that was
made especially for her.

I'm glad you stopped by today.
If you don't already visit
pop over and watch her videos, 
she's really quite amazing.
Come again soon,
Until then I hope you'll 
try something new!


Note the links are only to give a reference so you can
see what the products are.
I didn't necessarily purchase from these sites,
except where specified,
and you may find better prices elsewhere,
I am in no way promoting any particular site.