My Other Pages

To make it easier to read about our trip to Ireland, I have made a page that is just for that. There is a tab above for Ireland Trip 2014 or click on the Home tab to read my other posts. I have also created a new page for My Weight Loss Journey if you are interested in that, click on the tab above.
Showing posts with label heat embossing. Show all posts

Sunday, December 18, 2022

Congrats Card with Mulberry Paper

Hello!
Today I have a very simple, but beautiful card to show you.
I love the look of torn mulberry paper.
To tear mulberry paper, use your wet finger or a
wet paint brush and run it along where you want to
tear it.  Once it's wet just pull it apart,
this will give it the feathery edges like on this card.
The 'congrats' was heat embossed with white 
embossing powder onto gold metallic card stock.
I simply layered the mulberry paper onto some metallic
gold card stock, added the greeting and adhered it to
a card base and the card was done.
So quick and easy and any greeting could be used
on this type of card.
You can make it masculine or feminine, whatever
you are in need of.

Thanks for stopping by today and checking what I've
been up to lately.
I hope you will come again soon.
Until then,
experiment with different kinds of paper.


Saturday, December 10, 2022

Heat and Dry Embossed Card

Hello everyone!
A couple posts ago I showed you a couple cards
that I made with embossing folders and the
letterpress technique.  Today I have another 
card to show using an embossing folder.
For this card, I rubbed a VersaMark Ink pad
over one side of the inside of the embossing folder.
I used a heavier hand and the ink got the raised areas
as well as the lower areas.
I added a piece of white card stock and ran it through
my Cuttlebug.
I then added silver embossing powder and heated
it until it was melted.
I think it gives this a look of night time
in a forest and I love how it turned out.
I added that little bird and that finished off the
card.  This could be used for any occasion.
I really need to try some of my other embossing
folders with this technique.

Thanks for stopping by today, I hope you 
have been inspired in some way.
Come again soon,
until then,
emboss something!


Friday, September 16, 2022

Sequined Cards

Hello!
Welcome to Kristie Kreates.
Today I have a few cards to share with you.
They were made after seeing 
this video by Marion Emberson
I loved the technique she used and decided to 
do my own cards inspired by hers.
Of course mine don't look like hers,
but as I always like to say
"Inspiration not replication"
A short explanation of the technique is
that I put glue across the middle of the
panel, then using a brush spread the glue 
out to either side of the panel.
I then applied embossing powder and heated it
until it was all melted.
Once everything was embossed, I added another line
of glue and sprinkled sequins onto the glue and let it
dry.  I love how my cards turned out.
This technique can have many different looks,
depending on the amount of glue you use and how
much you spread it out.  Also what kind of 
embossing powder and the colors makes a big
difference.
Hop on over and watch Marion's video and see how
her cards turned out.

Thanks for spending time here at Kristie Kreates,
I hope you will come again soon.
Until then,
emboss on!


Sunday, September 4, 2022

You Make My Heart Smile

I'm Back!
Covid knocked me for a loop, but I'm pretty much
back to my usual self.  And I tested negative the other day.
Turned out the entire family, including my 2 month old Grandson
ended up with Covid, but luckily, we are all recovered now.
Today I have a card to show you that I made for my Granddaughter,
Marie.  I love to send her cards in the mail now and then.
After all who doesn't love to receive mail?  Especially a 2 yr old.
I used one of the Embossing Powder Backgrounds that
I showed in this post.  They are fun and easy to do.
I chose this one, because pink and purple are her favorite
colors.
The sentiment and heart were stamped and heat embossed also,
then fussy cut and adhered to the card.
Having some backgrounds ready to go in your stash makes
it quick and easy to put a card together.
Marie loved this card and when I was over visiting after she
received it, she brought her card to me, rubbed her fingers over the
embossing and asked "What is this stuff?"
I told her that it was embossing powder and that I'd show her
how it works one day soon.  
She already loves stamping, I'm sure she'll love the 
magic of heat embossing too.

Thanks for stopping by to see what I've been up to.
I hope you have been crafting and having some fun 
being creative.
Come again soon, until then
make a card and bring a smile to someone's face.


Sunday, August 21, 2022

Embossing Powder Background Technique

Hello Everyone!
I'm glad you have decided to spend a little time with me
today.  I have a technique to show you today and I 
hope what I tell you will make sense and you'll be able
to give it a try.
This is the card I made for my son for his
30th birthday this month.  I used this technique
to make it.  For lack of a better name I call it
embossing powder background technique.
The pieces I'm showing you when I explain the technique 
are not pictures of the background I used for the card, but
just the technique.
I started with some plain white card stock.
I put glue onto the card and spread it around with 
my finger.  Then added embossing powder and
heat set it.
On some pieces I use the glue in smaller spaces.
Unfortunately, I didn't remember to take pictures as I 
went.  I was so engrossed in experimenting, that it totally
slipped my mind.
I just kept adding glue in different areas and adding colors.
I tried different ways of applying the glue also,
I brushed it on with a brush, with a q-tip and right from the
bottle and just let it go where it wanted to go.
Just don't get it too thick.
Each layer of embossing powder changes the look,
and I found that the more layers there were, the more texture
I got.  It also depends on the brand and type of powder you have.
Some are chunky and some are fine, or anywhere in between.
I'm sorry I don't have more pictures to show you, but here is a
video from  Marion Emberson showing the basic idea of how to
do this technique.  I don't have the same products as she does,
I used what I have and experimented a bit with it.
I also gave some VersaMark Ink a go and swiped it on with
a make up sponge.  The glue and the VersaMark both worked great.

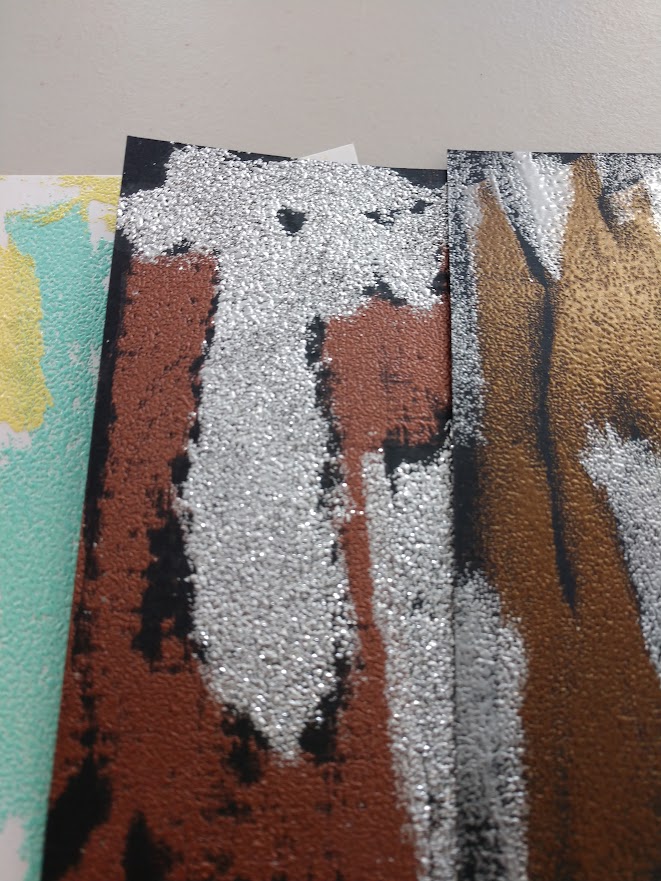
These are the pieces I created.
Here they are a little closer.
Click on the pictures and you can see them larger.
This one I used a silver sparkle embossing powder,
you can see that the results are different than the other
powders.  Not only the sparkle, but the texture also.
This is the one I used for Jaryd's card,
It was my favorite of the bunch.  
I thought the colors blended beautifully.

I hope you have been inspired in some way today,
and maybe will give this technique a try.
Be sure to watch the video linked above to 
maybe understand the technique a little better.
I hope you'll come again soon.
Until then,
emboss away!

Monday, May 16, 2022

Embossing Powder Technique

Hello!  I'm glad you are here for a visit.
Today I have a few cards to show you.
I saw this video where embossing powder was used on
parchment paper and she was able to peel it up to use
as an embellishment.
I didn't have any parchment when I wanted to give it a go,
so I tried a couple other kinds of paper.
Nothing worked the way it did in the video, but I still
got some interesting backgrounds to use.
This one was done on gold vellum.
I heat embossed the sentiment to add to the card front.
This one, I used the backing from some labels
thinking that since it was a type of release paper,
the embossing may peel off.  It didn't, but 
I used the background anyway.
This is another one done with the 
label release paper.
Here is another one from the vellum.
This one I did on a shiny silver metallic card stock
and I think it may be my favorite.
This one was done on a piece of deli paper.
Although none of them worked out the way they
did on the video, I'm happy with how they turned out and
the cards I made with them.
I've re-watched the video and plan to give it a try
with the parchment paper that she suggests using.
I'll surly post what I get when I try it the way she 
shows in the video.
Never hurts to give new techniques a try, even when they
don't turn out how you hoped.  I love how these cards turned out and
I've already used a few of them.

Thanks for stopping by today,
I hope you have been inspired in some way and will 
come again soon.
Until then,
watch a video and learn a new technique.

Saturday, November 6, 2021

Anniversary Card

Good day blog fans!
Today I'm showing you the Anniversary card I mad
for our son and daughter in law.
I stamped the
Large Knot Heart
from Eureka stamps, now sold through 
Stamp On It, onto card stock with VersaMark ink.
I then heat embossed it with silver embossing powder.
The sentiment was also heat embossed, but on
The sentiment was wrapped around the image
panel and adhered to the back.
I then layered it onto white card stock and 
more of the silver vellum, then onto a 
card base.
Since this card was a odd size, I made my own

Thanks for stopping in today,
I hope you are having a wonderful day.
Come again soon.
Until then,
try some heat embossing.


Note the links are only to give a reference so you can
see what the products are.
I didn't necessarily purchase from these sites,
except where specified,
and you may find better prices elsewhere,
I am in no way promoting any particular site.

Wednesday, January 6, 2021

Colors and Numbers Book

Hello crafty people!
Today I'm showing you one of the gifts I made
for my granddaughter for Christmas.
This is a color and number book.
I've made a few projects similar to this in the past,
but never put them into a book like this.
I thoroughly enjoyed making it. 
The cover is made with canvas.
I had just gotten a pad of canvas at a clearance sale, so 
it worked out perfect for this project.
I used various colors of 
to color the canvas.  I love how it turned out.
On the first page, I put a pocket with a tag with a
message for Marie and added a piece of paper colored 
like the cover.
Then the fun begins,
each page has a library pocket that I laminated with 
a tag, also laminated, that has a color and number.
As you can see, this one had one red heart.
I have the color spelled out along the side of each page.
Each tag was made with different techniques.
Some were stamped, some were drawn and cut out.
Some were simple shapes and some were heat embossed.
Some were done with ink and stencils.
I also matched the ribbon on the top with the color
for that tag.
Here is the back of the book.
I think it turned out darling and I hope Marie will
love it and learn from it.

Thanks for stopping by today,
I hope the new year is starting out great for you.
Come visit again soon.
Until then,
stay safe and stay healthy.


Note the links are only to give a reference so you can
see what the products are.
I didn't necessarily purchase from these sites,
except where specified,
and you may find better prices elsewhere,
I am in no way promoting any particular site.


Friday, March 22, 2019

Tags - Foliage

Hello blog friends.
Today I have another tag post for you.

These were made with an alcohol inked background.
I used "Further Around The Edge" stamp set from
 Dyan Reaveley to stamp the vine design
 and heat embossed it with gold embossing powder.

For these 2 tags I used alcohol inks on silver card stock,
then stamped them with a variety of leaf stamps using
Alcohol Lift Ink.
The Alcohol Lift Ink does just what it say, it lifts the ink
off the card stock, leaving the design of the stamp.
Once it is lifted, you can take that stamp and stamp
the "lifted ink" onto another surface.
I would encourage you to watch some videos on this
product and technique and give it a try,
it's fun and gives a great look to projects.

Thanks for stopping in, come again soon.
Until then,
try something new.


Note the links are only to give a reference so you can
see what the products are.
I didn't necessarily purchase from these sites,
except where specified,
and you may find better prices elsewhere,
I am in no way promoting any particular site.

Tuesday, February 26, 2019

Tags - Stars

Hi All.
It's tag series day.

These tags were made with white card stock
cut to size then stamped with
stars from a Dyan Reaveley stamp set.
(I can't find this set to link online, but
any set would do.)
I used VersaFine Crimsom Red Ink to stamp the stars
on the tag. I stamped and heat embossed the small
stars with silver embossing powder, then fussy cut them.

I used red metallic thread to make a little
nest of thread, glued it to the tag and topped it
with the silver star using foam tape.

I hope you have enjoyed your visit with me
and were inspired in some way.
Come again soon,
until then
bring a smile to someone's face


Note the links are only to give a reference so you can
see what the products are.
I didn't necessarily purchase from these sites,
except where specified,
and you may find better prices elsewhere,
I am in no way promoting any particular site.

Saturday, June 30, 2018

Thanks

Hello fans!
I'm back, it's been a while since I've posted any
new projects, but I'm back at it.
I have had some time to create and will try to
post often again.

Today I'm sharing a card I made for friends that 
we visited on our trip south.
I, like many others, have become enamoured
with the string pulling that has become the
latest rage.
I am having a lot of fun with this technique,
if you are interested, check on YouTube for 
"string pulling"
you will find a lot of great videos there.
For this image I used plain white string,
you can use any kind you like, and 
The "thanks" is embossed with
In this picture, you can see the shimmer and shine
that the mat around that pink image has.
I love how this card turned out and have
plans to make more cards with these 
string pulled images.

Thanks for stopping in today,
come again soon.
Until next time,
try something new!


Note the links are only to give a reference so you can
see what the products are.
I didn't necessarily purchase from these sites,
except where specified,
and you may find better prices elsewhere,
I am in no way promoting any particular site.


Wednesday, April 4, 2018

Unicorn Envelope

Hi everyone! 
Have you ever been out shopping and see something
that you know you just have to pick up and send to a friend
or family member?
That's what happened one day when I was browsing around
in Michael's.
I found the cutest stickers that had unicorns,
I had to get them for my little God Daughter, Andrea.
She absolutely is all about unicorns, I guess at 6 yrs old
that is pretty normal.
My problem was that I didn't have an envelope that they would
fit into.  I wanted to send them to her rather than wait until
I saw her again.  Doesn't everyone love to get mail?
So I made an envelope to fit them.
I have a pad of paper that I picked up at Hallo's, 
which is a paper store in Brunswick, Ohio.
They have all kinds and sizes of paper and this pad 
is large, sturdy paper.
I made the envelope and stamped and heat embossed 
images all over it, leaving space for the address, return
address and stamps.
I think it turned out pretty cute and I'm sure she'll 
love getting this in the mail.
I had a lot of fun making this for Andrea.
Have you ever decorated any envelopes?
I love doing it, but don't do it all that often,
need to take the time to decorate them more.
How fun to get something pretty in the mail?!?!
Thanks for stopping by today,
I hope you'll give mail art a try,
if you need some ideas, a great place to get 
inspiration is from
Kristina Werner,
she does a mail art video every month.
Kristina is one of my favorite artists,
check her out, you won't be disappointed, 
she does beautiful cards too.
Until next time,
give mail art a try!


Note the links are only to give a reference so you can
see what the products are.
I didn't necessarily purchase from these sites,
except where specified,
and you may find better prices elsewhere,
I am in no way promoting any particular site.


Friday, October 13, 2017

Engagement Card

Hello Friends!
Many of you know that my son, Jaryd, recently got engaged.
He and Sara will be getting married September 29, 2018.
I made this card for them to celebrate their engagement.
The image is
from Eureka Stamps now sold by
I stamped the heart design onto white 
card stock with VersaMark Ink and 
heat embossed it with silver embossing powder.
I then used Distress Ink and an ink blending tool
to cover the entire image with ink.
Once that was done I buffed off any ink that was 
on the silver embossing.
I fussy cut the image leaving a small border 
around the image.
For the background panel, I used a piece of
silver card stock and ran it through the 
Cuttlebug in a heart embossing folder.
I adhered the panel to a white card base and
used foam tape to adhere the Knot Heart to 
the panel.
I love the way the card turned out,
it is perfect for Jaryd and Sara,
as Sara is Irish and Jaryd is part Irish and has
visited Ireland a couple times.
Purple and gray will be their wedding colors.
I think they will like it.

Thanks for stopping by today,
I hope you're having a creative day.
See you next time.


Note the links are only to give a reference so you can
see what the products are.
I didn't necessarily purchase from these sites,
except where specified,
and you may find better prices elsewhere,
I am in no way promoting any particular site.


Saturday, September 16, 2017

Card for Julie

Hello fans!
Recently I was invited to a birthday party for my
daughter's boyfriend's nephew.  It happened that his birthday
and his grandma's are on the same day, so I wanted to also
give something to Julie.
I wrapped up some of my handmade cards as a gift and
wanted to make a card for her.
This is the card that I made for her.
I started with a background stamp and stamped 
it onto white card stock with VersaMark Ink and 
heat embossed it with Silver Embossing Powder.
Once I trimmed it down I adhered it to a piece of
silver card stock, then onto a white card base.
I know this isn't a great picture, but I wanted to show
the shine on the embossing and the silver mat.
For the inside, I stamped and embossed this greeting, 
which was a stamp in my stash.
She loved the card as well as the ones I gave her as a gift.

Thanks for stopping by today,
I hope you'll come again soon, next time
I'll be showing you what I made for Lennon,
the little guy the party was for.
Until then,
Happy Stamping!


Note the links are only to give a reference so you can
see what the products are.
I didn't necessarily purchase from these sites,
except where specified,
and you may find better prices elsewhere,
I am in no way promoting any particular site.


Sunday, July 2, 2017

Card with Kit and Clowder Image

Hi blog friends!
Have you ever heard of Kit and Clowder?
I have heard a lot about their online classes on one of the blogs that I follow.
They have classes teaching all kinds of coloring techniques,
I know they have some free ones if you'd like to check them out.
I'm on their e-mail list, so I was sent an e-mail before Mother's Day
offering a free digital download.
This beautiful floral image was what they were giving free and I
loved it.  I had already made my Mother's Day cards, so decided to 
use it for some birthday cards.
For this card I colored the flowers with colored pencils,
then cut a circle with a die, stamped the sentiment
(Happy Birthday from Biblical Impressions)
and adhered it to the circle area of the image.
I added a few sequins and the card was done.
For this card, I colored the image, then cut the center out to
make it into a shaker card.
I adhered some clear acetate to the back of the panel,
put foam tape around the hole, added some sequins and micro beads
and covered the back with white card stock.
For the sentiment I heat embossed the "happy"
with white embossing powder onto a piece of vellum,
wrapped it around the front panel and adhered it to the 
back of the panel.
Inside I stamped "birthday"
The sentiment stamps are from the
"Big Scripty Words" set from Lawn Fawn.
I love that I can size this digital image to whatever size I want
it to be. I also love being able to alter the image and do something
a little different with it.

Thanks for stopping by to see what I've been up to,
I hope you've been inspired in some way.
Until next time,
go try something different to stretch your images.


Note the links are only to give a reference so you can
see what the products are.
I didn't necessarily purchase from these sites,
except where specified,
and you may find better prices elsewhere,
I am in no way promoting any particular site.