My Other Pages

To make it easier to read about our trip to Ireland, I have made a page that is just for that. There is a tab above for Ireland Trip 2014 or click on the Home tab to read my other posts. I have also created a new page for My Weight Loss Journey if you are interested in that, click on the tab above.

Tuesday, July 31, 2012

Well blog fans, I'm making a little dent in my Christmas cards!
Here is one I made using
Lg Wrapped up Kitty and Puppy (#17802)
From Eureka! Stamps and
Tree (#14501) from
I started this card by stamping the "Lg Wrapped up Kitty and Puppy" onto white cardstock and coloring it with FlexMarkers.
I fussy cut the image, adhered it to red cardstock and fussy cut it again.
Then I was trying to figure out what to do on the front of the card, I came across a piece of the vellum and thought it would work great with this cute image.  But it just wasn't working until I spotted the "Tree" image what I had already colored with water color pencils and fussy cut.
I don't have a clue what I had planned to use it for, but there it sat, waiting for me to use it.  So I adhered it under the vellum and I love how it looks.
I love the pine tree and the sprigs on the vellum together.
Don't ya just love when things work out like that?!?!

Have you started your Christmas cards yet?
Why not pop into the Eureka! Stamps or QKR Stampede shops and see what you might like to use to get started?  There are lots of wonderful images that you can use for Christmas cards in both shops.

Thanks for stopping by today, hope you enjoyed your stay.
Come again soon.

Until next time, Happy Crafting!

Monday, July 30, 2012

The Selflessness Project

Last week I came across this story
and decided to make a card to send out to Matthew for his project.
Here is the card I made at My Happy Place.
I used some distress inks for the background and FlexMarkers to color the
"Flying Girl Holder" (#21701)
"Oval Balloon" (#5201)
and "Heart Balloon" (#5204)
which are all images from Eureka! Stamps
The grass is stamped with
"Field Grass Right" (#38925)
The girl and balloons were fussy cut and adhered to the card with foam tape.
I hope you'll read the story about this little boy and maybe make a card or two to send off to him for his project.
On their facebook page his Mom says they have already surpassed his goal and it is bigger than they ever imagined and I'm sure it's going to keep on growing!
 and see what you would like to use to make some cards.

Thanks for stopping by today, leave a comment if you will and
come again soon!

Until next time, Happy Crafting!

Sunday, July 29, 2012

Happy Birthday with banners

Banners seem to be all over the blogosphere these days and I do love them.  I haven't done a lot with these little guys, but today I have a card for you with some banners that was inspired by one that
Kristina Werner showed on her blog.

I got all my paper from my scrap stash.
for the sentiment I used
"Happy Birthday" (#22803)
from QKR Stampede
I used embroidery floss to string the banners together.
This simple card would be great for a guy, don't ya think?
It would be easy to make up quick if you suddenly need a card.
It goes together in no time at all.  I left the inside blank to write my own message or stamp one when I am ready to use the card.

Thanks for stopping by today, I always appreciate comments and feed back.
Come again soon.

Until next time, Happy Crafting!

Thursday, July 26, 2012

Upcycled Card

Hello blogger friends!
Today I have a card to show you that was very simple to make.
I used "Just a Note" (#6405)
from  Eureka! Stamps for this card.
I was playing around with papers trying to match up some colors and patterns, which I sometimes have a tough time doing.
My friend, Marie, had just opened a package of paper that she bought and gave me the "cover sheet"
You know the one, it shows little swatches of the papers inside.
Now I didn't have to hem and haw over what would match,
the work was done for me and I was upcycling too.
I punched squares out of the different patterns with a punch,
arranged and adhered them to a piece of paper from my stash.
I then ran it through the Cuttlebug in an embossing folder.
I love how it looks with the embossed flowers on the patterned paper!
This I adhered to a white cardstock base.
I used the "Just a Note" stamp on another scrap and trimmed it down.
Blue and pink embroidery floss were wrapped around it and tied into a bow then it was adhered to the card.
What an easy note card!  And I think it's quite lovely.

Thanks for stopping by today, I hope you've gotten some inspiration.
Leave a comment if you will and come again soon.

Until next time, Happy Crafting!

Tuesday, July 24, 2012

Get Well Card

Welcome bloggy friends!
Today I'm showing you a get well card that I made for a fellow crafter.
Doris comes to My Happy Place from time to time and her daughter, Jen is one of our regulars, who I have become good friends with.
Doris recently suffered a heart attack and I wanted to send her a card,
so I made this one for her.
For this card I used
"Crazy Kitty Set" (#32111)
and "Thinking of you" which is from a set I borrowed from a friend,
I believe it was by Inkadinkado.
"Crazy Kitty Set" come with this adorable cat and paws.
I stamped him onto white cardstock and colored him with FlexMarkers
and I think he is just adorable.
Inside I used some white cardstock and punched he edge with an
EK Success border punch.
I hand wrote " Peeking in to say I hope you are feeling better every day."
I sure hope Doris likes her card. I think she will, she is an animal lover and she loves handmade cards.  How could I go wrong?
Thanks for stopping by today, leave a comment if you will.
Come again soon!
Until next time, Happy Crafting!

Friday, July 20, 2012

QKR Stampede July Blog Hop

Hello and welcome to my blog!
Today is the first QKR Stampede Blog Hop with the new
Design Team Ladies. 
I'm pleased to be joining them for this hop
and welcoming them all to the team. 
Although I'm not a "full" team member,
I will be joining them from time to time for hops.
I will also be posting projects made with my QKR images here on my blog and from time to time on the QKR company blog.
If you have just happened upon the hop, you will want to start at the beginning.  I know you won't want to miss meeting any of these talented ladies and seeing what they have to inspire you.
If you have come from Katie's Blog, you are on the right track.
This month for our intro hop the theme is "anything goes" so I have decided to show you one of the Christmas cards I've made.
(I'm trying to get done early this year.)
Sorry for the poor photo, the cardstock is foiled and even without the flash it has a glare. 
I know it looks kind of plain, but when you open those little windows,
that's when you see the best part of the card.
The images I have used are available through QKR Stampede as well as our sister company Eureka! Stamps.

"Christmas Balloon" (#ES16402)
was used for the first window.  I stamped it onto white cardstock and colored it with FlexMarkers, then covered it with Glossy Accents.
"Reindeer Balloon" (#ES2606)
was used for the second window.
Again, colored with FlexMarkers
 and a bit of Glossy Accents used on his bells and nose.

Snowman Balloon (#ES11805)
was used for the third window.
He was colored with FlexMarkers and covered with Stickles.
I hope you will take a minute to check out the whole
"Balloons/Holders" category in the QKR Stampede store,
 there are tons of great images, not only for Christmas,
but for other occasions too.
Now I'm sending you off to see what lovely project
 has for you on her blog.
Thanks for stopping by, leave a comment if you will and come again soon.
Until next time, Happy Crafting!

Thursday, July 19, 2012

Pop up I "heart" U

Today's card was inspired by one I saw on Pinterest. 
Unfortunately, I don't know whose blog it came from,
so I can't give credit where credit is due. 
If you recognize it, let me know and I will give credit.

Pop up cards are always fun and not nearly as hard to make as you'd think.
This one is a little tougher to figure out a template for, but it's really just a matter of cutting and folding.

On the front of the card I used
"I am Blessed" (#36313) and
"Swirl Heart" (#32402)
They are both stamped onto white cardstock, then I added some little self stick bling to the heart.
I used stones from a bling word that I found at one of the big box craft stores for a 50 cents.  You know how they have them marked down sometimes, because they are names or words that no one buys?
I buy them and just use the individual pieces, they cut apart easily with a craft knife or scissors.  So don't pass them up because your name isn't Yolanda, find the longest name or word you can find in the bin and pick them up cheap.

And here is the pop up inside of my card.
Isn't is cool?

Thanks for stopping by today, leave me a comment and let me know what you think of my card.
Then why not stop in to the Biblical Impressions online store
and see what great stamps you can find to go with a cool pop up card of your own?!?!

Until next time, Happy Crafting!

Tuesday, July 17, 2012

Thinking of You

Hello bloggy friends!
Today I'm showing you a simple card that I made using
"Baroque Background" (#57701)
and
"Thinking of You" which I have no idea who it is made by.
I made this card at a crop and must have borrowed
the stamp from one of the other gals.
The Baroque Background was stamped onto white cardstock and cut to fit the card base of white cardstock.
I stamped the Thinking of You onto white cardstock with Versamark ink and embossed it with white embossing powder.
I then used the same ink pad with a direct to paper technique to color the cardstock and punched it out with a circle punch.
I tied a bit of embroidery floss onto the card and used foam tape to adhere the sentiment over it.

This simple card can be used for any number of occasions.

Thanks for stopping by today, leave a comment if you will
and come again soon.

Until next time, Happy Crafting!

Saturday, July 14, 2012

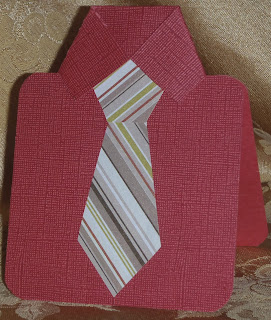
Shirt and Tie

ETA:  A follower let me know in a comment that it was actually a tutorial that SHE had done for Split Coast Stampers that I had seen this card from.
I had only seen the picture of her card and not the tutorial, so my insturctions are a little different. 
Thanks Susan aka Rainy!
Her tutorial can be found HERE!

I know Father's Day is past, but when I saw a shirt card similar to this on Pinterest, I had to make one.  It really is very easy and I'm sure there is a tutorial written up somewhere, but I will tell you really quickly how to make one.

Cut a piece of card stock to 11" x 4 1/4"
Score it at 5 1/2" and fold in half.
Measure down about 1 1/4" from the fold of the card on the right and left of the card.
Now measure in from each side of the card at that 1 1/4" mark about 1"
Cut in to that 1" mark.
Turn the card over to the front and fold forward to make the collar. 
The top corners of the card should meet in the center.
Don't worry if the cut goes farther in than the fold.
Make a score line between the cuts, this is where your card will fold to open.
If the underside of the collar shows when you look at the card, trim some of it off.
Use a corner rounder to round all the corners.
This is all there is to making the shirt.
I'm sorry I don't have a template for the tie.
I just used some scrap paper and a ruler and scissors and played around with the size until I like the demensions and then used it as a template.
I made one piece that is the knot and one that is the rest of the tie.

Once you have your tie on the card, you may want to glue down the collar and you will be done.

I hope this has made sense to y'all.  If you have any questions be sure to leave a comment or e-mail me.  My addy is at the right of my blog.

Thanks for stopping by today,
come again soon.

Until next time, Happy Crafting!

Thursday, July 12, 2012

Coloring partial images

Hello and welcome!

Today's card is made with
"Butterfly and Sunflower" (#20801)
I wanted to do something a little different with this card and decided that I would do this technique where you only color part of the image.
I stamped the image onto a piece of white cardstock cut to a strip smaller than the image.
I colored the image with FlexMarkers.
I then stamped the image onto the peach colored cardstock and adhered the colored image over it to line up exactly.
I think it could be a much more dramatic look with a narrower strip of white, but I wanted to have the entire butterfly colored.
Next time I will probably use a taller image that will have more uncolored on the background cardstock.
The ribbon I used is some lovely satin ribbon from May Arts.
I'm pretty pleased with how this card turned out.
Why not pop into the Eureka! Stamps site and see what images you might want to use this technique with?

Thanks for stopping today, leave a comment if you will
and come again soon.

Until next time, Happy Crafting!

Wednesday, July 11, 2012

Scored Tulips

Hi!  Hope you are having a lovely day!
Today I have a card that I made with
"Tulips" (#31705) from Biblical Impressions.
I stamped the image onto white cardstock with Memento black ink and colored it with FlexMarkers.
I then used the "out of the box" technique to cut the image
and outlined the box with a journaling pen.
The background paper was scored using my Score Pal
and sanding with a sanding block.
The fiber was some from my stash.
This card could be used for any number of occasions or just to say hello.

Thanks for stopping by today.  I hope you have been inspired to make something pretty.
Come again soon.

Until next time, Happy Crafting!

Monday, July 9, 2012

Eureka! Stamps Blog Hop

Hello and welcome to my post for the
 Eureka! Stamps Blog Hop
If you have just happened upon the hop you'll want to start at the beginning so you can meet all the design team ladies and see what wonderful inspiration they have for you. This is a very talented group and I am pleased to be working with them for the next 6 months.
We are introducing our new Design Team
and our theme is "anything goes"
If you arrived from Katie's blog, you are right on track.
Now for my card.
Today's card uses two different stamps.
"Butterfly and Sunflower" (#20801)
"Hybiscus and Bee" (#21001)
I stamped both images onto white cardstock and colored them with FlexMarkers.
I love the butterfly from the Butterfly and Sunflower stamp and wanted to use it without the sunflower, so I simply colored and fussy cut the butterfly and used it seperatly.
The Hybiscus and Bee was also fussy cut to be put onto the card.
I love using pages from old books on cards and this time simply used one as a background for my card.

Thanks for stopping by today, leave a comment if you will
and come back soon.
To see these and so many more wonderful images, visit
Eureka! Stamps.  I'm sure you'll love what you find.
Now it's time to hop on to Sara's blog, where I'm sure she will have some great inspiration for you.

Until next time, Happy Crafting!

Saturday, July 7, 2012

Chubby Chums, the stamp set I won.

Hello!
I've been pretty lucky lately and about a week or so ago, I won a prize on the Simon Says Stamp Blog.
I was so excited that I won an adorable set of stamps called
Chubby Chums made by Paper Smooches and sold through
Thank you Simon Says Stamp for this wonderful prize!
Here are the cards I made with the set.
Is this cow just the cutest little thing or what?
Don't you just want to sMOOch her?

I made a little dog house for the chubby little puppy.

Here is the inside of the dog house.
All of the animals were colored with FlexMarkers and fussy cut.

Isn't she too cute with the little hair bow I added?
I think she is 'purrr-fect'

This little chickie is soo 'tweet' don't you think?

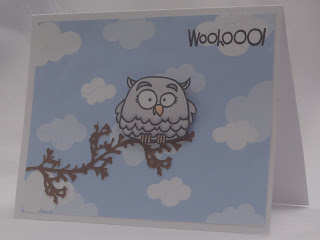
I think I love this owl card the best.
The branch was cut on the Cricut, but I'm sorry I don't remember which cartridge I used.
These cards were a delight to make and the images were fun to color.
Thanks again Simon Says Stamp!

Thanks for stopping by today, leave a comment if you will
and come again soon. And take a minute to stop into the
Simon Says Stamp Blog, they have some wonderful inspiration there!

Until next time, Happy Crafting!

Friday, July 6, 2012

Pear

Hello and welcome to my blog.
Today I'm showing you a card I made with
"Pear" (#3801) from QKR Stampede.
I stamped the image randomly on white cardstock with black ink and also stamped one image onto cardstock to be colored with FlexMarkers.
I cut down the strip and layered it onto green cardstock, and did the same with the single colored image.
I used some ribbon from my stash that I thought went well with the image.
I like how this card turned out and I think this would be a lovely card for just about any occasion.

I hope you have enjoyed my post today and will leave me a comment and come by again soon.
In the meantime, pop into the QKR Stampede online shop and see what images you might like to work with.
They offer unmounted red rubber as well as digital format stamps.

Until next time, Happy Crafting!

Thursday, July 5, 2012

Celebrate

I'm working on those Christmas cards again!
Today I have a Christmas card that I made using
"Round Ornament" (#83405)
I stamped the image onto red cardstock and cut out only the ornament part of the image.  I used a silver pen to color in the top and design on the ornament and a bit of embroidery floss for the bow.
I have had this printed vellum in my stash for ages, I have always loved it, but just never found a project to use it on. So glad I pulled it out for this card!
This picture shows the pine sprigs on the vellum a little better.
I thought the pine sprigs were a perfect background for the ornament.
I had the 'celebrate' bling in my stash and thought it would be a nice festive touch for the card.

Well, one more down in my quest to get my Christmas cards done early!
Hope you enjoy it and have gotten some inspiration here.
There are loads of great Christmas stamps at Biblical Impression, why not check them out and join me in trying to get some of those cards done early?!?!

Thanks for checking in. Leave a comment and become a follower if you will and come back soon to see what else I'm working on these days.

Until next time, Happy Crafting!

Wednesday, July 4, 2012

Little Miss Liberty

Happy 4th of July!
"Liberty Balloon Holder" (#19601) and "Firecracker Balloon" (#9401)
can be ordered through either QKR Stampede or Eureka! Stamps.
These companies are sister companies along with Biblical Impressions.

These balloons and holders are in both the QKR and Eureka! shops, along with a huge variety of other holders and balloons.
I love working with these stamps!  The images are versatile and interchangable.
I stamped the Liberty Balloon Holder onto white card stock.  Then I stamped another  and fussy cut it to make a mask. I used removable adhesive to put it onto the card over the stamped image, then used water color crayons to color the sky and land.
Once I removed the mask, I colored the Liberty Balloon Holder.
The Firecracker Balloon was stamped onto white card stock and colored, then cut out and adhered to the card.  I used a brown Zig pen to draw the string from the balloon.

I think she turned out quite cute, what do you think?
Leave me a comment and tell me what you are doing to celebrate Independance Day.

Thanks for stopping by today, I hope you are having a wonderful day!

Until next time, Happy Crafting!