My Other Pages

To make it easier to read about our trip to Ireland, I have made a page that is just for that. There is a tab above for Ireland Trip 2014 or click on the Home tab to read my other posts. I have also created a new page for My Weight Loss Journey if you are interested in that, click on the tab above.

Wednesday, December 30, 2015

Ornaments

Hello crafty friends!
A couple last minute ornaments that I helped my 
son and his girlfriend make.
Jaryd and Sara glittered the ornaments 
and I cut the vinyl for them.
Then they put the vinyl onto the ornaments.
This ornament was on they ended up giving to me,
sneaky little devils, getting me to make my own gift.  LOL
I didn't mind though and I love my ornament.
The snowflake was made from a file I got from
It is from the set Snowflake Set 2 which is a free file
that is offered on her site.
My daughter is a "pizza nut"
this "pizza infinity" ornament was for her and of course
it's on purple, her favorite color.
This one is, I'm told, a Navi fairy.
I guess it's from a video game, I don't have a clue,
but we created what they wanted.
I wish I had gotten the time to make some ornaments of 
my own this year, but I was just too busy with other projects.
Come back again soon and you'll see what other projects I was busy with.
Thanks for stopping by.
See you soon.

Monday, December 28, 2015

Jingle all the Way

Hi all!
I know it's after Christmas and these are Christmas decorations,
but they were made only a couple days before Christmas and
were gifts for a couple people who might be checking out 
my blog. (Check out the end of the post for other ideas)
So here they are a little late.
I used some shadow box frames that I had on hand
from a great sale at Michael's and some bells that I had picked
up for this kind of project from the Dollar Tree.
I used scrapbooking paper to cover the back of the frame.
"Jingle all the Way" was cut from gold and red vinyl
on my Silhouette Cameo and layered onto the glass.
I  just poured the bells into the frame, no need
 to count them, put the back on and the project was done.
I think they turned out pretty cute and so did my kids
who were the recipients on Christmas morning.

How cute would this be with "Happy Easter" and some
little eggs inside?  Or "Happy Halloween" and some candy corn?
Use your imagination, I'm sure this project could be adapted
for many occasions and holidays.

Thanks for stopping, come again soon.

Saturday, December 26, 2015

Wine Glass Candle Holders

Hello!  I hope y'all had a wonderful holiday!
Today I want to share with you the 
wine glass candle holders
that we made.
My son's girlfriend, Sara, wanted to make some,
so we did them together.
I made the templates on my Silhouette Cameo.
For the Grinch, I traced a picture and made a 
few adjustments.
For this snowman, I created the elements 
of his face myself in the Designer Edition software.
I created the template for the penguin also.
We used Mod Podge and glitter to make these, 
removing different parts of the template and using 
different colors of glitter.
After they were all glittered, we coated them with 
a clear spray coating so the glitter wouldn't come off.
We could have also used glossy Mod Podge, but I was out of
the glossy.  Didn't realize what I had was matte until I had 
covered one with it.
Sure glad I didn't coat them all at one time.
I used tea lights for the candle on top of the holder,
to dress them up a little bit, I wound some black ribbon 
around them and attached it with ATG tape.
I love how they turned out and Sara is happy with hers too.
Sara made a Grinch with a "fatter" glass,
a couple penguins
And these little ghosty guys for her sister who
doesn't like traditional decorations and is 
very 'goth' in her style.
I created these templates also.
I think the candle holders were a big success.

Thanks for stopping by today, come again soon,
I have a lot to show you and you never know
what you'll see on 
Kristie Kreates.


Thursday, December 24, 2015

My Christmas Cards

Merry Christmas!
I hope you are enjoying Christmas if you celebrate,
and if you don't I wish you happiness and peace in whatever
way you do celebrate.
Today I'm showing you some of the Christmas cards
I made and sent out this year.
They all had the same design, but were a bit different
from one another.
For the trees, I used a variety of scraps of Christmas
themed paper.
The trees and tags were cut with Sizzix dies and my Cuttlebug.
I tried a couple different techniques for the strip down the left side.
A few I did foiling with "gold leaf"
Sorry the picture doesn't show this better,
it really is beautiful.
Most of them I did with 
glitter embossing powder.
I heat embossed some card stock and cut
strips from it.
I also tried a couple different kinds of bows.
I found the twine was much easier to tie and adhere,
so most of them have twine bows.

Inside, I stamped a holiday sentiment.
I also made a few cards on cream card stock,
unfortunately I forgot to take pictures before I started
getting the cards ready for mailing, so I don't have
 pictures of all of them or the inside.  
Too much going on to remember everything I guess.

Thanks for taking time to stop by and see what I've been up to.
I hope you have a wonderful Christmas,
I know I will.


Tuesday, December 22, 2015

Star Wars

I have a little great nephew who is crazy for Star Wars.
I needed a little something more to go with his
Christmas gift and though these would do the trick.
I asked his Mom who his favorite characters are and
Darth Vader and Yoda were the ones.
I found the cut files on a facebook group page and
cut them from vinyl with my Silhouette.
And the backs. 
I like how they turned out
I think he'll like these and hopefully will think of me
for years to come when he puts them on the tree each year.

Thanks for taking time from your busy schedule to check
out what's happening on 
Kristie Kreates.
I hope you'll come again soon.


Monday, December 21, 2015

Sara's Stocking

Hello crafty friends.
Today I'm going to show you the Christmas stocking
I made for my son's girlfriend.
Unfortunately, I forgot to take a picture of the sweater
I was making it from before I cut it.
So here it is put back together.
Sometimes I just forget to take the appropriate pictures.
I also need to clarify that this sweater is not dirty like it looks 
in this picture, I assure you it's clean, but when I looked at the
pictures, it sure looks awful.  Sorry about that.
I had seen the idea of making a stocking from a sweater
and was lucky to find one at the Goodwill Store with the 
half price colored tag on it.
I used the stockings that I made years ago for the family
as my pattern and cut the stocking out with the bottom
ribbing on the sweater to be the top of the stocking.
I also picked up some cream colored cotton fabric to use
as a lining. I felt that it needed the stability of the cotton
lining.  I would think that the stocking would stretch out and
sag once it was filled, without that lining.
I cut out all 4 pieces and sewed them together.
Easy peasy!
Here's a look at the lining inside the stocking.
I turned the lining inside and stitched around the top of it.
I also cut a strip and sewed on a loop to hang the stocking.
Here is the finished stocking.
And a close up to show the beautiful 
cable stitching.
I think she'll love this stocking!
And these are the left overs.
The plan is to make a pair of 
with the sleeves.
Sara has very small hands so this
should work out fine.
I hope you have been inspired in some way today,
thanks for stopping.
I love upcycling and think this was a great way
to reuse a sweater.
See you again soon.

Sunday, December 20, 2015

Oh Christmas Tree!

Hi everyone!
Do you have your Christmas tree up and decorated?
We just go ours up and it looks beautiful.
Let me tell you about this sad tree below.
My daughter doesn't have room for a full sized
tree in her flat and she loves anything in miniature size.
My son and his girlfriend decided that she definitely
 needs a Christmas tree 
We had this little tree in our attic.
My husband thinks it is adorable,
I, on the other hand, think it is pretty sad.
Sara, my son's girlfriend, says every tree deserves
to be decorated, so they took it for Kelsie.
A few days later, Sara told me that the tree was shaping up,
but it needed something for the top of it.
I was going to make a star for them,
but happened upon this one at 70% off.
So for something like $.52 they had a topper.
I needed to make it shine though.
The first thing was to put a hole in the bottom, 
so they could put it on the top of the tree.
This also gave me a way to hold it while working on it.
I gave it a good coat of Mod Podge.
Then covered it with gold glitter.
Ohhhhhh, look at that sparkle.
But it still needed a finishing coat,
so the glitter wouldn't fall off all over everywhere.
I only had dishwasher safe Mod Podge that was 
glossy, so I used that to coat the entire star.
Propping it in an empty can while it dries is
a lot easier than trying to hold it all that time!
And it turned out bright and shiny.
Here are a couple pictures of the final tree.
With some loving care, some bending of 
branches, adding of a bit of greenery,
putting some glittery stuff in there, beads and a few ornament,
it turned our great.
And the star was perfect for the little tree.
They were so excited to give her the tree, that they
left my house after putting the star on and took it 
right over to Kelsie.
They gave her some mini ornaments to add where she wanted
them to be.
I have a small strand of lights to give her to add also.
She wants to light it up and put it right in her window.
I think it turned out adorable.
See what a little love can do for a sad little tree?

Thanks for stopping by today.
Stop again soon,
you never know what you'll find on
Kristie Kreates.

Friday, December 18, 2015

Gift Wrap

Hi everyone!
Have you wrapped your Christmas gifts yet?
No, me neither!
But I have gone to a couple parties and had to bring a gift for
an exchange.
What to do when the Christmas paper is all in the attic,
any you are home alone and still don't feel confident in
climbing the attic stairs after you've had a hip replacement?
I did have some of this black and white paper, so I went with it.
And when you have a stash of all kinds of things
for crafting, you're all set.
I used some wired ribbon and red roses
to "holiday up" the package and I was all set.
If I had some poinsettias in my stash I would have used them,
but alas, I only had one small one and it just didn't work.

So next time you don't have the "right" paper, think outside the box.
Look in your craft supplies and see what might work.
And if you don't have a lot of crafty stuff,
check around the house and see what you might
be able to use.
Now go get your wrapping done!
Thanks for stopping by today,
hope you'll come again soon.

Thursday, December 17, 2015

Baklava


Baklava!
That one word can make mouths water in my family.
Today I'm going to tell you about my baklava.
I'm not Greek or anything close to it.
I'm 1/2 Swedish and 1/2 a variety of other nationalities.
So I don't know where I got the knack for making baklava,
but I have it.
It really isn't a difficult thing to make, just a little
tedious and time consuming.
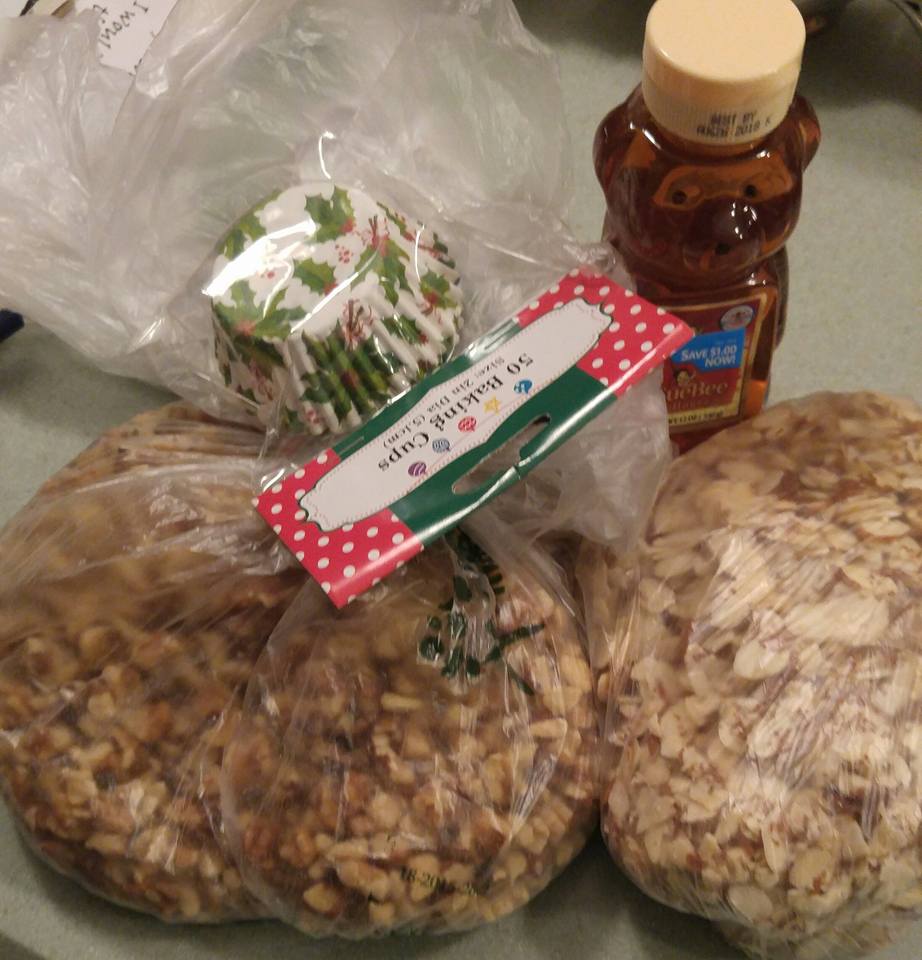
I posted this picture on facebook one day and asked if 
anyone had a guess as to what I would be making.
My family knew right away.
I don't make it often, and I haven't made it at 
Christmas time for years.
I thought it was about time I made it again.
Here's the recipe I follow.
1 pkg phyllo dough 
(sometimes it's spelled Fillo, found in the freezer section)
1 1/2 cups butter
1 pound nuts (chopped walnuts and slivered almonds)
1/2 cup white sugar
1 tsp. cinnamon
Syrup: 1 cup honey
1 cup sugar
1 cup water
In a bowl mix the nuts, sugar and cinnamon and set aside.
Melt the entire 1 1/2 cup butter.
In a large baking pan 
(mine is 12 x 17, a lasagna pan will work.)
layer the sheets of phyllo. 
Lay down one sheet of phyllo covering the bottom of the pan,
(You will probably have to piece it together to cover the entire bottom)
brush it with melted butter.
Lay down another sheet of phyllo,
brush it with butter.
Continue this until about 1/3 of the phyllo is used.
It is very important to lay down single sheets of the phyllo
and brush each one with butter.  This is the tedious part,
the phyllo is like tissue paper, don't worry if it is put down in 
pieces, in the end no one will know the difference.
Once you have 1/3 of the phyllo down,
cover it with 1/2 of the nut mixture.
Then repeat the phyllo process with 1/3 more of the phyllo.
cover it with the other 1/2 of the nut mixture.
Using the last 1/3 of the phyllo, repeat the process of 
phyllo and butter until all the phyllo is used.
Brush the top generously with butter.
I know this is going to sound odd, but now is the time to 
cut the baklava, yes, before you bake it.
Using a very sharp knife, cut the baklava into pieces.
Traditionally, they are cut into triangles.
I cut lengthwise into strips about 2 - 2 1/2" wide,
cut the same sized strips on the width.
Now you have squares, each square is now cut diagonally,
to create the triangular pieces.
Bake at 350 degrees for 30 minutes,
turn the temp down to 300 degrees and bake for another 30 minutes.
While it is baking,
combine the ingredients for the syrup in a sauce pan.
Heat until it is just starting to boil and turn down,
let simmer while the baklava bakes.
Stir often.
When the baking is finished remove the baklava from 
the oven and immediately pour the hot syrup over the hot baklava.
Let sit until cooled.
Enjoy!
Here is some of my finished baklava.
I have it in cupcake papers here, I then wrapped them 
with plastic wrap.
The ones that will be going to a party tomorrow
I didn't wrap individually with plastic wrap,
I just placed them on a plate to go.
I don't always use the cupcake papers,
but they are easier to eat this way when they are 
used on a buffet table.
If cupcake papers aren't used,
I wrap them individually in plastic wrap.
It just makes it easier to store until they are
taken to a party, given as gifts or eaten.
With this pan I got about 70 pieces.

Thanks for stopping by today.
I hope you like my recipe for Baklava,
I know my family loves it.
If you have any questions please feel free to contact me.  
My e-mail address is in the right side bar of
the blog.
Hope I'll see you again soon,
you never know what you'll find on 
Kristie Kreates.

Wednesday, December 16, 2015

Card for Dale

Hello crafters!
Hope you are having a great time getting
ready for the holidays.
Are your cards finished?
Are your gift purchased?
Are they wrapped?
Well, my cards are done, not sent yet, but done.
Okay, I'm getting off track.
Today I have a Christmas gift card holder to show you.
Along with 2 friends, I run a scrapbooking and crafting studio
that is located in a church.
They have a really great guy as their custodian.
Dale always stops in to say hi and see if we need anything.
One day he came down from the other end of the church, 
because he knew there was a "strange man" in the building
and he wanted to be sure we were okay.
That "strange man" happened to be my 23 yr old son,
but the point is that Dale was watching out for us.
Jen, Danielle and I wanted to give him a little something
for Christmas and know he loves Tim Horton's, 
so we got him a gift card.
I made this card for him.
Inside is a pocket for the gift card.
(By the way, that isn't a mess up on the center of the card,
I had already written in the card and signed our names and
put a piece of card stock to cover what I wrote.)
We gave Dale the card when we had our 
Christmas crop and he stopped to say hello and check on us.
He loved it and the fact that I'd made it just for him.

Thanks for stopping by today,
I hope you'll pop in again soon to see what
I'm up to.
Until then, Happy Crafting!

Sunday, December 13, 2015

Couples in hearts


Hello all!
I hope you're having a wonderful day.
Remember a while back I made this card for a same sex wedding?
Well, one of the gals who comes to My Happy Place,
our crafting studio, asked if I could make her some of the heart
cut outs.
And could I make them with 2 women as well as the 2 men
that I had already done.
I told her sure I could do that for her.
I found some silhouettes of women that I could trace with 
my Silhouette Studio Designer Edition software and
set to work.
It took a bit of fiddling around, but I finally got the look 
that I wanted.
Here is how they turned out.
I did some with white with a dark outline and some 
the opposite.
These are some of the cuts I made for Susan, 
she wanted some black and white and some red and white.
I think they are going to make beautiful cards.
I love creating things with my Silhouette, especially when I 
can create something that isn't easy to find.

Thanks for stopping by,
come again soon and let me know what you think 
of my projects.
Until next time, Happy Crafting!


Thursday, December 10, 2015

Rachelle's Book

You know you never know what you'll find on 
Kristie Kreates.
Today I'm asking you to consider checking out 
on my friend Rachelle's blog.
She is a fabulous author and a wonderful person.
I post tutorials on her crafty blog
Mashed Potatoes and Crafts
which I always link to here.
She has a new book
The Soldier's Bride
which you can preview and
nominate for the Kindle Scout Contest.
All is explained on her blog
where you will find the link to nominate her book
as well as enter to win a fabulous prize.
So please go check it out and
nominate her book.
I think she deserves to win!
Thanks for stopping by.
See you again soon.

Smitten with my Smittens

Hello crafty people!
Do you like to recycle and upcycle old things?
I do!
Today I'm going to tell you about the "Smittens" I made.
I just called them mittens made from a sweater,
but my friend, Julie, tells me they are called smittens.
I love that name, so from here on out I'll be calling them that.
I went to the Goodwill Store and found a sweater.
The sweaters there are only $5.00 to start, then it was
50% off anything with a blue tag and low and behold,
didn't this one have a blue tag.
Actually, I was kind of keeping my eye open for the 
blue and found one I liked.
I was really drawn to the wide "band" at the bottom of the 
sweater. I hate when smittens are short and the cold and snow
can get to my wrists.
So I purchased this baby for only $2.50!
Great deal.
The first step was to trace my hand.
I just used a scrap piece of computer paper.
I then cut out my smitten pattern and pinned it to the 
sweater, making sure that the band would make a nice extra long cuff.
I also lined up the left side of the pattern with the seam,
this means less sewing on my part, as well as a nice strong seam.
I then cut around the pattern.
I wasn't sure about the sizing since this was my first try at this,
so I gave it a little extra room.
I then flipped the pattern and lined it up along the opposite seam.
Here they are all cut out and ready to sew.
I used some extra strong thread that is actually nylon upholstery thread.
I sewed around the smittens using a back stitch that 
would be nice and strong.
I tried them on a few times and made adjustments
on the thumb and the width near the end of the fingers.
But I finally got it right.
Once they were done I turned them right side out,
and I have to say, I love my new smittens!
Here they are and I think they turned out great!
Another great thing is that the sleeves on the sweater were wide enough 
that I can make another pair of smittens from that sweater
and I may be able to squeeze a third pair out of it too.

Here are a few things I learned through out this process.
1. Trace your hand and stick to that pattern, no extra is needed.
2. Be sure to cut in far enough on that thumb. My thumbs are pretty short,
but that thumb needs do be cut in far enough to be comfortable.
3. If the cuff is going to be long, cut it wider near the end of the cuff.
I can just fit the cuff around my arm if it isn't folded over, it would
be a bit more comfortable if it was a tad wider. Remember your forearm 
is larger than you wrist.
4. If the cuff is going to be turned over like in the picture, sew the seam
on the opposite side, so it doesn't show when folded over.
5. Next pair, I'll probably sew on the machine, it will just make things
easier and the seams stronger.
6. I'm thinking of finding some scraps of fleece and lining
my smittens to give them extra warmth.

Thanks for stopping by today,
I hope you enjoyed my post and my smittens.
Let me know if you give them a try,
it's a great way to upcycle an old sweater.
I hope you'll come again soon,
because you never know what you'll find on 
Kristie Kreates.