My Other Pages

To make it easier to read about our trip to Ireland, I have made a page that is just for that. There is a tab above for Ireland Trip 2014 or click on the Home tab to read my other posts. I have also created a new page for My Weight Loss Journey if you are interested in that, click on the tab above.

Friday, April 26, 2024

Meet Iggy (aka Chichi) and Sally

Hi everyone!
Today I have a couple gifts I made for my grandchildren.
Let me introduce you to Iggy and Sally.
This is Iggy the Iguana.  I'm told that he was promptly
renamed Chichi by Asher, but I don't know if that name stuck.
I usually make these amigurumi critters with worsted 
weight yarn, but decided to use 
Bernat blanket yarn that I had in my stash.
This yarn is very soft, but since it is a thicker yarn,
the animals come out considerably larger.
I'm guessing Iggy is about 18" long.
This is Sally the shark.
I made her for Marie and I think she may have 
kept her name.
Sally is also about 18" long.
Here is a picture of Marie with Sally.
This book was a gift from Jaryd and Sara, so I could
make stuffies for the kids and I love making them.
I think I've made about half the animals so far.

Thanks for stopping by today.
I hope you have enjoyed your time here and got inspired
in some way.
Come again soon,
you never know what you'll see on
Kristie Kreates.


Note the links are only to give a reference so you can
see what the products are.
I didn't necessarily purchase from these sites,
except where specified,
and you may find better prices elsewhere,
I am in no way promoting any particular site.


Thursday, April 18, 2024

Anniversary and Birthday Cards


Hi everyone!
I hope you're having a beautiful day.
As I write this we are having a warm, but
rainy day here in Western NY.
Hopefully, these cards might brighten your day.
This is an Anniversary card I made for my hubby.
I got the die from Temu and just love it.
The yellow background was embossed with a 
folder from my stash with little hearts on it.
It was a fun card to make and inside I wrote a
personal message.
This card I used the same die and made a card for my
daughter, Kelsie, for her birthday.
Inside, I stamped a birthday sentiment and 
wrote a personal message.
I totally loved making both these cards and will
be using that die for more.
Thanks for stopping by today,
I hope you'll come again soon.
Until then,
have fun being creative.


Sunday, April 14, 2024

Be Magical Unicorn Card

Hello craft lovers!
Doesn't everyone love to receive mail?
My granddaughter, Marie, sure does.
That's why I decided to make her this card.
She loves unicorns, so when I found this stamp in my
stash, I decided to make a card with it.
Pink is her favorite color, so it had to be pink.
For the inside of the card, I stamped, colored and fussy
cut some other designs.  She does love rainbows too, so that
was another must.
I stamped and cut a few things for her to color herself.
Sending cards in the mail now and then is one simple
way to say I love you.

Thanks for stopping by today to see what I've been creating.
I hope you have been inspired in some way and will come again soon.
Until then,
send a card and make someone smile.


Wednesday, April 10, 2024

Art Swap Post Card and Card

Good day and welcome!
I've mentioned my art swap group before
and today I'm going to show you my latest 
project for the swap.
We were to make a masterboard then 
from that we were to make a post card for the
person we were given.
I made more than one masterboard.
This one I used paints and a few different objects 
to make marks (bottle caps, and a fork for instance)
I like how it turned out.
I made this masterboard using the washi tape in my stash.
I just started layering it onto the page and filled the entire
page.
This is the post card I made with the painted 
masterboard that I made.
I enjoyed making it and still have plenty of the
original board left for other projects.
I was a little hesitant to mail out the post card, so 
I made a card with the other masterboard and put the 
post card inside.
This was a fun challenge and the person I sent 
these too was happy to receive them.

Thanks for stopping in today.
I hope you have been inspired in some way.
Please, do come again,
until then,
stretch yourself and try something new.


Saturday, April 6, 2024

Easter with the Maynard Family

Hello and welcome back!
I'm finally recovered from the bronchitis.
I don't have a lot to post, because I was feeling
so bad, I didn't even do any crafting.
We did have a wonderful Easter and had our 
Annual Maynard Family Egg Coloring Contest.
Here are a few pictures of my grandkids and also the
egg contest results.
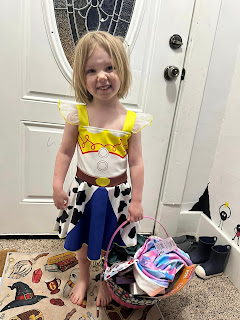
Marie and Asher all dressed up in their Easter outfits.
Marie got a Jessie dress from the bunny.
Asher got a Woody shirt from the bunny.
Here's Marie with all their Easter eggs.
This year there were only 4 of us that participated
in the egg coloring contest.
Things have been crazy around here.
Kelsie and Sara have been very busy with their business
Clumsy Cloud Gifts (dot com)
Below are the 4 entries.  I posted them on facebook and
people casted their votes.
Sara's "Duo Color Explosion"
4th place
Jaryd's "Pink and Purple Splendor"
3rd place
Marie's "Pretty in Pink and More"
2nd place
Your's truly "Marbled Neutrals"
1st place.
I used onion skins to color my eggs this year.
Onion skins were chopped up,
the eggs were run under water so the skins would
stick to them.
They were then wrapped in pieces of 
knee high stockings and tied closed.
They were place into a pot with water, salt, vinegar
and a little bit of blue food coloring.
Boiled to become hard boiled eggs.
Once they were removed and onion skins were
rinsed off they turned out marbled.
I only had brown onion skins,
but next time I'd like to try multi colored
skins and include some white and red onion
skins.
They were easy to color this way and turned out
great.
Did you color eggs for Easter this year?
Here are winners from past years from our contest.
2023 Marie (age 3 yrs old)
2022 Kelsie
2021 Brad
You can see we didn't have the time to 
decorate like we usually do,
but it was fun anyway.
And now I have bragging rights until next Easter.

Thanks for stopping in today to see what I've
been up to.
I hope you'll come again soon.
Until then,
enjoy spring!


Thursday, March 14, 2024

Bronchitis

 Hello crafty fans!

Sorry I haven't been around much lately.


I started with a nasty cold almost a month ago

and it turned into a really nasty case of bronchitis.

I'm going into my 2nd round of antibiotics now and

hopefully that will kick it out of me.

But for now I won't be posting for a bit,

I just don't have the energy to do much more than

 read, watch tv and sleep.

I will be back though, once I'm feeling

better and can get back to some crafting.

For now I'll leave you with these two 

crazy grandkids of mine.

They are just the cutest!


Sunday, March 3, 2024

Christmas Exchange Gift

Hello everyone and welcome!
I know this is a little late, but that's because
our Christmas Crop was late.
Our group always plans our Christmas Crop for
the first Saturday of the new year,
but that didn't work out.
The other gal, who runs it with me, and I 
both had covid, so we had to postpone it.
We ended up having it in mid February.
We bring a gift and do an exchange game.
Here is what I took as my gift.
I crocheted this little Christmas chick ornament.
And a pair of mittens, which I put a gift card for 
Joann's inside one of them.
I also made a "money tree"
I found a piece of tree branch decoration
at the store for 80% off and put that
through the top of a jar lid.
I covered the jar with wrapping paper and
then made dollar origami ornaments.

Here is a boot.
This is a butterfly that actually looks much better in 
real life.
A shirt.
A sail boat.
A duck.
A peacock.
And a leaf.
I had made one of these for a family exchange and
it went over very well.
I think the gal that got it liked it,
but I actually think she liked the mittens even 
more.

Thanks for stopping by today,
I hope you have been inspired in some way.
If you are interested in trying some
dollar origami, just google it
and you will find loads of tutorials online.
I hope to see you again soon.
Until then,
try something new and different.


Thursday, February 29, 2024

Easter Eggs

Hello all you crafty people!
Easter is coming and in our family
we usually have an Easter Egg Hunt.
In the past we have used those little plastic eggs
and put numbers inside that correspond to a 
prize.  The prize is inside a plastic cup that is covered
with tissue paper.  You have to "punch" through the
tissue paper to get your prize.  It could be anything
from candy to some nice squishy jello.
We have a lot of fun with it.
Sara said she'd love to have some reusable fabric
eggs and sent me a picture of them.
So of course, being me, I had to make some.
They were simple to put together and I used 
some fabric that each of us had and scraps that others
from my Buy Nothing Group gave me.
I made my templates in 3 different sizes.
They can be made in any size you want and 
we wanted them to be fairly small.
Here are some of them in the smallest size.
They open in the back to put a little treat inside,
or in our case, a number.
Here are more, you can see that any design of fabric 
can work.  It just needs to be a light weight fabric.
All my fabrics were fabrics that would be 
appropriate for quilting.
They turned out so cute and we can use them over
and over.
They can be used for any kind of goodies in an 
Easter basket also.
Here is the video I used to learn how to make them.
I made my own pattern, but otherwise followed these instructions

Thanks for stopping by today, I hope you'll be back again soon.
Until then,
have an egg-cellent day!


Sunday, February 25, 2024

Gifts for the Twinkies

Hello!  I hope you are having a lovely day!
Today I have a couple gifts I crocheted to show you.
We have a cousin that has twin girls, they call them
the Twinkies.  Dave was going to visit them
and asked if I could make something for him to 
take to them as a gift.
Jaryd and Sara had given me this book a few years ago
as a gift and I have been making animals for the
grandkids ever since.
I decided to make a couple animals for the Twinkies.
I made this robin bird for one,
and this jelly fish for the other.
I don't know which twin got which,
but Dave said they loved them.
I'm thinking they will probably share them
with each other.
I really enjoy making these
arigurumi animals
and am working on a couple more
for Marie and Asher for Easter.
I'll be posting about the ones I made them
for Valentine's Day soon.

Thanks for spending some time here today,
I hope you enjoyed your visit.
Do you crochet?
If you do, have you made any animals?
If you haven't, give it a try and if you don't crochet,
there is no time like the present to learn.
Hope to see you again soon.


Wednesday, February 21, 2024

Book Purse

Hello creative friends!
Today I'm showing you a gift I made for a friend.
My friend, Danielle, loves reading and has an area in her
home that is her personal library.
Her favorite book is A Prayer for Owen Meany.
I decided to make her a purse from her favorite book.
I don't know if she will ever use it as a purse, but it would look
great in her library.
I carefully removed the pages of the book and they
can still be read, so I may put a new cover on them.
The actual book cover was just plain, so I decided to
use the dust cover.  I cut the dust cover to size and 
used some strong glue to adhere it to the book cover.
I did the same with the back of the dust cover.
I kept the spine of the book as the bottom of
the purse with no dust cover on it.
I could have attached some type of feet to the spine,
but didn't think of it at the time.
This is what the purse will look like if she chooses
to use it as a purse.
For the inside I found some fabric that matched nicely
with the book and dust cover and lined the inside with it.
The sides are gusseted, so there is room to open
the purse and the sides easily fit back inside the purse
when it is closed.
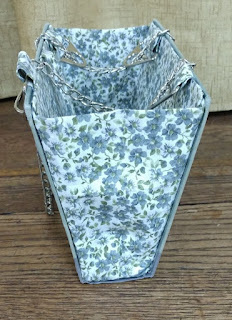
Here is a look down into the purse when it is open.
I purchased the chain handle and the "loops" they are
running through from Temu along with the magnet that
I used to hold it closed.  It's hard to see, but I made a little
closure that is attached to the left side in this picture, it 
goes across and holds the purse closed on the other side
with a magnet.
If you are interested in doing a project like this,
here is a link to the tutorial I basically followed.
There are others out there, but Nik the Booksmith is one
of my favorite You Tubers and I found it easy to follow.
I did make some changes, only because I needed to 
with the supplies I had, but her tutorial is a good one.
On the other hand, if you are interested in purchasing
a book purse, I have a friend that makes and sells them.
Check out 
BeeZ Vintage Book Purses.
Kathleen does an amazing job with her craft and
they are far better than anything I could ever do.

Danielle absolute loved her book purse and she 
showed it to everyone that came to the event we were
hosting when I gave it to her.
I enjoyed making it and I know she will enjoy having
it, whether she wears it or just displays it.

Thanks for stopping by today.
I hope you were inspired in some way and
will come again soon.
Until then,
think outside the box and try something new.