My Other Pages

To make it easier to read about our trip to Ireland, I have made a page that is just for that. There is a tab above for Ireland Trip 2014 or click on the Home tab to read my other posts. I have also created a new page for My Weight Loss Journey if you are interested in that, click on the tab above.
Showing posts with label Birthday card. Show all posts

Thursday, April 18, 2024

Anniversary and Birthday Cards


Hi everyone!
I hope you're having a beautiful day.
As I write this we are having a warm, but
rainy day here in Western NY.
Hopefully, these cards might brighten your day.
This is an Anniversary card I made for my hubby.
I got the die from Temu and just love it.
The yellow background was embossed with a 
folder from my stash with little hearts on it.
It was a fun card to make and inside I wrote a
personal message.
This card I used the same die and made a card for my
daughter, Kelsie, for her birthday.
Inside, I stamped a birthday sentiment and 
wrote a personal message.
I totally loved making both these cards and will
be using that die for more.
Thanks for stopping by today,
I hope you'll come again soon.
Until then,
have fun being creative.


Tuesday, November 7, 2023

Birthday Card For My Friend

Good day blog friends!
I have a friend who recently turned 50,
her family threw a surprise party for her,
so I needed a card and gift for her.
She is an avid reader and book lover,
and I had bought this stamp specifically
to make a card for her.
For the back ground I used a napkin.
Here is a link if you are interested in the  
process.  I layered the background onto 
a white card stock base.
When I made the background, the second layer
of the napkin had a light image on it,
I used that also and then stamped onto
it with VersaMark ink, then embossed with
gold embossing powder.
In the picture, the image behind the stamped image
doesn't show very well, but it's very subtle and pretty
in person.
On the inside of this card I wrote a personal message
and included a gift certificate for Barnes and Noble.
I thought that was appropriate, especially with this card.

I'm glad you have come to spend some time here today.
I hope you have enjoyed your visit and have
been inspired in some way.
Come again soon.
Until then,
read a good book!


Note the links are only to give a reference so you can
see what the products are.
I didn't necessarily purchase from these sites,
except where specified,
and you may find better prices elsewhere,
I am in no way promoting any particular site.


Monday, July 24, 2023

Asher's Birthday Decorations

Welcome!
Today I have some things to show you from
my grandson, Asher's, birthday party.
I love when Sara asks for help with crafty things.
I started off by making the invitations for the party.
It took a bit of figuring, but I loved doing it.
I think they turned out adorable.
Sara asked me to make a banner for Asher's high chair.
She showed me a picture with an idea and said to go with what
ever I wanted.  I found pieces of bright colored fabric at 
the Dollar Tree and just cut them into strips.
I tied a few of the strips together and 
attached the "ribbons" to them.
For the Cookie Monster and Elmo,
I printed out the pictures of them, fussy cut them,
then laminated them.  I attached them with
gourd pins
Here's our birthday boy in the high chair with his
Sesame Street banner.
Sara found a cute book for everyone at the
party to sign, so she asked me to make a sign for it.
This is what I came up with.
She sent me the little poem, but I have no idea
where she got it or who to credit it to.
The book started out on the gift table,
but it didn't stay there very long.
Everyone was happy to sign it.
She also wanted a sign to hang near the gift table.
She told me what she needed it to say and to 
have at it.  I had a ball!
I printed the Elmo and fussy cut him.
The number 1, I found a picture and printed it
inside a number 1 then fussy cut that.
All the letters and balloons were also fussy cut 
and glued to the poster board.
Sign with the "It's my birthday" board on the 
gift table.
This was one of my favorite things that I made.
A Happy Birthday banner with all different 
Sesame Street characters.  I love how it turned out.
These were my other favorites.
I love making customized shirts for the kid.
Mr One-derful 
was made using my Silhouette Cameo and HTV
I think it turned out very cute.
Here is Mr. One-derful himself with Mommy.
Abby Cadabby is Marie's favorite character,
so I made this shirt for her.
Here she is in her shirt.
Kelsie and Sara put together
these trays.
Cookie Monster was made with 
blueberries and blackberries with 
little cups of dip for his eyes.
Oscar was made with veggies and olives
with dip for his eyes.
Big bird was cheese and crackers.
Dip with little tomato slices and blueberries
for his eyes.
I thought they did a great job on 
the platters.
And last, but not least,
here is the card I made for Asher.
I used a die from Kokorosa Studio
(unfortunately, I can't find it on their site.)
I printed the picture of the characters and fussy cut them
to add to the front of the card.
The sentiment is one I have in my stash.
I thought it was perfect for his Sesame Street themed party.
The party was wonderful and we had a fabulous time.

Thanks for stopping by today.
I hope you have enjoyed your time here 
and were inspired in some way.
Come again soon, you never know what your find
on Kristie Kreates.
Until then,
just be creative!


Note the links are only to give a reference so you can
see what the products are.
I didn't necessarily purchase from these sites,
except where specified,
and you may find better prices elsewhere,
I am in no way promoting any particular site.


Saturday, November 12, 2022

One in a Minion

Good Day!
My son in law's birthday was in October and
my granddaughter wanted to make him a card.
My daughter in law gave me this idea and we 
ran with it.
Marie and I used yellow craft paint, dipped her thumb
into the paint and made finger prints on a piece of
white card stock.
I put dabs of glue down and she put the eyes and the
hearts onto it.  I then used a Sharpie to make the faces etc.
Inside I wrote a message for her and she helped
me sign the card with her name.
We had a lot of fun making this card together and
she was so proud of it.  Uncle Brad loved it.
Kids are never too young to start crafting.

Thanks for coming by today,
I hope you have been inspired in some way,
and will come again soon.
Until then,
craft with a child.


Sunday, August 21, 2022

Embossing Powder Background Technique

Hello Everyone!
I'm glad you have decided to spend a little time with me
today.  I have a technique to show you today and I 
hope what I tell you will make sense and you'll be able
to give it a try.
This is the card I made for my son for his
30th birthday this month.  I used this technique
to make it.  For lack of a better name I call it
embossing powder background technique.
The pieces I'm showing you when I explain the technique 
are not pictures of the background I used for the card, but
just the technique.
I started with some plain white card stock.
I put glue onto the card and spread it around with 
my finger.  Then added embossing powder and
heat set it.
On some pieces I use the glue in smaller spaces.
Unfortunately, I didn't remember to take pictures as I 
went.  I was so engrossed in experimenting, that it totally
slipped my mind.
I just kept adding glue in different areas and adding colors.
I tried different ways of applying the glue also,
I brushed it on with a brush, with a q-tip and right from the
bottle and just let it go where it wanted to go.
Just don't get it too thick.
Each layer of embossing powder changes the look,
and I found that the more layers there were, the more texture
I got.  It also depends on the brand and type of powder you have.
Some are chunky and some are fine, or anywhere in between.
I'm sorry I don't have more pictures to show you, but here is a
video from  Marion Emberson showing the basic idea of how to
do this technique.  I don't have the same products as she does,
I used what I have and experimented a bit with it.
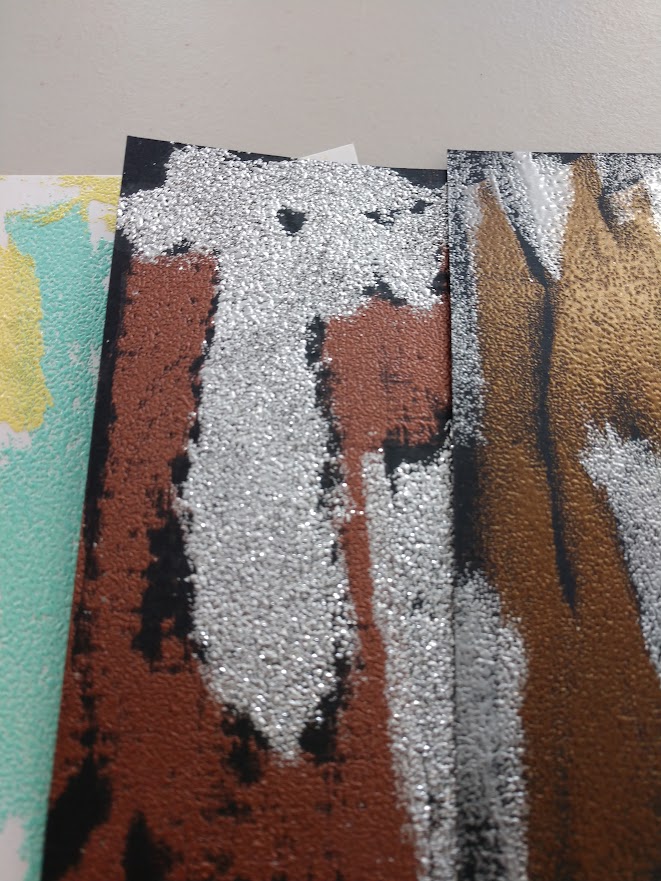
I also gave some VersaMark Ink a go and swiped it on with
a make up sponge.  The glue and the VersaMark both worked great.

These are the pieces I created.
Here they are a little closer.
Click on the pictures and you can see them larger.
This one I used a silver sparkle embossing powder,
you can see that the results are different than the other
powders.  Not only the sparkle, but the texture also.
This is the one I used for Jaryd's card,
It was my favorite of the bunch.  
I thought the colors blended beautifully.

I hope you have been inspired in some way today,
and maybe will give this technique a try.
Be sure to watch the video linked above to 
maybe understand the technique a little better.
I hope you'll come again soon.
Until then,
emboss away!

Monday, March 14, 2022

Pop Out Birthday Card

Hello crafters!
Today I'm showing you a card I made recently.
I had seen this video from Jennifer McGuire
making a pop up card and thought I'd give it a try.
The card folds flat to fit into an envelope.
When it's taken out of the envelope it pops out
giving great dimension to the card.
I made the background with a stencil, VersaMark ink
and silver embossing powder.
I stamped and cut the stars and adhered them to 
a piece of plain white card stock, the fussy cut around
the entire grouping.
I adhered the star arrangement onto the 
front of the pop out piece.
I love how it turned out.
 I stamped this greeting and colored it on plain white
card stock and cut it out with a die.  

Thanks for stopping in today,
I hope you'll come again soon.
Until then,
try something new.
(maybe this kind of card)


Friday, December 10, 2021

Little Fox Card

Hello blog friends!
I hope you're having a warm and cozy day.
It's cold here in my neck of the woods, so I'm 
bundled up in a nice warm sweater.
Today I have a card to show you.
I made this for my granddaughter's 2nd 
birthday.  She loves animals and I thought this
guy was very cute.
The background was embossed with an
embossing folder from my stash and then
inked with brown ink and a make up brush
to bring out a bit of detail.
I colored the fox with colored pencils, cut him 
out with the matching die and added some 
googly eyes, which I think made him even cuter.
I stamped and fussy cut the sentiment and added the
little heart and was done.
As usual, on the inside I added my own
personal note.

Thanks for stopping by today,
I hope you'll come again.
Until then
keep warm and snuggle with someone.


Wednesday, November 10, 2021

Birthday Card

Hello!
It looks like fall is here, at least in our area it is.
How about in your area?
Today I'm showing you a card I made for my daughter's 
boyfriend for his birthday.
I started by embossing a piece of brown card stock
with an embossing folder.  I don't know who made it
as it was just in my stash waiting to be used.
theme.
After it was embossed, I used a sanding block over
the trees to give them a bit more detail and dimension.
I cut the Happy Birthday! with my 
Silhouette Cameo and punched the leaves with 
a punch from my stash,
using pieces from my recycle box.
Great way to use up some little scraps.
On the inside I wrote a personal note 
to him.
I, like many, struggle with masculine cards in general.
I'm not totally crazy about this card, but I think it
turned out nice and I think he appreciated it.

Thanks for visiting!
I hope you'll come again soon.
Until then,
use some scraps.


Note the links are only to give a reference so you can
see what the products are.
I didn't necessarily purchase from these sites,
except where specified,
and you may find better prices elsewhere,
I am in no way promoting any particular site.


Wednesday, September 29, 2021

Happy Birthday Aunt Marilyn

Hello!  I hope you're having a wonderful day.
Today I have a birthday card to show you.
My Aunt Marilyn turned 98 today (Sept. 29th)
She lives in North Carolina and I haven't seen her
for quite some time now.
Covid has changed so much!
I wanted to make her something beautiful
so I used one of my favorite stamp sets.
onto white card stock with VersaFine Onyx Black
ink and colored them with my Arteza colored pencils.
I fussy cut them and adhered them to a card base.
The happy birthday sentiment is from 
Lawn Fawn Scripty Words set
also stamped with VersaFine ink.
Since this card was an odd size, I made
an envelope to send it in.
I think she'll be happy to receive a pretty 
card for her birthday.

Thanks for stopping in today,
I hope you'll come again soon.
Until then,
make someone smile.


Note the links are only to give a reference so you can
see what the products are.
I didn't necessarily purchase from these sites,
except where specified,
and you may find better prices elsewhere,
I am in no way promoting any particular site.


Thursday, August 19, 2021

Happy Birthday Baby Boy

Hello!
Welcome to Kristie Kreates.
Today I'm showing you the card I made for my
baby's birthday.
My baby, Jaryd, is 29 yrs old now.
How did that happen?
Here is my little man when he was just a baby.
He was 10 lb 3 oz when he was born, so we called him
a little man from the get go.
Such a cutie!
And I still have that little outfit!
Now my baby boy is 6'3" tall and is a Dad himself.  He's grown to be
a wonderful man and father that we are so proud of.
He has always been a joy in my life and continues to make 
me smile and laugh.
I made a simple card using a picture of him with his daughter.
On the inside I wrote a personal note to him.
You really don't have to do a lot to make a card that has
impact, so use your imagination and any card will turn out
beautiful.

Thanks for stopping to see what I've been up to lately.
Come again soon, you never know what you'll find at
Kristie Kreates!


Wednesday, May 26, 2021

Birthday Card and Envelope

Hello everyone and welcome!
Today I have a card and envelope to share with you.
I needed a birthday card for a friend and chose this one
from my stash.  I'm sure I have shared this one with you before.
I was inspired by Cee Cee who is one of my favorite watercolor
artists.  I follow her on YouTube and Instagram
Creationsceecee
She has very calming videos and her work is beautiful.
I wanted to make this special, so decided to make a
mail art envelope for the card.
The card itself is an uncommon size, so I made an envelope for
it with my 
I used 1070AA ZINNIAS
and colored them with my 
I think it will make her smile when she receives it.

Thanks for stopping by today to see what I've been creating
lately.  Hope you'll come again soon.
You never know what you'll see on 
Kristie Kreates.

Thursday, March 18, 2021

Watercolor and Doodle Card

Welcome to my blog!
Today I'm showing you a birthday card I
made for my daughter, Kelsie.
You may have seen this watercolor piece before, 
as I've had it in my stash for quite a while and 
I'm sure I showed it when I made it.
I put down some colors on a piece of water color paper
and doodled onto it with a black pen.
I haven't done a lot of this kind of artwork, but I do love
how it turned out.  I've been saving this piece for just
the right occasion. And Kelsie's birthday was
the perfect time to make a card with it.
I think she loved it and I know she'll have it 
on display somewhere.
Since it was an odd sized card at 
6"x6 1/2"  I made my own envelope for it with 
some paper from my stash.  She loves
animal prints and I thought this paper had
an animal-ish look to it.

Thanks for coming by today to see what I've
been up to lately!
I hope you have enjoyed your time here and
will come back soon.
Until then,
use something from your stash that you
forgot about.


Wednesday, March 10, 2021

Pocket Birthday Card

Hello and welcome!
Today I'm showing you the card I made for
my hubby, Dave, for his birthday.
This is made from a business envelope with
a window in it.
I simply folded up the envelope so the window
was at the bottom of the pocket that it made.
I stamped the "happy birthday" on a piece of
white card stock with VersaFine Black Onyx Ink
and positioned it inside the envelope,
before I folded and glued it to make the pocket.
I covered the front of the pocket with some 
alcohol ink covered deli paper from my stash.
Then found some woven burlap type embellishment
in my stash and added that and glued the 
postage stamps on top of it.
We are big fans of  Ireland and castles,
so I thought these stamps were perfect for him.
I then made a small tag to go in the pocket.
I used white card stock and inked it with
a couple Distress Inks,
I believe they were 
Broken China
and
I wrote out a greeting in Gaelic
Go n-eiri an t-adh leat
which basically means
wishing you the best of luck
Slainte means cheers
and gra which means love.
I adhered the entire pocket onto
a piece of card stock.
He loved his card, it is sooooo
him!
Here is a link to a video showing how
to make this kind of pocket, there are 
other uses for these, I just chose to make mine
into a card.  She does a bit more elaborate design
in the video, but you'll get the idea anyway.

Thanks for stopping in today.
I hope you have been inspired in some way
and will return again soon.
Until then,
try something new and different!


Note the links are only to give a reference so you can
see what the products are.
I didn't necessarily purchase from these sites,
except where specified,
and you may find better prices elsewhere,
I am in no way promoting any particular site.