My Other Pages

To make it easier to read about our trip to Ireland, I have made a page that is just for that. There is a tab above for Ireland Trip 2014 or click on the Home tab to read my other posts. I have also created a new page for My Weight Loss Journey if you are interested in that, click on the tab above.
Showing posts with label Embossing powder. Show all posts

Tuesday, November 7, 2023

Birthday Card For My Friend

Good day blog friends!
I have a friend who recently turned 50,
her family threw a surprise party for her,
so I needed a card and gift for her.
She is an avid reader and book lover,
and I had bought this stamp specifically
to make a card for her.
For the back ground I used a napkin.
Here is a link if you are interested in the  
process.  I layered the background onto 
a white card stock base.
When I made the background, the second layer
of the napkin had a light image on it,
I used that also and then stamped onto
it with VersaMark ink, then embossed with
gold embossing powder.
In the picture, the image behind the stamped image
doesn't show very well, but it's very subtle and pretty
in person.
On the inside of this card I wrote a personal message
and included a gift certificate for Barnes and Noble.
I thought that was appropriate, especially with this card.

I'm glad you have come to spend some time here today.
I hope you have enjoyed your visit and have
been inspired in some way.
Come again soon.
Until then,
read a good book!


Note the links are only to give a reference so you can
see what the products are.
I didn't necessarily purchase from these sites,
except where specified,
and you may find better prices elsewhere,
I am in no way promoting any particular site.


Friday, August 25, 2023

Swap Tag and Card

Hello and welcome!
I'm in a small online group of friends who
are doing swaps.
For the month of August, the theme was
"All that glitters"
I could make whatever I wanted to make.
Usually they are ATCs, tags or cards.
This month I chose to make a tag for my friend
Becky.
I cut a mask and stencil from 
I first put down the mask of the lady and
ink blended around her.
Then I removed the mask and put the stencil
down, so only the lady was showing.
I used a VersaMark pen to "color" in the
hair and dress areas and applied 
to those areas.
For the face and arms I used colored pencils 
to get a skin tone.
"Just be fabulous"
 was printed with my 
label maker on clear label tape.
I wish the glitter of it showed up better in the picture.
I really enjoyed making this tag.
I always like to send a hand made card along with my 
swap, so I made this card.
I wanted it to go along with the theme of the swap, so I used
silver reactive foil. When some of the alcohol ink was 
still a bit damp I laid down the foil, gave it a good
rub and then pulled it up, leaving random areas
of silver foil behind.
The alcohol ink and foil were done on vellum,
then it was layered onto a shimmery silver card stock
and finally onto pink and a white card base.
I was very happy with the card and tag alike
and Becky said it made her day 
when she received them.

I'm so glad you have stopped in today to see what
I've been creating.
I hope you have been inspired in some way and
will come again soon.
Until then,
glitter something up.


Note the links are only to give a reference so you can
see what the products are.
I didn't necessarily purchase from these sites,
except where specified,
and you may find better prices elsewhere,
I am in no way promoting any particular site.


Sunday, August 21, 2022

Embossing Powder Background Technique

Hello Everyone!
I'm glad you have decided to spend a little time with me
today.  I have a technique to show you today and I 
hope what I tell you will make sense and you'll be able
to give it a try.
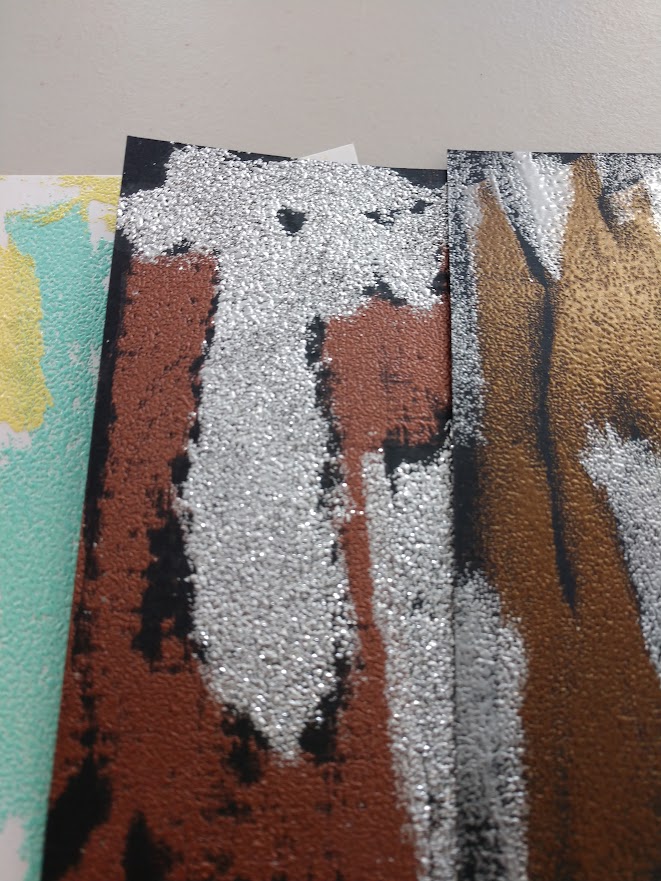
This is the card I made for my son for his
30th birthday this month.  I used this technique
to make it.  For lack of a better name I call it
embossing powder background technique.
The pieces I'm showing you when I explain the technique 
are not pictures of the background I used for the card, but
just the technique.
I started with some plain white card stock.
I put glue onto the card and spread it around with 
my finger.  Then added embossing powder and
heat set it.
On some pieces I use the glue in smaller spaces.
Unfortunately, I didn't remember to take pictures as I 
went.  I was so engrossed in experimenting, that it totally
slipped my mind.
I just kept adding glue in different areas and adding colors.
I tried different ways of applying the glue also,
I brushed it on with a brush, with a q-tip and right from the
bottle and just let it go where it wanted to go.
Just don't get it too thick.
Each layer of embossing powder changes the look,
and I found that the more layers there were, the more texture
I got.  It also depends on the brand and type of powder you have.
Some are chunky and some are fine, or anywhere in between.
I'm sorry I don't have more pictures to show you, but here is a
video from  Marion Emberson showing the basic idea of how to
do this technique.  I don't have the same products as she does,
I used what I have and experimented a bit with it.
I also gave some VersaMark Ink a go and swiped it on with
a make up sponge.  The glue and the VersaMark both worked great.

These are the pieces I created.
Here they are a little closer.
Click on the pictures and you can see them larger.
This one I used a silver sparkle embossing powder,
you can see that the results are different than the other
powders.  Not only the sparkle, but the texture also.
This is the one I used for Jaryd's card,
It was my favorite of the bunch.  
I thought the colors blended beautifully.

I hope you have been inspired in some way today,
and maybe will give this technique a try.
Be sure to watch the video linked above to 
maybe understand the technique a little better.
I hope you'll come again soon.
Until then,
emboss away!

Monday, May 16, 2022

Embossing Powder Technique

Hello!  I'm glad you are here for a visit.
Today I have a few cards to show you.
I saw this video where embossing powder was used on
parchment paper and she was able to peel it up to use
as an embellishment.
I didn't have any parchment when I wanted to give it a go,
so I tried a couple other kinds of paper.
Nothing worked the way it did in the video, but I still
got some interesting backgrounds to use.
This one was done on gold vellum.
I heat embossed the sentiment to add to the card front.
This one, I used the backing from some labels
thinking that since it was a type of release paper,
the embossing may peel off.  It didn't, but 
I used the background anyway.
This is another one done with the 
label release paper.
Here is another one from the vellum.
This one I did on a shiny silver metallic card stock
and I think it may be my favorite.
This one was done on a piece of deli paper.
Although none of them worked out the way they
did on the video, I'm happy with how they turned out and
the cards I made with them.
I've re-watched the video and plan to give it a try
with the parchment paper that she suggests using.
I'll surly post what I get when I try it the way she 
shows in the video.
Never hurts to give new techniques a try, even when they
don't turn out how you hoped.  I love how these cards turned out and
I've already used a few of them.

Thanks for stopping by today,
I hope you have been inspired in some way and will 
come again soon.
Until then,
watch a video and learn a new technique.

Monday, August 17, 2020

Wedding Card

Hello!  I hope you are all well.
Today I have a wedding card to show you.
A family friend got married the other day,
unfortunately, due to COVID they had to change their 
wedding plans and have a much smaller wedding than
originally planned and could only have immediate family
with them.  They will have a "reception" for their 1st anniversary
next year.  I thought this was a great compromise.  In these times
we all have to do what we need to do to stay safe and healthy.
I wanted to send a card to Michelle and Tony so I made this one.
I found this lovely hand made paper in my stash, just waiting for something
special. I tore it to the size I needed and adhered it to 
the card stock panel with Fabric-Tac glue.
I adhered the panel to a white card base and
heat embossed the sentiment with 
On the inside I used the same color panel,
printed a sentiment onto white card stock and adhered
them to the card base.
I love how this card turned out and I think
the happy couple will too.

Thanks for stopping by to see what I've been up to.
I hope you'll come again soon.
Until then:
Make something special.


Note the links are only to give a reference so you can
see what the products are.
I didn't necessarily purchase from these sites,
except where specified,
and you may find better prices elsewhere,
I am in no way promoting any particular site.


Friday, October 25, 2019

Post Cards for El Paso Kids

A while ago, after the El Paso shooting, a couple teachers
asked for cards of encouragement to be sent to their
classes.  The children were afraid to come to school
and they thought cards from around the country 
with encouraging words would help them.
These are the post cards that I made and sent.
I wrote an encouraging message on the other side
and I hope they helped the children in their classes
For this card, I stamped the "grid" with VersaMark Ink
and embossed it with silver embossing powder.
I then used water colors to paint it.
The sentiment was stamped with 
I used Distress Inks with water to make this background,
then stamped the unicorn with 
VersaFine Onyx Black ink.
I added a bit of clear Wink of Stella to the horn, mane and tail.
Both were done on water color postcards.

Thanks for stopping by today,
have a wonderful day and 
Be Kind To Others!


Note the links are only to give a reference so you can
see what the products are.
I didn't necessarily purchase from these sites,
except where specified,
and you may find better prices elsewhere,
I am in no way promoting any particular site.


Sunday, October 28, 2018

Ink Lift Card

Welcome to Kristie Kreates!
Have you tried the Alcohol Lift Ink yet?
If you haven't you should give it a try.
Well, that is if you use alcohol inks.
I love my alcohol inks, especially for making backgrounds.
When the Alcohol Lift Ink came out
I knew I needed to give it at try.
This is a card I made for my Aunt Marilyn.
Her 95th birthday was the same day my 
son got married.  Unfortunately, she lives in
 North Carolina and we are in Western New York,
so she wasn't able to attend.
I thought a fall themed card would be perfect for her.
There are a lot of video's out there showing how to use the
alcohol lift ink, so I won't go into detail about it.
I will say I used a glossy silver card stock,
made a background with a few different colors of
alcohol ink and stamped with several leaf stamps from
my stash of stamps.
I heat embossed the Happy Birthday with silver embossing powder,
mounted it onto silver card stock and layered them all
onto a matching card base.
If you haven't tried this cool ink, you should.
It's so much fun to work with and gives a very impressive
look to any card or project you make with it.
Here's a link to some videos on YouTube
showing techniques with this amazing product.

Thanks for stopping by today, 
come again soon.
Until then,
watch some videos and give 
something new a try.


Note the links are only to give a reference so you can
see what the products are.
I didn't necessarily purchase from these sites,
except where specified,
and you may find better prices elsewhere,
I am in no way promoting any particular site.


Saturday, November 18, 2017

Cards for Card Drive 5

Hi!
Here are a few more Christmas cards that I made for the
These 2 were both stamped with VersaMark ink
and embossed with silver embossing powder.
The card on the right was done on black card stock,
the one on the left was done on white card stock that
I used Distress Inks to color.
I like the one with the Distress Inks better,
I think it's a little more natural looking with the
different shades and colors I used, rather than 
a totally black sky. I also liked that the bottom of the
scene looks like snow.
For this card, I has some scraps of paper
that had the trees on it, I fussy cut them and 
adhered them in different layers to give dimensions
to the card.

Thanks for coming to check in and see what I've been up to.
Come again soon, you never know what you'll find on 
Kristie Kreates.


Note the links are only to give a reference so you can
see what the products are.
I didn't necessarily purchase from these sites,
except where specified,
and you may find better prices elsewhere,
I am in no way promoting any particular site.


Monday, October 16, 2017

Halloween Cards

Hello crafters!
It's October, so time to get those Halloween cards ready.
I usually don't send Halloween cards, but
as I've said before, this year I'm trying to send more
cards.  So I decided to make and send some Halloween cards.
Not only to a couple kids, but to adults too.
Here is what I made.
I heat embossed this Sm. Witch 
by Eureka Stamps, sold through 
For the moons, I punched a circle out of card stock
laid it over the black card stock,
smushed the VersaMark Ink pad over the circle hole,
then added gold embossing glitter and heat set it.
On some of the cards I stamped and heat embossed
"Flying by" on the outside,
inside I stamped "to say" with the same silver 
embossing powder and
"Happy Halloween"


For this card I added some 
Ghosts also from Eureka sold through 
Stamp On It.
I attached the witch with an Action Wobble
For this card I used the same Ghost stamp
for the night sky and added some water droplets
to give it a little texture.
I cut the curve on the bottom of the front of the card
For this card I used
from QKR Stampede
sold through 
Stamp On It.
All coloring was done with my 

I'm pretty happy with how these cards all 
turned out and I hope the recipients like them too.
Thanks for stopping by today
I hope you'll come again soon.
My next post, I'll show you the envelopes
I made for these cards to be sent in.
Until then,
Have fun crafting!


Note the links are only to give a reference so you can
see what the products are.
I didn't necessarily purchase from these sites,
except where specified,
and you may find better prices elsewhere,
I am in no way promoting any particular site.


Monday, October 2, 2017

Kitty card

hello!
This card I'm showing you today is one I made for 
my Aunt Marilyn.  Aunt Marilyn is my Mom's best friend.
They have been friends for well over 80 yrs.
Aunt Marilyn just turned 94 and I wanted to make a card for her.
She loves cats and this is perfect for her.
If you don't know Jennifer McGuire, you need to go to her
blog and check out her videos.  She is amazing and knows more
techniques than anyone I've ever seen.
I learned this technique from her blog.
I believe she calls it "double embossing"
I used a piece of black card stock, covered it with 
VersaMark Ink then embossed it with clear embossing 
powder.  Next I stamped the cat 
 in VersaMark and embossed it
with silver embossing powder, the same with the hello.
When the second embossing is done over that clear embossing,
the silver kind of sinks into the clear and creates a very cool look.
It doesn't look or feel like 2 layers.
For the inside of the card, I used a set of individual 
tiny letter stamps to stamp 
"peeking in to say' 
from Stamp On It
I wanted the sentiment to pop so I matted it onto
black card stock.
I know my Aunt will love this card that was
made especially for her.

I'm glad you stopped by today.
If you don't already visit
pop over and watch her videos, 
she's really quite amazing.
Come again soon,
Until then I hope you'll 
try something new!


Note the links are only to give a reference so you can
see what the products are.
I didn't necessarily purchase from these sites,
except where specified,
and you may find better prices elsewhere,
I am in no way promoting any particular site.


Tuesday, September 19, 2017

Gift for Lennon

Hi!  Hope you're having a great day.
Today I'm showing you a gift I made for a little guy.
He turned 5 and absolutely loves dinosaurs.
This wasn't an easy and smooth process and I'll try to tell 
about my mistakes, so you don't also make them.
I started with a blank canvas, acrylic paints and Chap Stick.
Yes, I know that sounds strange, but I couldn't find my Microglaze and
thought I'd give the Chap Stick a try.
And I have to say it did work to a degree, but not as easily as
the Microglaze would have.
Here is a link to what I wanted to do with it.
I ended up not using it for the gift piece, but 
not because it wasn't working at all, I just didn't
have the time to play with it.
And of course guess what I found a couple days later?!?!
I know this might be hard to see, but it sure is hard to
photograph something that is clear.
I cut out a dinosaur design with Lennon's name on it
using my Silhouette Cameo and The Dinosaur Border Set
I used a piece of acetate to make the stencil and mask.
I ran the stencil and mask through my large Xyron machine
and stuck the mask down onto the canvas.
I started painting with the lightest color that I had, which
was a pink.  I was going for a sunset/universe look.
I continued to add colors, one by one, lightest to darkest.
I also added the red to his name.
Then came the darker colors, blues and purples.
And BOOM that's when things went awry. 
It all looked fine, until I took the mask off and the paint
had bled under the mask and made a total mess.
So I began again.
I used a little different strategy for the second attempt.
I used a bit less paint, less water on my brush when cleaning
it between colors and was more careful about how I applied the 
paint, trying to brush out from the mask at all times.
This time the dinosaurs came out much better, but there was
still some bleeding, but no where near as bad this time
Then I laid the stencil part of the acetate over the painted
canvas to see exactly where the dinosaurs were and painted his name in
more carefully.
Once that was done, I took the stencil off and began 
painting all the white parts with black paint.
After a couple coats of black and some more red....
it was almost finished.
For a finishing touch, I used some white paint,
added a little water and used my paint brush to flick
spatters onto the sky.  
I did lay the mask over the dinosaurs before
flicking the white paint.
I also gave the dinosaurs red eyes and I was done.
Then I was on to the card.
I decided to make a card to match the gift.
I cut the dinosaurs and the 
Happy Birthday! 
from black card stock.
I used a star stamp and stamped the card with 
VersaMark Ink and heat embossed them with silver
Here is a picture of the gift and card together.
The day of his party, I think Lennon was so overwhelmed
that he didn't really know all the gifts he got,
but his parents did and they both loved this gift.
I think it turned out pretty cool too.

Thanks for popping in to see what I've been creating.
Glad to have you here, come again soon.
Until next time,
have fun crafting!


Note the links are only to give a reference so you can
see what the products are.
I didn't necessarily purchase from these sites,
except where specified,
and you may find better prices elsewhere,
I am in no way promoting any particular site.