My Other Pages

To make it easier to read about our trip to Ireland, I have made a page that is just for that. There is a tab above for Ireland Trip 2014 or click on the Home tab to read my other posts. I have also created a new page for My Weight Loss Journey if you are interested in that, click on the tab above.

Tuesday, December 28, 2021

2021 Christmas Ornaments

Hello blog fans!
I hope you are having a wonderful holiday season.
A few years ago I started a new tradition in our family.  
Whoever comes to Christmas dinner receives
a home made ornament from me.
My son and daughter in law have been hosting
Christmas dinner the last couple years, 
but I've continued the tradition.
This year, these are the ornaments I made.
They started out like this.
 Several years ago I was out shopping at one 
of the craft stores and found packages of
metal tags dirt cheap on clearance.  Of course I couldn't pass up
that deal, so I bought a couple packages.  Had no idea
what I might do with them, but knew I'd come up with something.
This year I came up with something.
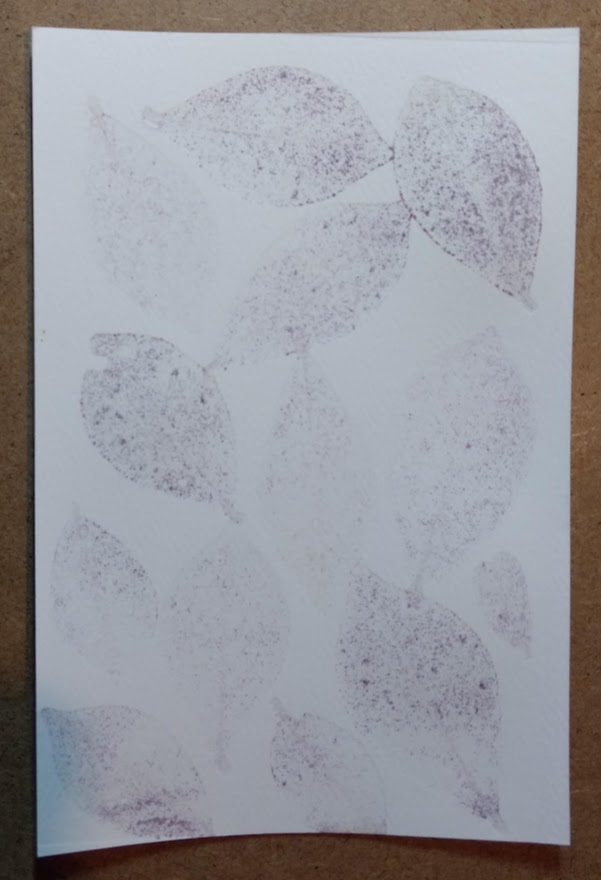
I used alcohol inks to color the metal tags,
then used stamps and Alcohol Lift Ink to
lift the ink from the tag.
It's a very simple process that turns out looking great.
I did find that some colors lifted easier than others.
Surprisingly I found some of the lighter colors were
harder to lift than the darker ones.
It's all a matter of trial and error.
I also found that some stamps did not work as well as
others and it seems rubber stamps worked better than 
the clear acrylic/polymer stamps did.
The amount of ink used also made a difference.
If I did more than one coat to make the color 
appear darker, it was harder to get the ink to lift off.
But with persistence and repeated stamping, most of
them did work.
Although there were a few that just wouldn't lift.
I'm not sure why that was.
One of the great things about using the alcohol ink
on metal, is that if you don't like the color, the way it stamps
or if the ink won't lift, all you need to do is use some
 rubbing alcohol and remove the ink and start again.
I stamped the year on the back of each ornament.
This is one case where the polymer stamps worked
well.  It may be because it was such a solid 
image, but I can't say for sure.
I'm very happy with how this year's ornaments
turned out.

Thanks for stopping in for a visit, 
come again soon.
Until then,
have a happy and healthy 
new year.
Let's all make 2022 a 
wonderful and creative year!


    Note the links are only to give a reference so you can
see what the products are.
I didn't necessarily purchase from these sites,
except where specified,
and you may find better prices elsewhere,
I am in no way promoting any particular site.


Friday, December 24, 2021

Merry Christmas!

Happy Holidays one and all!
Just want to take a moment to wish you all the best,
 whatever holiday you celebrate.
For us, it's Christmas and here is a picture of my 
sweet little Snowbaby tree that my hubby
put up for me while I was out of town visiting 
a friend and having a crafty weekend
Over the last several years we have pared down
what we do with our Christmas decorating and gift
giving.  We enjoy our time with family and 
friends and try to let the craziness go away.
Of course, we now have a 2 yr old granddaughter,
so things will be a little hectic, but that will
be fun.  
And for Christmas we are going to have a 
gender reveal and find out what the new baby will be.
It's sure to be an exciting Christmas and 2022 for us.
Our son and daughter in law just moved into their new home,
they are expecting baby number 2 in June.
Our daughter is getting married in May and we
are thrilled about that and love her fiance. 
Bring it on 2022!

Thanks for stopping by today and every time you
come to visit.  I love doing my blog and hope you
enjoy your visits and that you are inspired in some
way with what you find here.
Wishing you a wonderful holiday season and a
fabulous 2022


Monday, December 20, 2021

Bernadette Brings an Elf Hat and Mittens

Hello and Happy Holidays!
Christmas is close and our sweet granddaughter has
an elf friend visiting.
Bernadette came to visit when Marie was with us
the other day.  Marie took her nap and when she got
up, Bernadette was sitting in our Christmas tree with a 
gift for Marie.
These are the hat and mittens that I made for
Marie.  Bernadette had them in a cute little 
bag sitting under the tree for Marie.
I'm sure she's wondering how Bernadette got into the tree.
And she loves her hat and mittens,
especially since that elf on the top is probably
a friend of Bernadette's.
When it was time to go home, Marie ran
over to the little bag and pulled her hat and 
mittens out, so she could wear them home.
I was happy to see she loved them so much.

Thanks for stopping by to see what I've been up to.
Do you have an elf visiting at your home?
I hope you'll come again soon.
Until then,
make the holidays magical!


Saturday, December 18, 2021

Eco print cards

Good day friends!
A few weeks ago, I suddenly had a desire to do some
eco-printing.  I saw the beautiful leaves that were falling
and wondered how they would work on some prints.
So I gathered up some leaves from the ground and some 
that hadn't fallen yet and set myself to work.
Here are a few that I did with some leaves from our
"burning bush" that gets bright red leaves in the fall.
I laid the leaves on a piece of card stock,
laid another piece of card stock over it and 
ran them through my Cuttlebug.
This is what I got and I just love how they turned
out.
I thought I may as well experiment a little more,
so I put another piece of card stock over the leaves 
and ran it through again.
This more muted piece is what I got from the second pass.
Here are the cards I made with those first 
prints.  Just trimmed them to size,
adhered to some colored card stock and
then onto a card base.
This was just the start of the prints I made with leaves and
some flowers that were still hanging around, but
I haven't had time to make anything with the other
prints.  I'll show those in another post.
But I did learn that even though the leaves have fallen
from the trees, as long as they aren't dried and brittle,
they are worth give a try running through
the cuttlebug.
I found some just didn't work as well, some gave
very strong colors and some were more muted.
You just have to give them a try, it's surprising the colors
you may get.

Thanks for stopping by today,
I appreciate that you spend time here.
Come again soon,
until then,
try some eco-printing.
Use leaves, flowers, grass whatever you can
find in nature that will go through your machine.


Tuesday, December 14, 2021

My Christmas Cards

Hello everyone!
Today I'd like to show you my Christmas cards.
I was having a difficult time figuring out what to 
do for my Christmas cards this year.
Nothing seemed to be clicking,
then, as often happens, an idea struck.
And what a messy idea it was!
I had seen the Altenew Burlap Texture Die on
several videos and finally picked it up.
I decided on a design and got to work.
What a mess I made, but it was so worth it!
I used an embossing folder from my stash
and embossed the backgrounds.
Then I found a tree in my library of my 
Silhouette Design Studio software and
cut them out with my Silhouette Cameo.
I used glitter card stock for the trees, but the glitter
doesn't show up well in the pictures.
Once I had all the pieces ready, I 
assembled the cards.
Gluing down that burlap piece was a little
tricky, then I got the idea to brush the back
with glue and a foam brush and it worked
like a charm.
I used the scraps of the gold vellum from the
burlap pieces to punch out the stars, glued them
on and the card fronts were done.
Inside I stamped this sentiment
Now my cards were finished!
I love how they turned out, 
a little different than anything I've done 
before, yet they are still 
"really me"

Thanks for stopping in today.
I hope you have your cards all made and mailed out.
By the time this is posted hopefully mine will be too.
Please come to visit again,
until then
make your holiday season a happy one.


                                      Note the links are only to give a reference so you can
see what the products are.
I didn't necessarily purchase from these sites,
except where specified,
and you may find better prices elsewhere,
I am in no way promoting any particular site.

Friday, December 10, 2021

Little Fox Card

Hello blog friends!
I hope you're having a warm and cozy day.
It's cold here in my neck of the woods, so I'm 
bundled up in a nice warm sweater.
Today I have a card to show you.
I made this for my granddaughter's 2nd 
birthday.  She loves animals and I thought this
guy was very cute.
The background was embossed with an
embossing folder from my stash and then
inked with brown ink and a make up brush
to bring out a bit of detail.
I colored the fox with colored pencils, cut him 
out with the matching die and added some 
googly eyes, which I think made him even cuter.
I stamped and fussy cut the sentiment and added the
little heart and was done.
As usual, on the inside I added my own
personal note.

Thanks for stopping by today,
I hope you'll come again.
Until then
keep warm and snuggle with someone.


Monday, December 6, 2021

Art Swap Christmas Card

Greetings!
I belong to an Art Swap Group, it's a group 
of ladies who met years ago on a stamping 
message board.  We now have our group on Facebook.
Each year we do a swap at Christmas time.  This year
we are doing a card swap with one other person in
the group.
Some of us are from the US, some from Canada
and some from Australia.
I always look forward to seeing what everyone does
for their swap.
I decided to do a card with an inlaid technique.
I had this star design in my library of my
Silhouette Design Studio Software
and love it.
I cut it out of metallic textured card stock
and gold glitter card stock.
The holly leaves, berries and ribbon are cut from
plain colored card stock.
I adhered double sided tape to the back of the star
and then went about placing the pieces into the star
cut out.
I was really loving this card, but it needed a little something.
I think the white dash lines around the card 
give it a finishing touch.
I hope the gal that I'm sending this to likes it
as much as I do.
Have you made any different Christmas cards this year?
The one I make for this swap is always different
than the others I make.

I'm glad you came to spend a little time with me today,
I hope you enjoyed your time here and will come again
soon.
Until then,
have a happy holiday season!


Thursday, December 2, 2021

Gratitude Set

Hello crafty peeps!
Today I'd like to show you a set that I made
as part of a prize at our 
"Girlfriends and Gratitude Crop"
We thought a gratitude journal would be 
appropriate and of course I couldn't stop there.
So I made a note pad and a post it note holder also.
This note pad would be lovely on anyone's
desk or counter. 
I received some glue from a friend that is 
specifically for making tear off pads.  It's wonderful,
and I can make any size note pad that I want.
Great way to use scraps.
Here is the inside of the notepad.  
The notepaper measures 4 1/4 x 5 1/5
for this particular pad.
Somehow I didn't get a photo of that
particular Post It note holder, but
here are a couple others.
They simply have a pad of 
Post It notes inside.
This is the journal and I love how it 
turned out.
I used different colors and weights of paper
for the pages.  I made a file and printed the lines onto 
the paper.  I also left some pages blank to leave
space to draw or add a picture.
This journal can be used for anything the recipient 
wants it to be.
Here is a picture of the signatures sewn together
before they were put into the cover.
I'm loving this process for sewing them,
if you are curious as to how it is done,
here is the video I learned from.
Nik the Booksmith
is fabulous and has many, many great
videos about book making.
Last, but not least, is the "basket" I made to put all
the prize items into.
The items above and some crafting supplies were 
all wrapped up in this Grateful basket.
Here's a picture of our lucky winner, our
friend Marie.  She was very happy with her
winnings.
Here is a tutorial showing how to make 
a similar basket.
The Posh Paper Lady

Thanks for popping in today to see what I've
been up to.  I hope you'll come again soon.
Until then,
watch a video and try something new.


Sunday, November 28, 2021

Goodie Bags for Crop

Good Day!
In October we had a
"Girlfriends and Gratitude Crop"
to raise some funds for 
The Grove Street Christian Church,
which houses My Happy Place.
My Happy Place is a crafting "studio" where
we host Crop and Craft time for whatever kind of crafting
people want to do. Most of us are scrapbookers and
card makers.
We always have a goodie bag for each 
cropper at our "specialty" crops.
Today I'm showing you what we gave at
our recent crop.
Each cropper received a bag with a gratitude card
that my "partner in crime" wrote out along with a little
thank you tag that I stamped.
In the bag was a card kit, instructions included.
Some kind of bling, mine happened to be pearls, 
a post it note holder (I made these.) and of course,
some candy.
This is what the Post It note holders were like.
I had a lot of fun making them in different 
Autumn themed papers.
This is the sheet included with instructions for 
the Thank You tags and card kit.
We love making up these little goodie bags,
every crop they are different depending on 
what we have on hand and what we can find to 
add to the bag.
I love to add some kind of little handmade gift in
these bags.
I think they were well received.
The crop was loads of fun for 
all of us and we raised a good amount of
money for the church.

Thanks for stopping by today,
come again soon.
Until then,
show gratitude.


Wednesday, November 24, 2021

Snowglobe Ornaments

Hello crafters!
Today I'm showing you some ornaments that I made
for my family for 2020
They are simple to make as long as you have a 
laminator.
I can't find the video on how to make them, so 
I'll give you a quick written tutorial.
Trace a circle on the outside of a laminating pouch.
On the inside of the pouch use white paint to make a 
snow hill and flick paint on for snowflakes.
Print picture of your choice and cut out around the
person you want to feature,
Once the paint is dry, lay the picture into the
pouch and put it through the laminator.
Once it's laminated, cut out the circle.
With card stock, cut out two bases,
glue the laminated piece between the two base
pieces.  Punch a hole in the top and add ribbon or string.
Now you've got a cute ornament.
I hope that makes sense, let me know if you have 
any questions and I'll try to give you some help.
This one was for Sara.
Picture of her with Marie when she was out in her
first snow.
Made this one for Dave, my hubby, wearing the hat and scarf 
I made her for her birthday.
This one was for Kelsie with her favorite 
little human in the world.
Jaryd's with his Princess.
And for Kelsie's boyfriend, Brad, I made
this one with our little Molly.
Molly is afraid of anyone she doesn't know
and she finally warmed up enough to Brad that
he could hold her.

Thanks for stopping in today.
I hope you will give these ornaments a try,
they make a nice little keepsake.
Come again soon,
until then
create on!


Saturday, November 20, 2021

Brad's birthday gift

Hello crafty people!
Today I have a shirt to show you that
I made in collaboration with my son and daughter in law.
They do some video gaming with my daughter and
her boyfriend, Jaryd and Sara designed what they
wanted on this shirt for Brad and sent it to me.
I traced it with my 
Silhouette Studio  Designer Edition software,
then cut it on my Silhouette Cameo from 
The Chameleon HTV is pretty cool as it changes
color with different lighting.
It's hard to show in the photographs, but
you can see that the different areas are different colors.
This is the front of the shirt.
This is the logo that they created for the back of the
shirt.  You can see that the color is totally different
in this picture, but it's all done with the same
HTV color.
Here is a picture of Brad in his new
shirt.  He loves it and doesn't he just 
look too handsome?!?!
Happy Birthday Brad!


Note the links are only to give a reference so you can
see what the products are.
I didn't necessarily purchase from these sites,
except where specified,
and you may find better prices elsewhere,
I am in no way promoting any particular site.


Tuesday, November 16, 2021

Guardian Angel

Hi!
It's getting to be that time of year again.
Time to work on Christmas decorations and
gifts.
Last year our granddaughter, Marie, was 1 yr old.
It was her 2nd Christmas, but the first year that she
had a clue about what was going on.
Marie has a "Guardian Angel" that
she will receive a little gift from each
Christmas.  Her angel has decided that she
will always receive an angel of some kind from her.
In 2020 she received this little angel ornament.
Here is a tutorial on how to make this
angel ornament.

Thanks for stopping in today,
I hope you'll give these little ornaments a try.
They are really very easy to make and look lovely
on a tree.
Come again soon,
you never know what you'll find on 
Kristie Kreates!