My Other Pages

To make it easier to read about our trip to Ireland, I have made a page that is just for that. There is a tab above for Ireland Trip 2014 or click on the Home tab to read my other posts. I have also created a new page for My Weight Loss Journey if you are interested in that, click on the tab above.
Showing posts with label cards. Show all posts

Sunday, July 16, 2023

Spin Painting Clean Up

Hello and welcome!  
Today I have a few cards to show you.
Back in April, I did some "spin painting" with 
Marie.  Once we were done, there was quite a bit of
paint in the inside of the salad spinner.
I let it dry and then peeled it off.
Me, being the crafty saver that I am, kept the pieces of 
peeled off paint.  I glued them to pieces of paper/card stock.
This week I decided to create from my stash and 
pulled them out.  Here are a few of the cards I made with
the spin painting clean up.
All these cards were pretty simple to make, since I pretty
much had the focal piece ready to go.
I mounted this piece onto pink, then a black mat and 
decided that a piece of hand made paper would be perfect
behind it.  Then onto a white card base and it's good to go.
With this one I decided on some bright colors to match
the paint colors.
I pulled some scraps from my stash, 
then mounted onto a card base.
I had the little sentiment stamp in my stash and have
no idea what company it's from.
Inside I use a sentiment from the same set of stamps, 
mounted on a piece of the purple mulberry paper.
This card is larger than the others, they are A2 size and
this one is a full sheet of card stock folded in half,
so it's 5.5" x 8.5"
It was the largest paint piece and I wanted to keep it
together, so larger card it was.
Simple card with a sentiment.
I think you can see the texture of the paint better in this
picture.  It had dripped down the side of the bowl and then
dried.
One more angle showing the texture.
I love this one.  To me it looks like a flying dragon.
Maybe you don't see that, but that's okay.
I love the drama of it being on black.
The orange at the top and bottom and that the sentiment
is mounted on are from my stash of alcohol ink backgrounds
that I have made.
I didn't put a sentiment inside these cards, except for the
Dream card.  I will either stamp them or write in them
when I decided to use them.

Thanks for stopping by today.
I hope you have been inspired in some way.
Come again soon.
Until then,
use something "different" for a card.


Tuesday, April 5, 2022

I Challenged Myself

Welcome blog friends!
One day I wanted to craft and didn't really 
have any set plans for what to do.
I decided to challenge myself to make some 
cards with images and backgrounds from my
stash.  These are three of the cards I made.
I had this image all colored and in my stash for a
long time.  It's not my usual style of image, but
I like it a lot, so I fussy cut it.
Then I went to my box full of backgrounds
that I have made and picked out this one. 
It was made with alcohol inks.  I simply adhered
the image to the inked panel and then added
it to a card base and I had it done.
Next I found this poppy image, which is one of my
favorite flower images.  I fussy cut it leaving a bit of a
white border around the image.  I think this really helps
set it out from the background.
I chose this background, which was also made 
with alcohol inks.  It's hard to see, but it also
has areas of gold foiling.  While the ink was still a
little bit sticky, I pressed the foil to the ink and then pulled 
it off.  This leaves the foiling anywhere that it could 
stick to the ink.  
I used foam tape to adhere the flower to the background panel,
then adhered it to a card base.
For this card, I pulled out a tag and 
covered it with the alcohol inked background
piece.  I had a totally different idea in mind,
but then the silver and pink flocked animal 
print caught my eye and I added that.
I then used a stamp and 
Alcohol Lift Ink
to stamp the sentiment.
If you haven't ever used 
Alcohol Lift Ink, I encourage you to
give it a try.  I love using it.
Now I had a tag, but what to do with it?
I actually tried a couple other things and ended
up taking them apart, nothing seemed to be working
for me with this.
Then I decided to mount the tag on a piece of 
silver card stock, then black, then a card base.
As you can see, I trimmed each layer out as I went.
I really love how this turned out in the end.

I'm glad and grateful that you stopped by today.
I hope you have learned something or been inspired
in some way and will come back again.
Until then;
challenge yourself in some way.


Note the links are only to give a reference so you can
see what the products are.
I didn't necessarily purchase from these sites,
except where specified,
and you may find better prices elsewhere,
I am in no way promoting any particular site.


Saturday, December 18, 2021

Eco print cards

Good day friends!
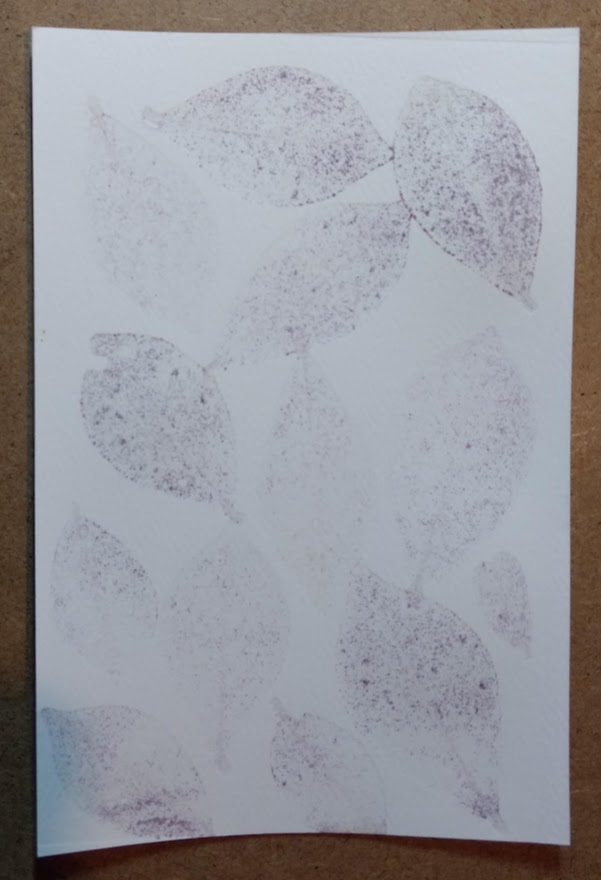
A few weeks ago, I suddenly had a desire to do some
eco-printing.  I saw the beautiful leaves that were falling
and wondered how they would work on some prints.
So I gathered up some leaves from the ground and some 
that hadn't fallen yet and set myself to work.
Here are a few that I did with some leaves from our
"burning bush" that gets bright red leaves in the fall.
I laid the leaves on a piece of card stock,
laid another piece of card stock over it and 
ran them through my Cuttlebug.
This is what I got and I just love how they turned
out.
I thought I may as well experiment a little more,
so I put another piece of card stock over the leaves 
and ran it through again.
This more muted piece is what I got from the second pass.
Here are the cards I made with those first 
prints.  Just trimmed them to size,
adhered to some colored card stock and
then onto a card base.
This was just the start of the prints I made with leaves and
some flowers that were still hanging around, but
I haven't had time to make anything with the other
prints.  I'll show those in another post.
But I did learn that even though the leaves have fallen
from the trees, as long as they aren't dried and brittle,
they are worth give a try running through
the cuttlebug.
I found some just didn't work as well, some gave
very strong colors and some were more muted.
You just have to give them a try, it's surprising the colors
you may get.

Thanks for stopping by today,
I appreciate that you spend time here.
Come again soon,
until then,
try some eco-printing.
Use leaves, flowers, grass whatever you can
find in nature that will go through your machine.


Monday, May 31, 2021

Father's Day Card

Welcome!
Father's Day is fast approaching, so I got a couple 
cards made to have ready.
I made this one for my husband who is a wonderful
father and grandfather.
I made it very easily using a background I found in
my hand made stash.
I used alcohol inks and spray alcohol to make this
background.
The sentiment was made using my 
This card, I made for my son, who is a wonderful father
to our beautiful 18 month old granddaughter.
I'm so proud of the father he is and the love and caring he
shows for Marie.
I used 2 background pieces from my stash for this one.
Both of them were made with alcohol inks.
I cut the sentiment and the shadow with my Silhouette.
The shadow was cut out of the brown background
then the letters were adhered into those spaces.
I trimmed out the top and bottom of the front to match the 
lettering, then decided to trim the inside of the card also.
This added just that little something inside.
My family always appreciates when I make cards for them,
so I know they will like these.
Have you made your Father's Day cards yet?

Thanks for stopping by today and spending some time
with me.
Come again soon.
Until then,
create something special.


Note the links are only to give a reference so you can
see what the products are.
I didn't necessarily purchase from these sites,
except where specified,
and you may find better prices elsewhere,
I am in no way promoting any particular site.


Sunday, June 14, 2020

Smile

Hello and welcome!
I think a rainbow of colors is so happy looking!
I decided to make some simple cards with a happy
look, so I got out my watercolors and made these.
I thought "smile" was a prefect addition to the fronts of 
these cards.  
I had trimmed off a bit of the front panel to make it fit
on the card and thought I'd carry the color inside.
For this card I use a smaller swatch of colors and
heat embossed the "smile" with embossing powder.

I hope these cards made you smile as well as the friends the
were sent to.
Until next time
Smile and spread some rainbows.


Wednesday, June 10, 2020

Watercolor swatches

Hi y'all!
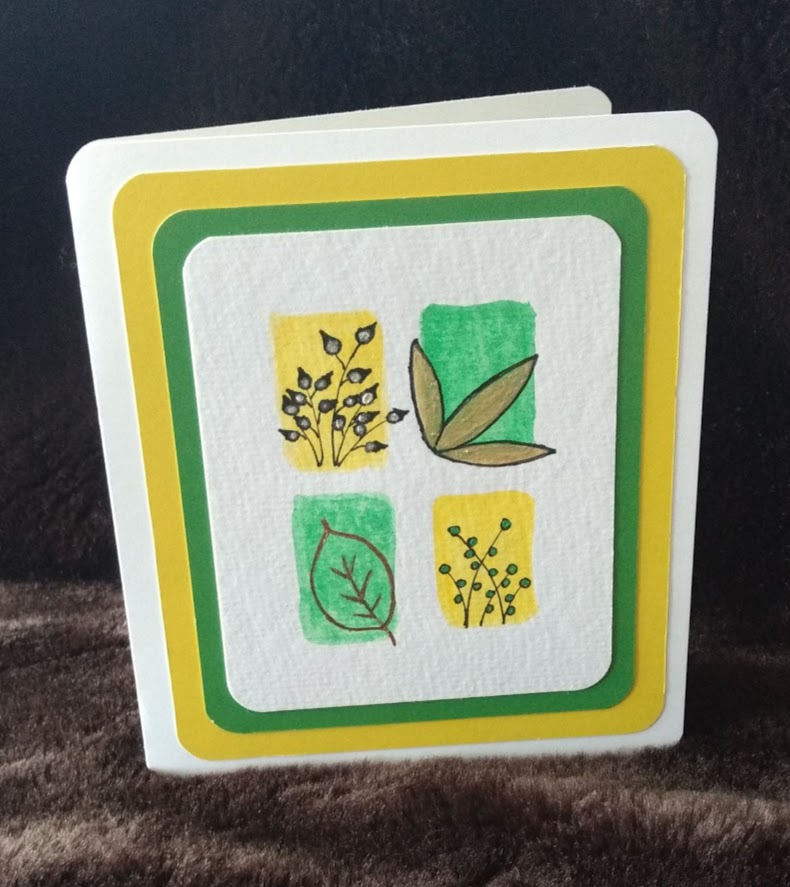
Today I have a couple cards to show you that I made
from some watercolor and doodling pieces that
I made.
I painted the swatches onto water color paper
with water color paints, then doodled with a black
pen.  I used more water color paints to paint in the 
leaves etc. and I love how these turned out.
Same technique was used on these swatches,
I've been practicing and thought I should do something
with the pieces I created, so cards it is.
I hope the people that receive them like them
as much as I do.

Thanks for spending time with me today,
I hope you have enjoyed your visit and will
come again soon.
Until then;
Try something new.


Friday, May 29, 2020

Embossed cards

Hi Everyone!
Today I have a few cards to show you.
I made these cards using an embossing folder.
I inked the one side of the inside of an embossing folder,
put card stock into the folder and ran it through
my Cuttlebug.
By inking one side of the folder, when it is run
through the Cuttlebug, it presses the ink into the 
embossed area, coloring it.
This image was inked and embossed with 
creating a nice crisp image.
After doing the first image, I did a second
generation print for this card.
I ran the folder through the Cuttlebug
again with a piece of card stock,
but did not reink the folder,
giving a much softer look.
This card was done with the same 
technique using an 
second generation  printing.
The embossing folder I used was

Thanks for spending time with me today.
I hope you have learned something and/or been
inspired in some way.
See you next time, until then;
Get inky!


Note the links are only to give a reference so you can
see what the products are.
I didn't necessarily purchase from these sites,
except where specified,
and you may find better prices elsewhere,
I am in no way promoting any particular site.


Monday, April 27, 2020

Eco Print Cards 2

Welcome!
I hope you're having a good day and getting through this
difficult time with good health.
Today I have a couple more cards that I made
from some of my eco-prints.
This one was done the same way the 2 in my last post
were done, using the masterboard as my background
and the eco-print as the focal point.
This one was a single leaf that I loved,
it is pretty light, but in real life you can see it a little
better.  I wet the paper a bit around the leaf and
tore around it to give an organic feel.
The background piece is hand made paper that
I had used some bronze and gold inks to color.

I'm glad you stopped in today for a visit and
I hope you'll come again soon.
Until next time:
Stay safe, stay healthy!

Thursday, April 23, 2020

Eco Print Cards 1

Hi crafty people!
Today I have some cards to show you that I
made with some eco-prints that I made.
Last fall I decided to give eco-printing a try.
I really enjoyed making the prints and seeing how
different leaves and flowers turned out.
I can't wait to give some flowers a try this summer.
I used my heat press to do these,
HERE is a video on the process.
If you don't have a heat press or don't want to
use it for this, just search eco-printing on YouTube
there are lots of videos out there to help you.
I cut the pages that I made into pieces featuring 
some of the prints I like the best.
The background layer is from a "masterboard" 
that I made a couple months ago.
This one was done with all the same supplies,
but I did ink up the edges with some 
Antique Linen Distress Ink.
This one I chose to add a small strip from a
background that I had in my stash, adding a little
color to the card.
I have a lot more eco-prints in my stash and
will be making more projects with them soon. 
Some as focal points and some as backgrounds.
I hope you'll come back and see what I come up with.

Thanks for stopping in today and spending a little
time with me.  I hope you will look up eco-printing and
maybe give it a try.
Until next time;
Try something new!


Sunday, April 19, 2020

Alcohol Ink "Flower" cards

Hello everyone!
I hope you are all staying safe and healthy.
I've been home for about a month now,
I haven't really been motivated to do much in the
line of crafting, but every now and then I
sit down and get some things done.
I decided to take out my stash of backgrounds
and such and make some cards to send out to some 
of my family and friends.
Thought getting something in the mail,
other than bills, might bring a smile to their faces.
Here are a few of the cards I made from some
alcohol ink "flowers" that I had in my stash.
Silver card stock with alcohol inks.
I believe this one was done on photo paper.
Again, done on photo paper.
I hope these cards put a smile on someones face.

Thanks for stopping by today,
I'll be sharing more of the little projects I've
been doing, so be sure to stop back again soon.
Until then:
Stay safe, Stay healthy!

Sunday, March 29, 2020

Flowers and Hearts

Hello crafters!
Today I have some cards and book marks to show you.
I recently saw a video, I'm sorry I don't know whose 
it was, and she made flowers with hearts.
I took the idea and went with it and here's what I 
came up with.
I used scrap pieces of backgrounds that I made with
alcohol inks.
Some hearts I punched, but most of the large ones
I cut freehand.


Thanks for coming by today.
I hope y'all are doing well and keeping
yourselves busy during this health crisis.
Maybe you can use up some of your scraps
to make some cards or book marks like these.
You can use any kind of paper and they 
will turn out cute.
Until next time,
stay safe, stay healthy and stay busy.

Thursday, October 31, 2019

Halloween Cards

Happy Halloween!
Today I'm sharing a couple cards I made for
Halloween.
I made this spinner card using 
I stamped the image onto white card stock, 
colored it, adhered it with temporary adhesive
to another piece of card stock and fussy cut it.
Adding the other card stock to the back gives 
that second layer to sandwich the thread
to make the spinner mechanism.  It also
gives a nice clean look to the back
of the image.
I didn't want the sentiment and what I wrote
to show through the front of the card,
so I made a circle flip up the same size as
the cut out in the front of the card.
Where I stamped Happy Halloween and
signed the card.
This card was an odd size, so I made my own 
envelope with my 
I stamped 
and colored it for a festive look, 
using colored pencils.
The other card I made was this
spider card.
I think he turned out pretty cute.
I love the little shoes I made for him too!
It was a little bit of a challenge getting him into 
the envelope, but since I made my own envelope
I made it happen.  I just hope he arrived okay, 
having been squished into the envelope.
I attached a card base to the bottom, 
where I stamped a greeting and could sign the card.
I stamped the envelope with 

I hope the kids I sent these to enjoyed them,
and had a frightfully good Halloween.

Thanks for stopping by today,
hope you enjoyed your Halloween.
Come again soon,
until then 
don't eat too much candy!


Note the links are only to give a reference so you can
see what the products are.
I didn't necessarily purchase from these sites,
except where specified,
and you may find better prices elsewhere,
I am in no way promoting any particular site.