My Other Pages

To make it easier to read about our trip to Ireland, I have made a page that is just for that. There is a tab above for Ireland Trip 2014 or click on the Home tab to read my other posts. I have also created a new page for My Weight Loss Journey if you are interested in that, click on the tab above.
Showing posts with label Alcohol ink. Show all posts

Tuesday, February 4, 2025

Gift for Grandma and Grandpa

Hello crafty people!
I hope all is well in your part of the world.
Today I'm sharing a gift that I helped 
Marie and Asher make for their 
Grandma and Grandpa for Christmas.
I found this little hanging metal sign at the
Dollar Tree one day.  I picked it up with 
a whole bunch of others to use with the kids.
Their Grandma and Grandpa have a boat and I thought
it would be just perfect for them.
I took the jute off and let the kids pounce all over the
sign with alcohol inks.  They had a ball painting it and
we all thought it turned out great.
I did have to clean up the anchor with some alcohol, but that
was simple enough.  I tied the jute back on and then 
found some letters in my stash to add their name.
Marie and Asher were very excited to have made
this special gift for their grandparents.
Of course, Marie thought it was pretty funny that
G-Ma was the messiest one and ended up with blue 
fingers.  The next day I had a doctor appointment and
Marie thought it would be funny if the doctor thought I 
had some crazy disease.
She didn't, she just asked "You been painting?"
Didn't fool her one bit.

Thanks for stopping by today,
I hope you have been inspired in some way and will
come again soon.
Until then,
remember, crafting doesn't have to always be expensive.
Take a look a the Dollar Tree in your area and the clearance
items in your local craft stores.
This project only cost me $.50!


Friday, August 25, 2023

Swap Tag and Card

Hello and welcome!
I'm in a small online group of friends who
are doing swaps.
For the month of August, the theme was
"All that glitters"
I could make whatever I wanted to make.
Usually they are ATCs, tags or cards.
This month I chose to make a tag for my friend
Becky.
I cut a mask and stencil from 
I first put down the mask of the lady and
ink blended around her.
Then I removed the mask and put the stencil
down, so only the lady was showing.
I used a VersaMark pen to "color" in the
hair and dress areas and applied 
to those areas.
For the face and arms I used colored pencils 
to get a skin tone.
"Just be fabulous"
 was printed with my 
label maker on clear label tape.
I wish the glitter of it showed up better in the picture.
I really enjoyed making this tag.
I always like to send a hand made card along with my 
swap, so I made this card.
I wanted it to go along with the theme of the swap, so I used
silver reactive foil. When some of the alcohol ink was 
still a bit damp I laid down the foil, gave it a good
rub and then pulled it up, leaving random areas
of silver foil behind.
The alcohol ink and foil were done on vellum,
then it was layered onto a shimmery silver card stock
and finally onto pink and a white card base.
I was very happy with the card and tag alike
and Becky said it made her day 
when she received them.

I'm so glad you have stopped in today to see what
I've been creating.
I hope you have been inspired in some way and
will come again soon.
Until then,
glitter something up.


Note the links are only to give a reference so you can
see what the products are.
I didn't necessarily purchase from these sites,
except where specified,
and you may find better prices elsewhere,
I am in no way promoting any particular site.


Thursday, February 2, 2023

You Are My Sunshine Valentine Card

Hello y'all!
Today I have another Valentine's Card to show you.
The back ground is a piece of alcohol inked 
glossy card stock from my stash.
I die cut a heart and off set it to the right to give a
little more interest to the card.
I stamped the sentiment and drew my dash lines and
all that was left was to adhere it all to a white card base,
and of course, stamp a sentiment inside.
The Happy Valentine's Day inside was stamped with 
I love this stamp set, it is quite large, but it works for me.

Thanks for stopping by today.
I hope you will stop again to see what I'm up to.
Until then,
use your stash!


Sunday, January 29, 2023

You Make My Heart Smile Valentine Cards

Hello everyone!
Today I have a couple more Valentine cards to show you.
I used a piece of alcohol inked card stock from my stash
as a background.
I cut the heart our with a die and my Cuttlebug,
stamped the sentiment onto it and added little
dash lines around the heart.
It was adhered with foam tape to the front of
the card.
This card was even simpler to make.
I found the paper with the red flower petals around
the edge in my stash and used that as a front panel.
Stamped the sentiment, I adhered it to
a red card base and it was done.
For both cards I stamped 
Happy Velentine's Day
on the inside with a
Dyan Reavely alpha set
Easy peasy cards,
just use what you have, use up that
stash and people will love these cards much more
than something bought from a store.


Note the links are only to give a reference so you can
see what the products are.
I didn't necessarily purchase from these sites,
except where specified,
and you may find better prices elsewhere,
I am in no way promoting any particular site.


Monday, October 10, 2022

Halloween Cards 2

Hello!
My last post I showed you a couple Halloween cards.
Today I have the other 2 that I made to share with you.
I started with this background piece that I had in my stash.
I used alcohol inks on a coffee filter, then cut the filter
to size and adhered it to a piece of card stock.
When I was ready to use it, I ran it through my Cuttlebug
in an embossing folder to get some texture.
I stamped the witch with black ink and colored in the
other areas with colored pencils.
Once it was fussy cut, it was adhered to the card.
For the sentiment, I stamped the spider web, then
the greeting and fussy cut around some of the web.
I used the same web stamp for the BOO greeting
for the inside sentiment.
Used the same witch stamp for this card and adhered it
to an alcohol inked background along with the sentiment.
Inside I used the same stamps and added some other 
spider webs in the corners.
I loved making these cards, my biggest problem
is deciding which kids get which cards.

I'm glad you stopped by today and hope you have 
enjoyed it and have been inspired in some way.
Hope you'll come again soon.
Until then,
enjoy the season!


Tuesday, April 5, 2022

I Challenged Myself

Welcome blog friends!
One day I wanted to craft and didn't really 
have any set plans for what to do.
I decided to challenge myself to make some 
cards with images and backgrounds from my
stash.  These are three of the cards I made.
I had this image all colored and in my stash for a
long time.  It's not my usual style of image, but
I like it a lot, so I fussy cut it.
Then I went to my box full of backgrounds
that I have made and picked out this one. 
It was made with alcohol inks.  I simply adhered
the image to the inked panel and then added
it to a card base and I had it done.
Next I found this poppy image, which is one of my
favorite flower images.  I fussy cut it leaving a bit of a
white border around the image.  I think this really helps
set it out from the background.
I chose this background, which was also made 
with alcohol inks.  It's hard to see, but it also
has areas of gold foiling.  While the ink was still a
little bit sticky, I pressed the foil to the ink and then pulled 
it off.  This leaves the foiling anywhere that it could 
stick to the ink.  
I used foam tape to adhere the flower to the background panel,
then adhered it to a card base.
For this card, I pulled out a tag and 
covered it with the alcohol inked background
piece.  I had a totally different idea in mind,
but then the silver and pink flocked animal 
print caught my eye and I added that.
I then used a stamp and 
Alcohol Lift Ink
to stamp the sentiment.
If you haven't ever used 
Alcohol Lift Ink, I encourage you to
give it a try.  I love using it.
Now I had a tag, but what to do with it?
I actually tried a couple other things and ended
up taking them apart, nothing seemed to be working
for me with this.
Then I decided to mount the tag on a piece of 
silver card stock, then black, then a card base.
As you can see, I trimmed each layer out as I went.
I really love how this turned out in the end.

I'm glad and grateful that you stopped by today.
I hope you have learned something or been inspired
in some way and will come back again.
Until then;
challenge yourself in some way.


Note the links are only to give a reference so you can
see what the products are.
I didn't necessarily purchase from these sites,
except where specified,
and you may find better prices elsewhere,
I am in no way promoting any particular site.


Tuesday, December 28, 2021

2021 Christmas Ornaments

Hello blog fans!
I hope you are having a wonderful holiday season.
A few years ago I started a new tradition in our family.  
Whoever comes to Christmas dinner receives
a home made ornament from me.
My son and daughter in law have been hosting
Christmas dinner the last couple years, 
but I've continued the tradition.
This year, these are the ornaments I made.
They started out like this.
 Several years ago I was out shopping at one 
of the craft stores and found packages of
metal tags dirt cheap on clearance.  Of course I couldn't pass up
that deal, so I bought a couple packages.  Had no idea
what I might do with them, but knew I'd come up with something.
This year I came up with something.
I used alcohol inks to color the metal tags,
then used stamps and Alcohol Lift Ink to
lift the ink from the tag.
It's a very simple process that turns out looking great.
I did find that some colors lifted easier than others.
Surprisingly I found some of the lighter colors were
harder to lift than the darker ones.
It's all a matter of trial and error.
I also found that some stamps did not work as well as
others and it seems rubber stamps worked better than 
the clear acrylic/polymer stamps did.
The amount of ink used also made a difference.
If I did more than one coat to make the color 
appear darker, it was harder to get the ink to lift off.
But with persistence and repeated stamping, most of
them did work.
Although there were a few that just wouldn't lift.
I'm not sure why that was.
One of the great things about using the alcohol ink
on metal, is that if you don't like the color, the way it stamps
or if the ink won't lift, all you need to do is use some
 rubbing alcohol and remove the ink and start again.
I stamped the year on the back of each ornament.
This is one case where the polymer stamps worked
well.  It may be because it was such a solid 
image, but I can't say for sure.
I'm very happy with how this year's ornaments
turned out.

Thanks for stopping in for a visit, 
come again soon.
Until then,
have a happy and healthy 
new year.
Let's all make 2022 a 
wonderful and creative year!


    Note the links are only to give a reference so you can
see what the products are.
I didn't necessarily purchase from these sites,
except where specified,
and you may find better prices elsewhere,
I am in no way promoting any particular site.


Sunday, August 9, 2020

Journal for Watercolor Practicing.

Hello crafty people!
I wanted to show y'all another journal I made.
Yes, I've been obsessed with making journals lately.
This one I specifically made for myself and put watercolor
pages into it.  I need a place where I can do some
practicing with my watercolors and this will be perfect
for that. 
For the front I used this alcohol ink flower piece that I
had in my stash.
For the binding, I used a piece of goldish fabric.
I love how it turned out and I'm sure I'll love 
doing some practicing in this journal.
Hopefully I'll see some progress through out the book.

Thanks for stopping by today.
I hope you have been inspired in some way.
Come again soon, until then:
give something new a try!

Monday, May 25, 2020

Nature cards

Hello crafty friends!
The prompt for May for the
has been Nature.
Here is a card I made for that challenge.
The background is a piece of hand made paper
that I had in my stash.
The colored layer is a piece of deli paper
that I colored with alcohol inks.
The leaf image is an eco-print that I made
this past fall.
It is all adhered to a white card base.
I do love how it turned out, 
and I hope you do too.
Thanks for stopping by today,
hope you'll stop in again soon.
Until then:
See beauty in the little thing!


Sunday, April 19, 2020

Alcohol Ink "Flower" cards

Hello everyone!
I hope you are all staying safe and healthy.
I've been home for about a month now,
I haven't really been motivated to do much in the
line of crafting, but every now and then I
sit down and get some things done.
I decided to take out my stash of backgrounds
and such and make some cards to send out to some 
of my family and friends.
Thought getting something in the mail,
other than bills, might bring a smile to their faces.
Here are a few of the cards I made from some
alcohol ink "flowers" that I had in my stash.
Silver card stock with alcohol inks.
I believe this one was done on photo paper.
Again, done on photo paper.
I hope these cards put a smile on someones face.

Thanks for stopping by today,
I'll be sharing more of the little projects I've
been doing, so be sure to stop back again soon.
Until then:
Stay safe, Stay healthy!

Sunday, March 29, 2020

Flowers and Hearts

Hello crafters!
Today I have some cards and book marks to show you.
I recently saw a video, I'm sorry I don't know whose 
it was, and she made flowers with hearts.
I took the idea and went with it and here's what I 
came up with.
I used scrap pieces of backgrounds that I made with
alcohol inks.
Some hearts I punched, but most of the large ones
I cut freehand.


Thanks for coming by today.
I hope y'all are doing well and keeping
yourselves busy during this health crisis.
Maybe you can use up some of your scraps
to make some cards or book marks like these.
You can use any kind of paper and they 
will turn out cute.
Until next time,
stay safe, stay healthy and stay busy.

Friday, March 13, 2020

Challenge Swap - Floral

Hello!
I hope y'all are doing well and keeping healthy
during this trying time.
Our most recent Challenge Swap in my 
online crafting group was "floral"
Today I'm showing you what I sent to my friend,
Lisa, for this swap.
I happened to see THIS TUTORIAL from 
Almut Olsson
on YouTube and knew right away this is what I
wanted to make. This "wallet" was made from a 
brown paper lunch bag.
It's a cute little wallet that can be used for
any number of things.
The paper I used to cover the wallet is mulberry paper
that I colored with alcohol ink and shaving cream.
When opened, there are 2 little pockets.
I stamped some small floral images as well as
fussy cutting others and included them in the wallet.
I also stamped some of my favorite floral images for her.
I colored some of them and left others uncolored.
The lower right flower was stamped onto white card
stock as well as onto the same paper as I used to cover the
wallet, then fussy cut it and adhered it to the card stock image.
I think it's always nice to have some different images 
to work with.  Lisa loved her swap gift.
Now on to our next one and that theme is 
Friendship.

Thanks for stopping by today to see what I'm up to.
I hope you are inspired in some way.
Until next time
Happy Crafting!

Friday, February 7, 2020

Dorky Bird Card and Cool Cat Envelope

Hello and welcome back!
My last post was a card I made for a little guy
turning 6.  Today I have the card I made for his twin 
sister.
I again used an alcohol ink background.
I stamped "Dorky Bird" with 
and colored it with colored pencils and 
fussy cut the image.
I stamped the Hello and cut it into a banner
and adhered the images with foam tape.
For the envelope I stamped
"Cool Cat" 
and colored him with colored pencils also.
I love how this card and envelope turned out
and I think the little gal they are going to will
like them too.

Thanks for stopping by,
I hope you have been inspired in some way.
Hope to see you again soon,
until then,
Happy Crafting!


Note the links are only to give a reference so you can
see what the products are.
I didn't necessarily purchase from these sites,
except where specified,
and you may find better prices elsewhere,
I am in no way promoting any particular site.

Monday, February 3, 2020

Party Poopers Birthday Card adn a Fishy Envelope

Hi Everyone!
Today I have a card to show you.
Recently a mom in a group I'm in on Facebook
posted that he twins are turning 6 yrs old and that they
love opening mail.  She asked if anyone would be
willing to send them cards for their birthday, just so they
would have them to open from the mail.
Being a card maker, I was happy to help out.
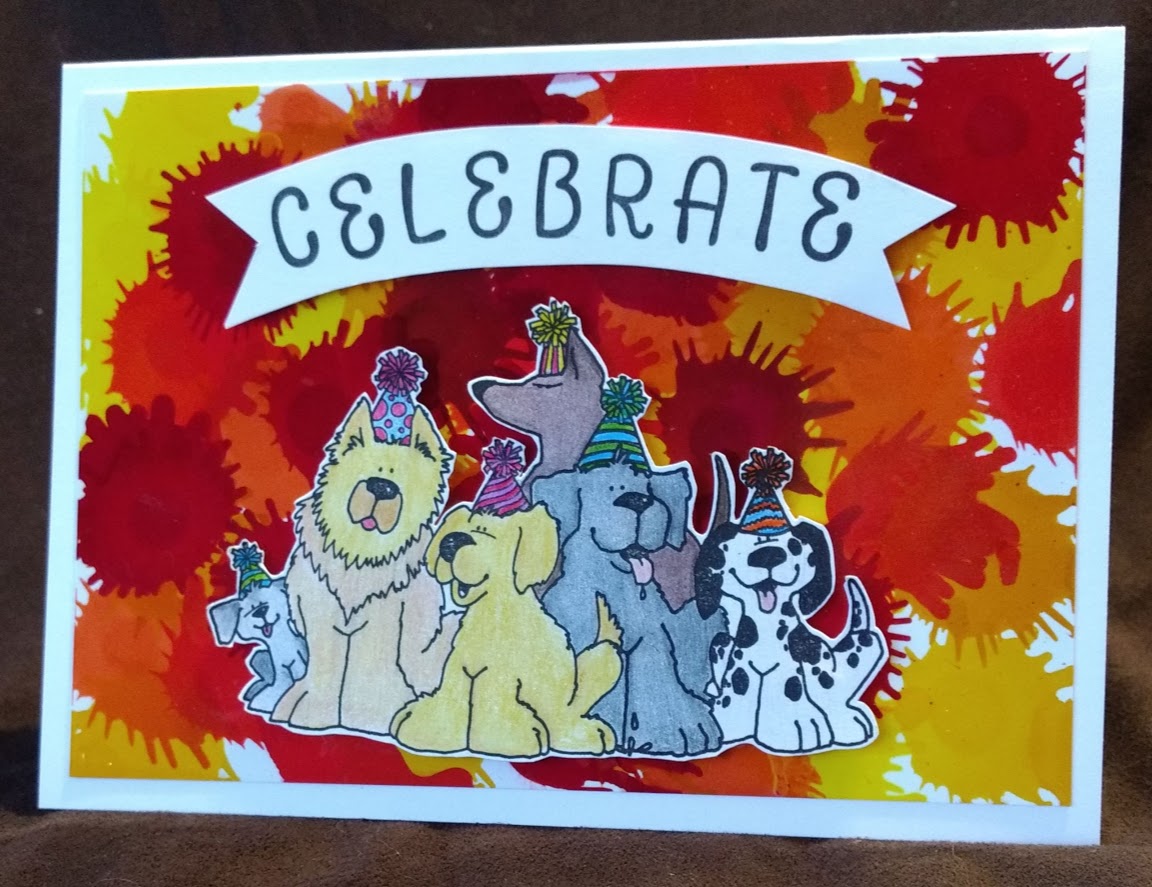
This is the card I made for her little guy.
The background piece was made with alcohol inks 
I thought it was a great background for a celebration.
The dogs are Party Poopers
I stamped the image with 
and colored them with colored pencils.
I fussy cut the image and adhered it to the background
with foam tape to give it a little dimension.
I stamped the Celebrate with an alpha stamp set
from my stash, I have no idea what company they are from.
I then fussy cut around it to make a banner shape.
The whole thing was then adhered to a white card base.
Inside I simply stamped "Happy Birthday"
I made the envelope with my
and decided to decorate it.
I stamped the fish onto the envelope, then stamped them 
onto scrap paper and fussy cut them to make a mask.
I put the mask over the fish (Sm Fat Fish & Lg Fat Fish)
and used Distress Inks to 
apply the 'water' to the envelope.
After taking the masks off the fish I colored them with 
colored pencils.
I covered the colored areas with 
which is a glaze that makes it water resistant, 
so the inks and coloring won't be ruined if they get wet.
I think the little guy will get a kick out of receiving 
this in the mail.

Thanks for spending time with me today,
I hope you have enjoyed it here at
Kristie Kreates 
and will come again soon.
Next up, the card I made for the other twin.


Note the links are only to give a reference so you can
see what the products are.
I didn't necessarily purchase from these sites,
except where specified,
and you may find better prices elsewhere,
I am in no way promoting any particular site.

Thursday, June 6, 2019

Challenge Swap #2

Hello crafty people!
I'm in an online group of friends and crafters
and we're doing a monthly challenge swap.
Today I'm showing you the card I did for the 2nd 
challenge.  It was my turn to choose the theme
and I chose "friendship"
I got to send my project to one of my closest friends,
so this was perfect for me.
I started by playing with some alcohol inks on
Yupo. I can't tell you which colors I used,
I just chose them and got to work playing.
This is how my first piece turned out and I loved
the color combination.
I made a couple more pieces with the same colors,
but blended them a little bit more.
I then used Alcohol Lift Ink to lift the Poppies image from
the ink on the Yupo.
I stamped what I picked up onto a piece of white card
stock, you'll see that later.
I loved the colors with this stamped image, 
so I started stamping on vellum and loved the results.
I cut a couple masks and stamped over this sheet of vellum.
I then laid it over the bright colored piece that
was my original creation.
I trimmed it down and adhered the vellum by 
folding it over the sides of the base piece,
using ATG tape on the back to hold it in place, then 
mounted it onto a white card stock base.
I use my computer to print the sentiment and adhered the
pieces to the front of the card.
I then took the pieces that I lifted the ink from and
played with them a little more, by adding some 
alcohol to them and this is what I got.
I love that you can just add more alcohol, and ink
if you want, and get more use out of the pieces.
I used the 2 pieces inside the card with the rest of the 
sentiment.
The flower in the bottom corner is the original
one that I stamped from lifting the ink.
I stamped it and fussy cut it, then added it
to the inside of the card.
The card was an odd size, so I made my own envelope
I lifted another bit of ink and stamped the envelope with 
a matching flower.
I loved making this card and sending it to one of
my closest friends.
I think she loved receiving it too.

Thanks for stopping by today,
I hope you learned something and/or have been
inspired in some way.
I hope to see you again soon.
Until then,
make something for someone you love.


Note the links are only to give a reference so you can
see what the products are.
I didn't necessarily purchase from these sites,
except where specified,
and you may find better prices elsewhere,
I am in no way promoting any particular site.