My Other Pages

To make it easier to read about our trip to Ireland, I have made a page that is just for that. There is a tab above for Ireland Trip 2014 or click on the Home tab to read my other posts. I have also created a new page for My Weight Loss Journey if you are interested in that, click on the tab above.
Showing posts with label colored pencils. Show all posts

Friday, January 13, 2023

Poppy Card

Hello from gloomy Western NY!
It's a typical January here as far as the sun.
It is out there every day, but we don't have any
real sunshine, lots of cloud cover and gloomy weather
lately.  But, it has been fairly warm for our area.
We did have a huge blizzard at Christmas, but a couple
days after Christmas it was in the upper 40s and into the 50s.
Thus is the crazy weather of the Buffalo, NY area.
I hope you are having nice weather in your area.
I thought I'd inject a little bit of summer and brightness
into everyone's day with this card that I made.
This is one of my favorite stamps.  It is from Stacy Stamps,
but I believe she is no longer in business, so I don't have a link
to this set.
The poppy stamp I used for this card is a single poppy.
I made a few masks, so I could layer the poppies.
I then stamped them with VersaFine onyx black ink,
and colored them with colored pencils.
Once I was happy with the coloring, I fussy cut
the image and adhered it to a blue card base.
I love the colors on this card, so bright and cheerful.
Inside I stamped this sentiment, sorry, I don't know 
what set or company this is from.
I love how this card turned out and hope it brings a little
summer brightness to your day.

Thanks for stopping by today to see what I've been 
up to lately.  I hope you will come again soon.
Until then:
bring some brightness to someone.


Monday, October 10, 2022

Halloween Cards 2

Hello!
My last post I showed you a couple Halloween cards.
Today I have the other 2 that I made to share with you.
I started with this background piece that I had in my stash.
I used alcohol inks on a coffee filter, then cut the filter
to size and adhered it to a piece of card stock.
When I was ready to use it, I ran it through my Cuttlebug
in an embossing folder to get some texture.
I stamped the witch with black ink and colored in the
other areas with colored pencils.
Once it was fussy cut, it was adhered to the card.
For the sentiment, I stamped the spider web, then
the greeting and fussy cut around some of the web.
I used the same web stamp for the BOO greeting
for the inside sentiment.
Used the same witch stamp for this card and adhered it
to an alcohol inked background along with the sentiment.
Inside I used the same stamps and added some other 
spider webs in the corners.
I loved making these cards, my biggest problem
is deciding which kids get which cards.

I'm glad you stopped by today and hope you have 
enjoyed it and have been inspired in some way.
Hope you'll come again soon.
Until then,
enjoy the season!


Saturday, September 24, 2022

Cards for 1st Birthday

Hi crafty fans!
Today I have a couple little cards to show you.
My great nephew turned 1 and I needed cards to
go with his gifts.
I decided to do small gift enclosure cards rather than
full sized cards.
I stamped this "Lion Balloon Stamp" onto white card stock,
colored it with colored pencils and fussy cut him.
For the grass, I simply cut a piece of green card stock and 
cut small slices into it to make the grass.  
The Happy Birthday was a stamp from my stash.
This card I used Elephant Balloon Stamp and the 
same process as the lion card.  I used 
embossing paste and gold glitter to make the 
"sand" along the bottom.
These were both quick and easy cards to make and
perfect for a 1 yr old.

Thanks for stopping by today and spending a little 
time here.  I hope you will come again soon.
Until then,
keep calm and stamp on!


Friday, December 10, 2021

Little Fox Card

Hello blog friends!
I hope you're having a warm and cozy day.
It's cold here in my neck of the woods, so I'm 
bundled up in a nice warm sweater.
Today I have a card to show you.
I made this for my granddaughter's 2nd 
birthday.  She loves animals and I thought this
guy was very cute.
The background was embossed with an
embossing folder from my stash and then
inked with brown ink and a make up brush
to bring out a bit of detail.
I colored the fox with colored pencils, cut him 
out with the matching die and added some 
googly eyes, which I think made him even cuter.
I stamped and fussy cut the sentiment and added the
little heart and was done.
As usual, on the inside I added my own
personal note.

Thanks for stopping by today,
I hope you'll come again.
Until then
keep warm and snuggle with someone.


Thursday, August 13, 2020

Card/Photo Carrier

Hello and welcome to 
Kristie Kreates.
Today I'm showing you a card/photo carrier that I made
for my sweet Aunt Marilyn.
Aunt Marilyn lives in North Carolina and I haven't been able to 
see her due to COVID.
I hope this will cheer her up and give her some smiles.
I wrote a letter to put into it and enclosed some pictures of
our family.  She has never met my daughter in law or granddaughter,
so I thought some pictures would be very welcome.
I stamped the
 onto white card stock with 
then colored it with colored pencils.
The "card" itself is made from 2 envelopes.
The flap of one envelope was glued into the other envelope,
then the outside was covered with  the green paper
and the flower image was adhered on top.
I chose some colorful paper from my handmade background stash for the
inside.  Here you can see where the envelopes open in the center to put 
the pictures inside.
I'm sure that Aunt Marilyn will keep this right next to her chair and look 
at the pictures often.  I know they will make her smile.

Thanks for stopping by today,
I hope you have been inspired in some way.
Come again soon,
until then:
Make something pretty for someone.


Note the links are only to give a reference so you can
see what the products are.
I didn't necessarily purchase from these sites,
except where specified,
and you may find better prices elsewhere,
I am in no way promoting any particular site.


Thursday, May 21, 2020

Jump Start Your Mojo

Welcome to Kristie Kreates!
Today I have a couple coloring pages to show
you.  During the COVID lockdown, there have
been plenty of days that I just haven't
been motivated to be creative.
One of the things that helped jump start my
mojo was to just pick up a coloring book and
colored pencils and do a little coloring.
Here are 2 pages that I colored, just for something
to do to try to get my mojo back.
I'm not sure what I'll do with them,
but they are in my background stash now.
Maybe an envelope, maybe a background, 
maybe the front of a card or an element 
for a card or project.

Thanks for stopping in today,
hope to see you again soon.
Until then;
try something simple to jump start your
creativity.

Friday, February 7, 2020

Dorky Bird Card and Cool Cat Envelope

Hello and welcome back!
My last post was a card I made for a little guy
turning 6.  Today I have the card I made for his twin 
sister.
I again used an alcohol ink background.
I stamped "Dorky Bird" with 
and colored it with colored pencils and 
fussy cut the image.
I stamped the Hello and cut it into a banner
and adhered the images with foam tape.
For the envelope I stamped
"Cool Cat" 
and colored him with colored pencils also.
I love how this card and envelope turned out
and I think the little gal they are going to will
like them too.

Thanks for stopping by,
I hope you have been inspired in some way.
Hope to see you again soon,
until then,
Happy Crafting!


Note the links are only to give a reference so you can
see what the products are.
I didn't necessarily purchase from these sites,
except where specified,
and you may find better prices elsewhere,
I am in no way promoting any particular site.

Monday, February 3, 2020

Party Poopers Birthday Card adn a Fishy Envelope

Hi Everyone!
Today I have a card to show you.
Recently a mom in a group I'm in on Facebook
posted that he twins are turning 6 yrs old and that they
love opening mail.  She asked if anyone would be
willing to send them cards for their birthday, just so they
would have them to open from the mail.
Being a card maker, I was happy to help out.
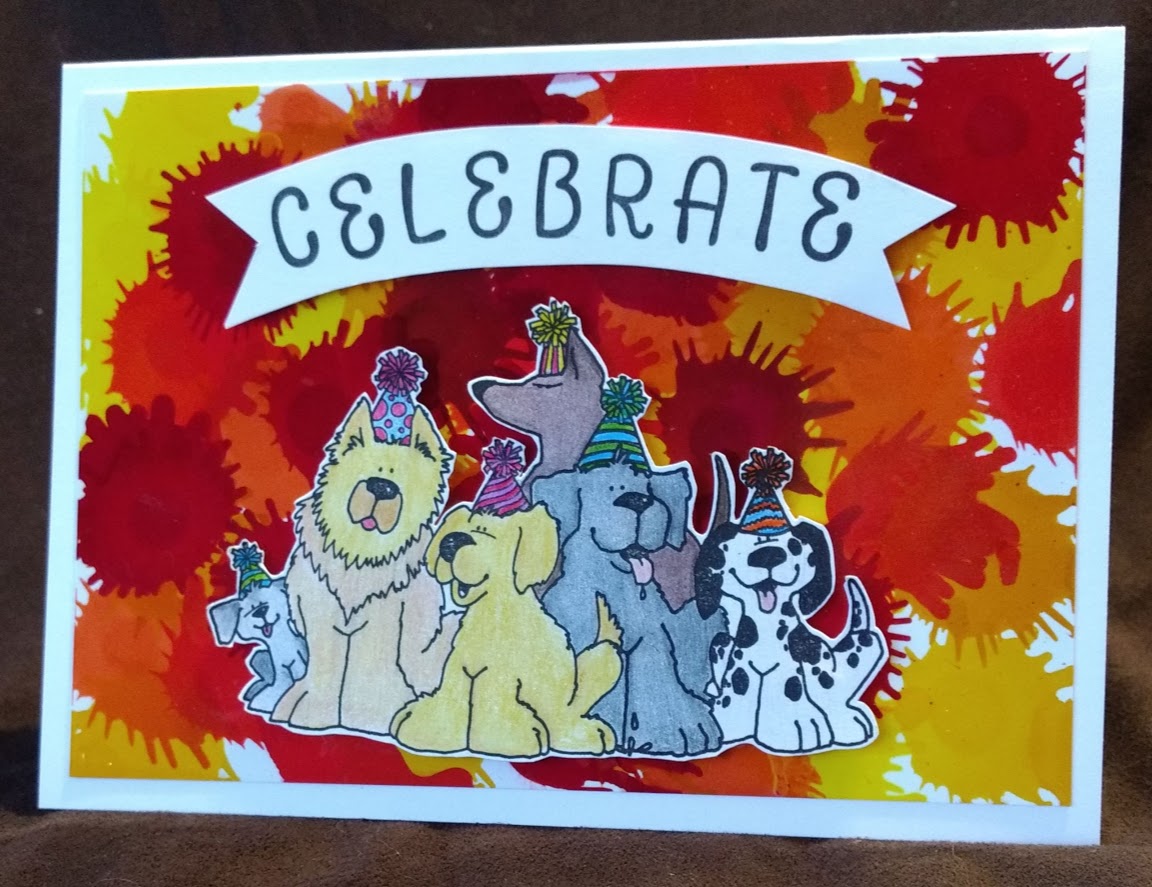
This is the card I made for her little guy.
The background piece was made with alcohol inks 
I thought it was a great background for a celebration.
The dogs are Party Poopers
I stamped the image with 
and colored them with colored pencils.
I fussy cut the image and adhered it to the background
with foam tape to give it a little dimension.
I stamped the Celebrate with an alpha stamp set
from my stash, I have no idea what company they are from.
I then fussy cut around it to make a banner shape.
The whole thing was then adhered to a white card base.
Inside I simply stamped "Happy Birthday"
I made the envelope with my
and decided to decorate it.
I stamped the fish onto the envelope, then stamped them 
onto scrap paper and fussy cut them to make a mask.
I put the mask over the fish (Sm Fat Fish & Lg Fat Fish)
and used Distress Inks to 
apply the 'water' to the envelope.
After taking the masks off the fish I colored them with 
colored pencils.
I covered the colored areas with 
which is a glaze that makes it water resistant, 
so the inks and coloring won't be ruined if they get wet.
I think the little guy will get a kick out of receiving 
this in the mail.

Thanks for spending time with me today,
I hope you have enjoyed it here at
Kristie Kreates 
and will come again soon.
Next up, the card I made for the other twin.


Note the links are only to give a reference so you can
see what the products are.
I didn't necessarily purchase from these sites,
except where specified,
and you may find better prices elsewhere,
I am in no way promoting any particular site.

Wednesday, December 4, 2019

Card Drive

Hello crafty friends!
Today I'm showing you a couple cards I made
for a card drive.
These are for a non profit called
they help people who have dogs with cancer.
They are in need of cards to send as encourangment,
sympathy and thanks.
These are the 2 that I made.
I stamped "Dorky Bird" with 
and colored it with colored pencils.
This image was stamped and colored the way as the 
card above.  The image is

Thanks for stopping in today,
I hope you've been inspired in some way.
See you soon,
Until then
spread handmade kindness!


Note the links are only to give a reference so you can
see what the products are.
I didn't necessarily purchase from these sites,
except where specified,
and you may find better prices elsewhere,
I am in no way promoting any particular site.


Friday, November 22, 2019

Becky's Christmas Swap

Hello crafting fans.
I belong to a facebook group of friends
that are all into crafting and art of various
types.
We decided to do a Christmas gift swap
and the gal who I made my gifts for 
is very into crocheting.
I decided to make her a bag to carry some of
her work in.  I downloaded the yarn and crochet hook
pattern from The Craft Chop and cut it from
I then used my heat press to add it to the bag.
For this little bag for her crochet hooks,
I altered the original design and made the
crochet hooks.
I designed my own wording and cut them
then added them to the little pouch.
I think she'll get a kick out of this.
I'm very happy with the way these gifts turned out
and I'm pretty sure Becky will enjoy them too.
I wanted to send a card along with the gift, so
I made this spinner card. The Santa is on a string and
before putting the card in the envelope I will spin it around.
When she opens the card the Santa will spin.
This is made from the 
and colored with colored pencils.
Inside the card, I made a flap that shows through 
the front of the card, once she opens the card, she can
lift the flap to read the sentiment..
I also made a Christmas envelope to go with the card,

Thanks for coming and spending some time with me
today.  I hope you have been inspired in some way
and will come again soon.
Until then,
make something nice for someone else!


Note the links are only to give a reference so you can
see what the products are.
I didn't necessarily purchase from these sites,
except where specified,
and you may find better prices elsewhere,
I am in no way promoting any particular site.

Monday, November 18, 2019

Swap round 2 #1 Dogs and/or Cats

Hello everyone!
My crafting group of friends have started a new
round of swaps and today I'm showing you what I 
made for our first round.
The theme was dogs and/or cats.
The friend that I got, Marie, likes to sew, so this is
the little card I made to go with the swap.
Marie likes journalling cards to use in her scrapbooking
so I made a variety of dog and cat
ones for her.
These can also be used as card fronts if she 
chooses.  Just add a sentiment and adhere to a
card base and she's ready to go.
These are all stamped with VersaFine Onyx Black ink
and colored with colored pencils.

The "cool cat" is actually on the envelope that
I sent all her little gifts in.  I covered her
name and address for privacy.
She especially love 'cool cat' but
I think she really loved them all.
Now I wonder what our next swap theme
will be.

Thanks for stopping by today.
Come again soon,
until then, 
share your talents with others.

Thursday, October 31, 2019

Halloween Cards

Happy Halloween!
Today I'm sharing a couple cards I made for
Halloween.
I made this spinner card using 
I stamped the image onto white card stock, 
colored it, adhered it with temporary adhesive
to another piece of card stock and fussy cut it.
Adding the other card stock to the back gives 
that second layer to sandwich the thread
to make the spinner mechanism.  It also
gives a nice clean look to the back
of the image.
I didn't want the sentiment and what I wrote
to show through the front of the card,
so I made a circle flip up the same size as
the cut out in the front of the card.
Where I stamped Happy Halloween and
signed the card.
This card was an odd size, so I made my own 
envelope with my 
I stamped 
and colored it for a festive look, 
using colored pencils.
The other card I made was this
spider card.
I think he turned out pretty cute.
I love the little shoes I made for him too!
It was a little bit of a challenge getting him into 
the envelope, but since I made my own envelope
I made it happen.  I just hope he arrived okay, 
having been squished into the envelope.
I attached a card base to the bottom, 
where I stamped a greeting and could sign the card.
I stamped the envelope with 

I hope the kids I sent these to enjoyed them,
and had a frightfully good Halloween.

Thanks for stopping by today,
hope you enjoyed your Halloween.
Come again soon,
until then 
don't eat too much candy!


Note the links are only to give a reference so you can
see what the products are.
I didn't necessarily purchase from these sites,
except where specified,
and you may find better prices elsewhere,
I am in no way promoting any particular site.

Sunday, April 15, 2018

Easter Favors

Hi blog friends!
I know I'm late with an Easter post, but I wanted to share 
with you the favors I made for my Easter guests.
As usual, I decided pretty last minute that I would 
make something for each place setting.
I don't know why I do this, I know I like to have something
for my guests, but always decide to make it at the last minute.
A couple days before Easter I picked up some things for 
the favors and the day before I decided that I would make
little tags to go on the bags.
I did a few different designs, all stamps from my stash
from when I was on a few design teams.
I've been playing with ink lately and making
background sheets to use when I need them.
This was what was left after I made the tags.
I used alcohol inks on some glossy paper
and I love the results.
Each goodie bag had a little package of 
chocolate chip cookies, some orange chocolate
sponge candy, and a few Reese's cups and Cadbury mini eggs.
Here they are all ready to go on the table.
This one is made with 
This one is 
This one is
There were 3 of the guys that love hot sauce
and since we had ham and they love it on ham,
I thought it would be the perfect little favor for them.
All the images were stamped with VersaFine, Onyx Black ink
colored with colored pencils, fussy cut, then adhered to the back
ground piece.
The sentiment is from a set that I got on clearance, 
because it had no outer wrapping, so I have no idea what
company it is from.
This is what each place setting looked like.
We had a wonderful Easter and I hope you did too.
Like I said, I know it's late for an Easter post,
but this kind of favor can be done for any 
dinner or event, it can be pulled together 
very quickly.
You don't have to stamp, color and fussy cut
everything.  You can just as easily, stamp a sentiment,
trim it down and put it on a little goodie bag, candy bar
or whatever you like.
I love doing this for my guests.

Thanks for stopping in today,
I hope you'll pop in again soon.
Until then,
create something beautiful.


Note the links are only to give a reference so you can
see what the products are.
I didn't necessarily purchase from these sites,
except where specified,
and you may find better prices elsewhere,
I am in no way promoting any particular site.


Friday, March 30, 2018

Cross with Flowers

Hello Everyone!
Here are a couple more Easter cards I made.
These are both one layer cards.
I stamped 
onto white card stock and colored them
with colored pencils.
I did color the background very lightly with 
blue as the white was a little to stark.
This toned it down just the right amount.
They were simply adhered to a blue card base
and Happy Easter was stamped inside.

Thanks for stopping in today,
I hope you've been enjoying this
Easter card series.
Until next time,
color something beautiful.

Thursday, March 29, 2018

Dorky Bird

Hi crafty friends!
Back again with a couple Easter cards.
These cards are a little different than the
average Easter card.
I guess the only thing that makes them 
Easter is the inside.
I love this Dorky Bird and thought it would
be cute to use for Easter cards.
I stamped, colored and fussy cut it, then
adhered it to the card with an Action Wobble
I think the Action Wobble makes it look like she is
waving. 
The background papers are from my scrap stash.
Inside I added a panel that I stamped and colored.
I used Happy Easter and simply colored them 
different for each card.


Now just to get them addressed and sent out.
Thanks for popping in,
I hope you're getting ready for Easter,
I know I am.
Until next time,
keep calm and carry on.


Note the links are only to give a reference so you can

see what the products are.
I didn't necessarily purchase from these sites,
except where specified,
and you may find better prices elsewhere,
I am in no way promoting any particular site.