My Other Pages

To make it easier to read about our trip to Ireland, I have made a page that is just for that. There is a tab above for Ireland Trip 2014 or click on the Home tab to read my other posts. I have also created a new page for My Weight Loss Journey if you are interested in that, click on the tab above.
Showing posts with label Silhouette Cameo. Show all posts

Saturday, March 1, 2025

Family Tee Shirts

Hello and welcome!
Today I have a few shirts to show you.
Every Christmas for the past few years, I've made
some shirts for my family.
These are 3 of the ones I made this past Christmas.
When I saw this idea, I had to make it for my son.
He has quite a beard and I knew he'd love it.
This is one I made for my grandson, Asher.
He is definitely "Seriously Handsome and Awesome"
I made this one for my husband, Dave.
He loves it and has worn it many times.
All these shirts were designed on my 
Shilhouette Design Studio program on my computer
and cut with my Silhouette Cameo from
I pressed the HTV onto the shirts with an iron.
I have a heat press, but have found that an iron 
works just as well and is much easier and more
convenient.

Thanks for stopping by today to check out what I've
been creating.
I hope you will come again soon.
Until then,
create something fun!


Note the links are only to give a reference so you can
see what the products are.
I didn't necessarily purchase from these sites,
except where specified,
and you may find better prices elsewhere,
I am in no way promoting any particular site.


Sunday, February 9, 2025

Fireball Cups

Hello all you crafty people!
Today I'm showing you a couple little gifts I gave
my girls for Christmas.
They have a resin business and sell at craft shows.
One day I was shopping with Jaryd and he found these little cups. 
They are bigger than a shot glass, but smaller than a 
regular cup.  They hold 3 oz.
They happened to have purple and teal, which are the 
Clumsy Cloud Gifts signature colors.
I picked them up for the girls so I could customize them.
On one side I put their logo.
On the other side I put the logo for 
Fireball.
Neither of them are big drinkers,
but it is their custom to have a shot of 
Fireball once they are home from a craft show.
These little cups will be perfect for that.
They loved them and they were easy to
customize with vinyl that I 
cut with my Silhouette Cameo.

Thanks for stopping in today,
I hope you've been inspired in some way.
Come again soon,
you never know what you'll find on 
Kristie Kreates!


Thursday, January 18, 2024

Crafty Girl Shirt

Hello everyone!
I hope 2024 is starting out well for y'all.
I'm sorry it's been so long since I've posted anything.
It was a crazy couple of months here with holidays
and such.  Then covid hit the family again.  Once that
was over we went on to something flu-like.
Hopefully, now I'm back again.
I have a little catching up to do, so some of these posts
might be a little out of season.
Today I'm showing you a shirt I made for Marie.
I got a larger sized tee shirt and made it into a crafting
shirt for her.  She loves her crafts and the shirt we have
has gotten a little small on her, so she was in need of
something new, to go along with the craft supplies 
we were giving her.
I created the design with my 
Silhouette Studio Designer Edition software and 
cut it with my Silhouette Cameo from 
Heat Transfer Vinyl.
The really fun thing is that the font I used is one that
Marie created herself.
Kelsie and Sara have started their own business,
with resin and hope to eventually have other
items to sell.  One of them is fonts for 
use with Silhouettes, Cricuts and such.
Marie made her own font and it's called
"Scribbles"
I love how this turned out and Marie loves it too.

Thanks for stopping by and I hope you'll come again soon.
Until then,
have fun crafting.


Friday, August 25, 2023

Swap Tag and Card

Hello and welcome!
I'm in a small online group of friends who
are doing swaps.
For the month of August, the theme was
"All that glitters"
I could make whatever I wanted to make.
Usually they are ATCs, tags or cards.
This month I chose to make a tag for my friend
Becky.
I cut a mask and stencil from 
I first put down the mask of the lady and
ink blended around her.
Then I removed the mask and put the stencil
down, so only the lady was showing.
I used a VersaMark pen to "color" in the
hair and dress areas and applied 
to those areas.
For the face and arms I used colored pencils 
to get a skin tone.
"Just be fabulous"
 was printed with my 
label maker on clear label tape.
I wish the glitter of it showed up better in the picture.
I really enjoyed making this tag.
I always like to send a hand made card along with my 
swap, so I made this card.
I wanted it to go along with the theme of the swap, so I used
silver reactive foil. When some of the alcohol ink was 
still a bit damp I laid down the foil, gave it a good
rub and then pulled it up, leaving random areas
of silver foil behind.
The alcohol ink and foil were done on vellum,
then it was layered onto a shimmery silver card stock
and finally onto pink and a white card base.
I was very happy with the card and tag alike
and Becky said it made her day 
when she received them.

I'm so glad you have stopped in today to see what
I've been creating.
I hope you have been inspired in some way and
will come again soon.
Until then,
glitter something up.


Note the links are only to give a reference so you can
see what the products are.
I didn't necessarily purchase from these sites,
except where specified,
and you may find better prices elsewhere,
I am in no way promoting any particular site.


Monday, August 21, 2023

Baby Shower Card

Good day!
Today I have a card I made for a baby shower
to show you.
I bought the svg file from the 
Silhouette Design Store
and cut it on my Silhouette Cameo.
As fine as some of the cuts are, it was an
easy one to cut and weed.
I adhered the die cut to the background paper, 
added the cloud with the greeting and
then added it all to a white card base.
To be honest, I actually cut the image larger
than I intended, so I made it into a square card,
but I'm glad, as I like how it turned out.
I wrote a personal note inside the card to go
with the shower gifts.

Thanks for stopping by today, 
I hope you have been inspired in some way.
Come again soon.
Until then,
embrace your "mistakes"
As I always say, there are no mistakes in 
crafting, only chances to be more creative.


Monday, July 24, 2023

Asher's Birthday Decorations

Welcome!
Today I have some things to show you from
my grandson, Asher's, birthday party.
I love when Sara asks for help with crafty things.
I started off by making the invitations for the party.
It took a bit of figuring, but I loved doing it.
I think they turned out adorable.
Sara asked me to make a banner for Asher's high chair.
She showed me a picture with an idea and said to go with what
ever I wanted.  I found pieces of bright colored fabric at 
the Dollar Tree and just cut them into strips.
I tied a few of the strips together and 
attached the "ribbons" to them.
For the Cookie Monster and Elmo,
I printed out the pictures of them, fussy cut them,
then laminated them.  I attached them with
gourd pins
Here's our birthday boy in the high chair with his
Sesame Street banner.
Sara found a cute book for everyone at the
party to sign, so she asked me to make a sign for it.
This is what I came up with.
She sent me the little poem, but I have no idea
where she got it or who to credit it to.
The book started out on the gift table,
but it didn't stay there very long.
Everyone was happy to sign it.
She also wanted a sign to hang near the gift table.
She told me what she needed it to say and to 
have at it.  I had a ball!
I printed the Elmo and fussy cut him.
The number 1, I found a picture and printed it
inside a number 1 then fussy cut that.
All the letters and balloons were also fussy cut 
and glued to the poster board.
Sign with the "It's my birthday" board on the 
gift table.
This was one of my favorite things that I made.
A Happy Birthday banner with all different 
Sesame Street characters.  I love how it turned out.
These were my other favorites.
I love making customized shirts for the kid.
Mr One-derful 
was made using my Silhouette Cameo and HTV
I think it turned out very cute.
Here is Mr. One-derful himself with Mommy.
Abby Cadabby is Marie's favorite character,
so I made this shirt for her.
Here she is in her shirt.
Kelsie and Sara put together
these trays.
Cookie Monster was made with 
blueberries and blackberries with 
little cups of dip for his eyes.
Oscar was made with veggies and olives
with dip for his eyes.
Big bird was cheese and crackers.
Dip with little tomato slices and blueberries
for his eyes.
I thought they did a great job on 
the platters.
And last, but not least,
here is the card I made for Asher.
I used a die from Kokorosa Studio
(unfortunately, I can't find it on their site.)
I printed the picture of the characters and fussy cut them
to add to the front of the card.
The sentiment is one I have in my stash.
I thought it was perfect for his Sesame Street themed party.
The party was wonderful and we had a fabulous time.

Thanks for stopping by today.
I hope you have enjoyed your time here 
and were inspired in some way.
Come again soon, you never know what your find
on Kristie Kreates.
Until then,
just be creative!


Note the links are only to give a reference so you can
see what the products are.
I didn't necessarily purchase from these sites,
except where specified,
and you may find better prices elsewhere,
I am in no way promoting any particular site.


Sunday, February 26, 2023

Arts & Crafts

Good day!
Today I'm sharing a layout that I created of my
Granddaughter and her love for  "Arts & Crafts"
When I ask her what she wants to do, she often says
"G-Ma can I do arts and crafts"
you never know what we'll get up to, but it's
always fun.
I love the picture of her flower painting on the right hand
page.  Click on the picture to enlarge it and 
you can read the little story about it.
 She was so confident when she finished it and
it was just perfect.
We had so much fun with all of these little projects.
I had to include a couple minions too,
so I created them with my 
Silhouette Studio Designer program and cut them
on my Silhouette Cameo.
The caterpillar was a real simple one to make,
it's just circles welded together and cut on my
Silhouette.  You could easily just punch circles and
glue them together if you don't have a Silhouette or other
cutter.
I had a lot of fun making this layout and hope you
enjoy seeing it too.

Thanks for stopping by to see what I've been up to.
Come again soon.
Until then,
get crafty with a kid.


Note the links are only to give a reference so you can
see what the products are.
I didn't necessarily purchase from these sites,
except where specified,
and you may find better prices elsewhere,
I am in no way promoting any particular site.


Sunday, January 9, 2022

Shot Glasses

Hi everyone!
I hope you're having a wonderful day.
Today I want to show you some etched shot
glasses that I gave my future son in law for Christmas.
He has a shot glass collection and loves the
Marvel characters.
I started by asking my local Buy Nothing Group if anyone
had clear shot glasses they no longer wanted.
(I've linked to the Buy Nothing Project site so you can
learn more about this and see if there is a group in
your area)
I got response from a couple people.  I only needed one
at the time, but it turned into a bigger project.
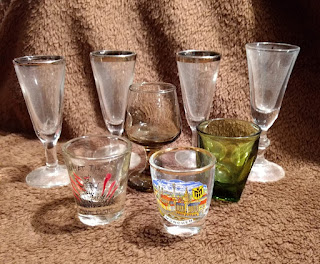
These weren't all what I was expecting, but I think they
will work out for a later project.
I did use the green one for this gift.
I also received these 6 glasses from another member.
They were perfect for what I was planning.
Using my Silhouette Cameo I cut stencils with 
vinyl, then applied the stencils to the glasses.
This one is the Captain America logo.
On the other side of the glass,
I etched the character's name.
Once the vinyl stencil was applied
It's simple to use, just follow the instructions
on the jar.
Here is the Avengers Logo.
And their name.  Sorry these pictures aren't
great, it's very difficult getting photographs of
etching on glass and the size of the names 
makes it difficult, but you get the idea.
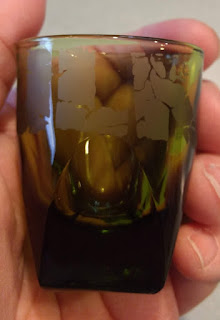
Hulk is Brad's favorite character and the
green shot glass was perfect for that character.
These 2 pictures show the HULK 
that is etched on the back of the glass.
Brad was thrilled with this little gift,
even more so because I made them for him.

I'm glad you stopped by today, I hope you are too. 
 Come again soon,
until then,
give something new a try and
check on a Buy Nothing Group
in your area.  I highly recommend 
being involved in one of these groups.


Note the links are only to give a reference so you can
see what the products are.
I didn't necessarily purchase from these sites,
except where specified,
and you may find better prices elsewhere,
I am in no way promoting any particular site.


D&D Bag

Good day!
My son, Jaryd, is into Dungeons and Dragons
and plays with his group of friends on a regular
basis. For Christmas my daughter, Kelsie, got him
some D&D items.  She wanted to have a storage bag 
to put all the items into for him to keep them together.
I, being the saver that I am, have many canvas bags of the
type she wanted.  I had several sizes, luckily, the blue one 
was just the right size and what she needed.
I hope no one is offended by the language on this bag,
but this was the order that I received from her.
software and cut it from silver heat transfer vinyl 
I used a Harry Potter font, as this has a D&D kind of feel to it.
I applied the vinyl to the bag with my heat press
and it was done.
Kelsie and Jaryd were both thrilled with how it turned
out.  I'm sure he'll be using it for years to come.

Thanks for stopping by today,
I hope you have learned something and/or somehow
been inspired.
Come again soon,
until then,
play a fun game.


Note the links are only to give a reference so you can
see what the products are.
I didn't necessarily purchase from these sites,
except where specified,
and you may find better prices elsewhere,
I am in no way promoting any particular site.


Monday, January 3, 2022

Engagement Party Shirts and Decorations

Hello everyone, I hope 2022 is starting of great for you..
Ours is.  Kelsie's bridal party held a
"Ring In The New Year" engagement party
for a few people on New Year's Eve.
I have a few things to show you that I created
for the event.
The party was very casual, pajamas, leggings, tee shirts,
what ever we wanted to wear.
I made these shirts for Kelsie and Brad.
I cut them with my Silhouette Cameo from some
HTV that I got for my birthday.

Here are a couple close up pictures, so you can see
the stars. (click on the pictures to make them larger)
This HTV was very easy to work with
and has some nice shine on the stars.
The theme for their wedding etc. is
"It was written in the stars"
so this was perfect for their shirts.
Sara and I made the decorations together.
I created a multi-sized file to cut the stars in my 
I cut the stars from a couple different colors of 
Once they were all cut, we strung them together
using a fine thread and hung them from the ceiling.
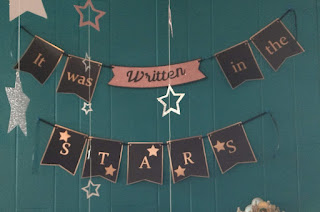
I also made the banner, cutting it out of black card stock
and backing it with metallic card stock.
We strung that with black ribbon.

I love how the banner turned out.
Since the theme was 
It was written in the stars
we thought it would be cute to have
their names hanging in the stars.
I used holographic vinyl and shadowed them with 
black card stock.
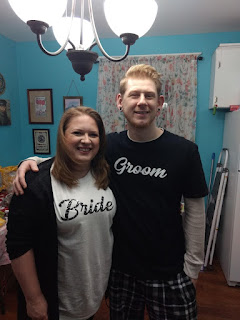
Here's a picture of the happy couple with
their shirts on that I made for them.
We were all very happy with how the
shirts and decorations turned out.
And the party was a big success.

Thanks for visiting today,
I hope you were inspired in some way.
Come again soon,
until then,
create!


Note the links are only to give a reference so you can
see what the products are.
I didn't necessarily purchase from these sites,
except where specified,
and you may find better prices elsewhere,
I am in no way promoting any particular site.


Tuesday, December 14, 2021

My Christmas Cards

Hello everyone!
Today I'd like to show you my Christmas cards.
I was having a difficult time figuring out what to 
do for my Christmas cards this year.
Nothing seemed to be clicking,
then, as often happens, an idea struck.
And what a messy idea it was!
I had seen the Altenew Burlap Texture Die on
several videos and finally picked it up.
I decided on a design and got to work.
What a mess I made, but it was so worth it!
I used an embossing folder from my stash
and embossed the backgrounds.
Then I found a tree in my library of my 
Silhouette Design Studio software and
cut them out with my Silhouette Cameo.
I used glitter card stock for the trees, but the glitter
doesn't show up well in the pictures.
Once I had all the pieces ready, I 
assembled the cards.
Gluing down that burlap piece was a little
tricky, then I got the idea to brush the back
with glue and a foam brush and it worked
like a charm.
I used the scraps of the gold vellum from the
burlap pieces to punch out the stars, glued them
on and the card fronts were done.
Inside I stamped this sentiment
Now my cards were finished!
I love how they turned out, 
a little different than anything I've done 
before, yet they are still 
"really me"

Thanks for stopping in today.
I hope you have your cards all made and mailed out.
By the time this is posted hopefully mine will be too.
Please come to visit again,
until then
make your holiday season a happy one.


                                      Note the links are only to give a reference so you can
see what the products are.
I didn't necessarily purchase from these sites,
except where specified,
and you may find better prices elsewhere,
I am in no way promoting any particular site.