My Other Pages

To make it easier to read about our trip to Ireland, I have made a page that is just for that. There is a tab above for Ireland Trip 2014 or click on the Home tab to read my other posts. I have also created a new page for My Weight Loss Journey if you are interested in that, click on the tab above.

Monday, May 30, 2016

My Little Farm

Hello all!
I decided that this year I wanted to grow some vegetables.
I haven't had a garden for many years and there is no way
that I could tend to one down on the ground.
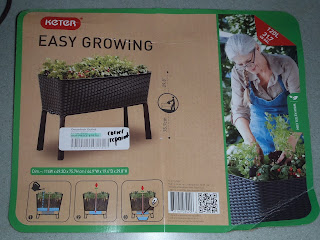
Something like this is what I really wanted, but my 
hubby wasn't so keen on that idea, so I had to figure out
another way to have my veggie garden.
The other day I went to a local discount store, 
Overstock Outle, and found
this garden container.
it's a pretty good size, it's above ground where I can reach
it to tend it easily and best of all it was a really good price.
Yes, one corner did have a tiny crack, but I don't think that's 
going to make any difference at all.
So off I went to the nursery and got a few bags of 
this soil.
I put my little farm in the back corner of the yard and 
filled it with the soil.
And planted what I had bought.
Hot peppers

and cucumbers.
I'll have to run some twine up to the fence for the
cucumber vines to grow up when they get bigger.
I had more room in there so today I went back and picked up
some Romaine lettuce and added that to my farm.
Now I hope I've left enough room for everything to grow.
Guess I'll find out, eh?

Here's my little farm, ready to grow and feed the family.
I didn't want to invest a lot more money in containers,
so I used what was available around the house and
garage.
These are my tomato plants.
Personally I'm not a tomato fan, but others are,
and I thought maybe we could make some 
salsa with some of what I grow.
I AM a fan of salsa.
We'll see how that goes.
I know they are going to need to have some 
stakes put in when they get bigger.
I'm sure I have some kind of dowels in my craft room
that I can use for that.
For now they will sit on the deck stairs.

Thanks for stopping by today.
come again soon.
You never know what you'll find on 
Kristie Kreates.
(hint: next post will have to do with zucchini)


Sunday, May 22, 2016

Birthday gift for hubby's friend

Hello crafty friends!
My hubby, Dave, travels a lot for art shows and 
has a whole family of friends out there in the art show world.
Next weekend he'll be staying with one of his artist friends
and it happens to be her birthday.
He has no idea what to get her, but wanted to give her a 
little something.
So I am surprising him with this bag book that I made for her.
Sure hope she likes it.
I know she will have pictures to put into it as she has
grand kids.
I found a paper pad in my stash that I thought would be
good for most anyone, young or not so young,
male or female and worked with that.
If she wants to she can put a picture on the front of the album.
Here you can see the openings where tags are slipped into 
the book.
Each page has space for pictures and a pull out mat
that is double sided.
Another page with tag insert.
The last page.  
All in all there are 18 spaces for pictures.
Not including the cover.
Here are the tags that pull out of the side pockets.
The tags are double sided, here are the other sides.

I'm really happy with how this album turned out,
I sure hope she likes it.
Dave hasn't even seen it yet and has no idea that I was 
going to make it for her.
I wasn't sure I'd have it done in time,
but when you have a coordinating paper pack, 
things can come together pretty quickly.

Thanks for stopping by today,
I hope you have been inspired in some way.
Come again soon.
Until then, Happy Crafting!

Saturday, May 14, 2016

Inky Fingers

Ever create an inky mess?
Oh I have more times than I'd like to admit.
Recently I posted about making backgrounds
with Dylusions Ink Sprays.
Check out my fingers in these pictures.
You can see a variety of colors on my fingers.
Oh and you really can't even see most of that ink.
There were many different colors.
I wish I had taken a couple pictures of just how inky
my hands had gotten, but I wasn't expecting to need
the pictures.
Why? you ask am I showing you pictures of inky fingers?
Well, I'll tell  you.  After we finished playing with the ink,
I cleaned up my fingers the best I could with some rubbing alcohol.
That didn't do much and my fingers were still a mess.
I went down to the kitchen to get a snack and washed my hands.
While washing my hands I saw the Dawn Dish Detergent and 
on a whim gave it a try for cleaning my hands.
Low and behold, didn't it take that ink right off my hands?!?!
I was so excited, I've always had to just let it wear off over
several shampoos.
Now I've found another reason to love Dawn.
I just wanted to pass this on to any of you who might
tend to get inky like I do.
At least it works to get Dylusions Inks off,
give it a try, maybe it will work for whatever kinds of
inks you are getting covered with.
Thanks for stopping in today,
now go get inky!

Wednesday, May 11, 2016

Spray backgrounds

Welcome!
I don't know about y'all, but I do love getting messy
now and then.
While visiting my friend, Mary, I did just that.
Funny how when ever I visit her, we get into something
messy with inks or sprays of some kind.
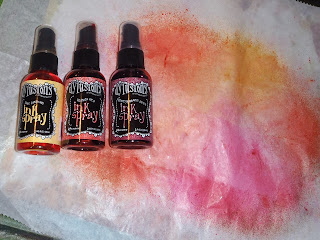
Here's what I used
Dylusions Ink Sprays, a spray bottle of water, deli paper
and white card stock.
Mary has an old cookie sheet that she uses for projects like this,
I put a piece of deli paper on the cookie sheet and sprayed it
with the Dylusions spray.
After spraying 3 different colors on the deli paper,
I sprayed it with water.
For this one I used Pomegranate Seed, Postbox Red and
Pure Sunshine.
You can see how the water blends with the ink and beads up.
Next I placed a piece of white card stock onto the ink.
This is what I got when I picked up the paper.
The white areas are where there were folds in the 
deli paper.
I laid another piece of card stock down to pick up 
more of the ink and this is the result I got.
I ended up with this pretty mix on the deli sheet
once I was done soaking up the ink.
I can use this for more backgrounds.
Next I used After Midnight, Lemon Zest and Polished Jade.
I used the same technique.  Love these colors together!
After I soaked up most of the ink with some card stock,
I spritzed the inks again and folded a piece of card stock
into the deli paper.
This is the result I got.
I sprayed even more water and soaked up ink from 
all over where ever it was wet.
And I got a pretty pastelish (is that a word) background.
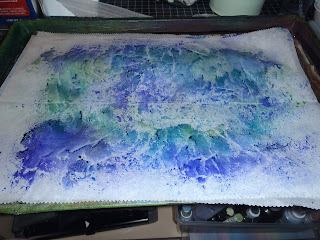
My last combination was After Midnight, Vibrant Turquoise
and Fresh Lime.
I played around with the deli paper after I made some
card stock backgrounds.
I laid another sheet of deli paper over the inks and picked
up what I could, this is the results.
I will use all these deli papers to create more backgrounds.
Below are the card stock pieces that I created.
They are going to make some beautiful cards.


I'm not sure what happened to that lower right corner piece,
I suspect that somehow I dripped some rubbing alcohol onto 
it when I was cleaning up.  Kind of an interesting splotch,
don't know how I can incorporate it, so I'll probably end up
covering it with something.
Never know what I'll end up doing with these,
but I do love how they turned out.

I'm glad you stopped by today,
I hope you are too.
Come again soon,
you never know what you'll find on
Kristie Kreates.


Saturday, May 7, 2016

Inktense Pencils

Hello crafting friends!
Have you ever used Inktense Pencils?
I had only heard about them from a couple 
of my friends, but had never tried them.
When I was visiting my friend, Mary, a couple weeks ago, 
I had a chance to give them a try.
I have to say that I did like them, I found that
they blended out pretty easily.
I did find some colors seemed to blend easier than
others did.
Here are the images that I colored with the
Inktense Pencils.
This was the first image I colored.
I'm really not too crazy about how the bird
turned out, but I do like the flowers.
It was all an experiment in how to use them
as well as what the colors were like.
I had to keep that in mind.
I then colored this rose.
I liked the results I got on the rose, but
had some difficulty on the background.
I don't think they are really meant to cover
a large area, so I needed to fix that.
I ended up cutting a mask to cover the rose
then I used some Distress Inks on ink blending
tools to make the background a little more acceptable.
I'm still not crazy about that background, but I'll
be trimming it down anyway, so most of it won't
show.
I then colored these roses, covered them with
masks and inked the background.
I'll have to see what I can come up with
to use these images.
As I said, it was an experimentation,
I had a lot of fun playing with these pencils.
Honestly, I won't be investing in any
Inktense Pencils, not because I didn't like
them, but because I really love 
water color crayons and I also
have a nice set of colored pencils and 
like to use them with Gamsol for blending.
I'm pretty sure I have some water color pencils around 
somewhere in my craft room too.
I just can't justify spending the money on them,
when I have other mediums that I can use.
Thanks for stopping by today,
come back again soon,
you never know when you might see
what I did with these images.
Until then, Happy Crafting!


Wednesday, May 4, 2016

Cheer Coach

This afternoon I got a text from a friend asking
if she could possibly use
My Happy Place,
our crafting studio, for about an hour tonight.
It turned out that someone she works with 
needed some gifts for TOMORROW!
She gave my friend the vinyl and what she
thought was white vinyl, was in reality
transfer tape.
We did the wine glass using the Cricut.
This is how the wine glass turned out.
Not too bad, I'd say, considering the fact that 
we can't weld the letters and they had to be put on
individually.
We weren't crazy about the lower case 's' in the font we
had available, so I had to do a little 'surgery' on it,
can't even tell can you?
I should have just brought her to my home right away,
we could have gotten this done quicker and nicer
if we had used my Silhouette Cameo.
When I realized what had to be done for the other 2 
coffee cups, I realized that we needed the Silhouette.
These didn't turn out exactly like the one in the picture she sent,
but close enough.
I created the CHEER COACH circle in my 
Silhouette Studio Designer Edition software
and cut them out in a flash.
It took us about 1 3/4 hrs to do that wine glass,
took about 30-45 minutes to create the file, cut and 
apply the vinyl on these 2 cups.
Oh I do love that machine!
We were pretty happy with the way they 
turned out, I hope her friend is too.

Thanks for stopping by today,
I hope you'll stop in again soon.
Until then, Happy Crafting!