My Other Pages

To make it easier to read about our trip to Ireland, I have made a page that is just for that. There is a tab above for Ireland Trip 2014 or click on the Home tab to read my other posts. I have also created a new page for My Weight Loss Journey if you are interested in that, click on the tab above.
Showing posts with label Christmas. Show all posts

Sunday, December 24, 2023

2023 Christmas Card

Hello! 
 Merry Christmas and Happy Holidays
I just want to take a moment to share 
a heartfelt wish with y'all for a very 
happy holiday season.
Whatever you celebrate, may it be
wonderful.
This is the Christmas card I sent out to family
and friends this year.
I love it and have received many compliments
on it.
Here is the sentiment I put inside and
I'm wishing you all the same.
Enjoy your holidays and I'll see y'all 
soon.


Friday, December 24, 2021

Merry Christmas!

Happy Holidays one and all!
Just want to take a moment to wish you all the best,
 whatever holiday you celebrate.
For us, it's Christmas and here is a picture of my 
sweet little Snowbaby tree that my hubby
put up for me while I was out of town visiting 
a friend and having a crafty weekend
Over the last several years we have pared down
what we do with our Christmas decorating and gift
giving.  We enjoy our time with family and 
friends and try to let the craziness go away.
Of course, we now have a 2 yr old granddaughter,
so things will be a little hectic, but that will
be fun.  
And for Christmas we are going to have a 
gender reveal and find out what the new baby will be.
It's sure to be an exciting Christmas and 2022 for us.
Our son and daughter in law just moved into their new home,
they are expecting baby number 2 in June.
Our daughter is getting married in May and we
are thrilled about that and love her fiance. 
Bring it on 2022!

Thanks for stopping by today and every time you
come to visit.  I love doing my blog and hope you
enjoy your visits and that you are inspired in some
way with what you find here.
Wishing you a wonderful holiday season and a
fabulous 2022


Tuesday, July 20, 2021

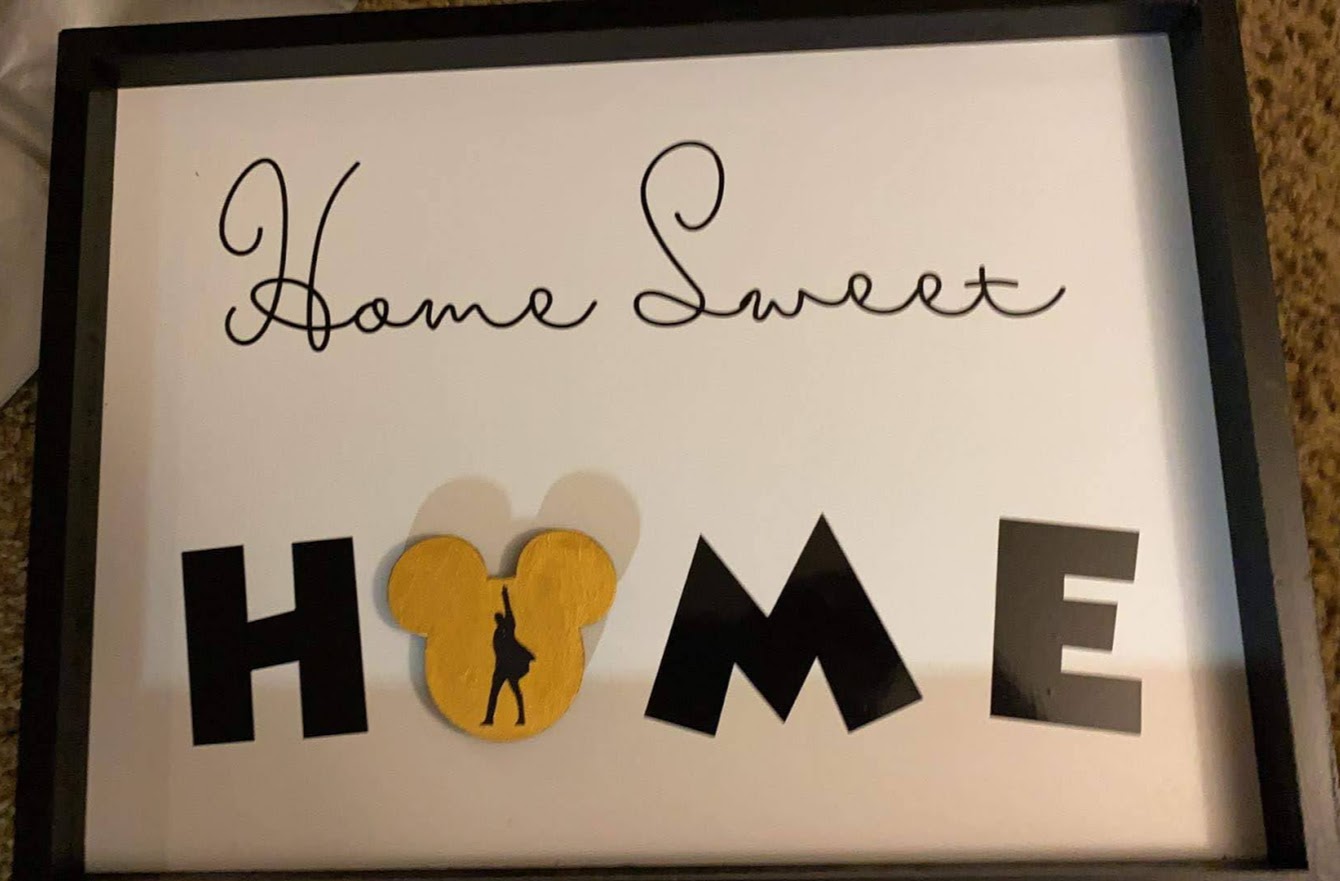
Disney Themed Home Sweet Home Sign

Hello everyone!
As I promised in my last post, today I'm showing you 
the other gift we made as a shower gift for Kelsey Ann.
Sara came up with the idea and we ran with it.
Kelsie, Sara and I divided up the Mickey heads and each
painted 4 of them.
This post has a lot of pictures, so you can see all the
different designs we painted.
Sara used her Cricut to cut the words from Vinyl and applied
it to the frame.
Jaryd got in on the process and helped with the 
application.
He also attached the magnet to the sign
as well as the backs of the Mickey Heads.
These pictures are in no particular order,
although we did do a loose monthly
theme on them.


Brian's (the groom) favorite team (by Sara)

Snow White (Kristie)

St. Patrick's Day (Kristie)


From Coco (Kelsie)

Olaf from Frozen (Kristie)


Little Mermaid (Kelsie)

Pride (Sara)


From Up (Kelsie)

Hamilton (Sara)

Christmas (Kelsie)

Wall E (Sara)


Finally, this is for October the month they are getting 
married.  I did the Mickey hands with wedding rings.
All the heads together in a monthly order,
although they can be used whenever they 
choose.  Most of them are pretty generic
as to what month they can be displayed.
Some of the pieces were done free hand and 
some we used stencils to guide us,
but all in all, I think they all turned out very
cute.
On the back of the sign Sara added this
little "trademark"
Kelsey Ann loved this gift.
She loves hand made gifts and we loved making this
for them.

Thanks for stopping by for a visit and I hope you have enjoyed
your time here and were inspired in some way.
Come again soon,
until then,
have a swell day!


Saturday, November 24, 2018

Black Friday Goodies

Hello and welcome!
Yesterday was my annual 
Black Friday Crop.
This is my favorite crop of the year.
I always have a "goodie bag" for the scrappers,
and this is one of the things I included in their goodies
this year.
I made little gift boxes for each scrapper.
They were inspired by this post from one of my 
favorite blogs.  I just adjusted the dimensions to what
I needed for the tags.
If you have never visited Pootles.co.uk, give it a try,
she has some wonderful projects.
Inside were 6 handmade gift tags.
I made all of them and love how they turned out.
Do you make your own gift tags for Christmas and/or
other occasions?
Thanks for stopping by today.  
I hope you've been inspired in some way.
Come again soon.
Until then,
Happy Crafting!

Monday, December 19, 2016

Left Over Cards

Merry Christmas y'all!
Today I'm showing you what I'm calling
my "left over" cards.
I had some small pieces of this paper
in my scrap stash from some cards I'd made
and decided to use them to make some
Christmas cards that I'll put away for next years
Caring Hearts Card Drive.
I simply cut some strips of paper and
started gluing them to some red card stock.
I left a couple small spaces for a greeting
and a little tree shaped sequin.
This is a very easy card to make
and uses up those scraps you have 
around.  You could make this style of card
for any occasion, just use different scraps.
I made about 7 or 8 of these, so I've got a start
on next years cards already.

Thanks for stopping in at 
Kristie Kreates.
I hope you'll think about using some 
of your scraps for a card or two.
Until next time,
have some fun crafting!


Thursday, December 15, 2016

Multi gift card holder

Hello everyone!
I hope your Christmas shopping is done or going well.
As of this writing, I still have a bit to do
and one thing is to buy the gift cards for this 
little holder.
Every year we give my Aunt Marilyn, who is 93 yrs old,
gift cards.  I get several cards for restaurants like 
Subway and Wendy's for her.
She loves it and every year I come up with another 
gift card holder for her.
In the past I have done this one and this one
and this year I made the one below.
I got the idea from Kristina Werner's blog
in her post for 
I made 2 of the double card holders and adhered them
to each other.
I then cut a cover for them and adhered the inside with
I made a small "cover" for the edges of the 
part where they were taped together, just
to give a more finished look.
I threaded a piece of craft twine through a button,
used foam tape to adhere the button to the front of the 
card holder and wrapped the twine around the
card holder and then around under the button to hold
it closed.
I'm pretty pleased with how it turned out.
Now I just have to get the cards for it and get it 
sent out to her with her other gifts.
Sure wish I could be there when she opens it.
I know she'll like the gift and she always 
appreciates the time I take to make a unique
card holder for her.

Thanks for stopping by today.
Not long until it will be Christmas,
my favorite holiday!
See you again soon.

Note the links are only to give a reference so you can
see what the products are.
I didn't necessarily purchase from these sites,
except where specified,
and you may find better prices elsewhere,
I am in no way promoting any particular site.

Wednesday, September 28, 2016

Inspired by Kristina Werner

Hello!  Hope you are having a beautiful day!
Today I have 2 cards to show you,
they were inspired by 
Kristina is one of my favorite bloggers and artists.
If you haven't discovered her yet, be sure to pop over
and check out her blog, she's really quite wonderful.
Now I have to start by saying that I goofed up both my cards.
This first one I adhered the vellum in the wrong spot for 
the style I was going for, but that's not really a problem,
because I love the way it turned out.
Kristina use a background stamp on her card, but 
I didn't have one large enough with me at the time,
so I used a patterned paper.
You can barely see the patterned paper in the pictures,
but in real life you can see it.  It's a fairly delicate purple pattern.
I cut the shapes on the Cricut from white card stock.
I then embossed them with silver embossing powder.
The sentiment, I did a little differently.
I covered a piece of card stock with Versa Mark ink
and silver embossing powder and heated it.
Once I had that done I used a die to cut out the sentiment.
I arranged all the pieces and glued them on with 
Although this wasn't as I intended it,
I do like how it turned out.
For the 2nd card I decided to go with a Christmas theme.
This one I put together the right way.
The snow flakes were cut on the Cricut,
adhered with Scotch Quick Dry Adhesive
and covered with clear Wink of Stella.
I added a little bling on the centers of the flakes also.
The vellum opens to reveal this striped card front.
This is a piece I had in my stash that I had made a while 
ago when I was experimenting.
I made it using 
and 
I didn't add a sentiment to this panel yet,
I want to see about fixing my goof on this card first.
I'll show that in a bit.
Lastly the front opens at the top and shows the sentiment 
inside the card.
This sentiment is 
from Eureka Stamps.
I put this card together pretty quickly as I was running out of time.
It's not prefect, far from it, but I wanted to post it anyway.
I don't mind showing my mistakes and sometimes I think
it encourages people to try new things and continue trying
until they like the results.
Now for the goof on this card.
Here you go!  
When I was stamping the sentiment inside
the card, I got red ink on one of the snowflakes as well as
on the vellum.  It came off the vellum pretty well, but not that
flake.  Can't get that snowflake off either, that Quick Dry Adhesive
really sticks!
Oh well, it was a quick card and I wasn't crazy about those
flakes anyway.  
Things don't always turn out the way we want them to,
but sometimes they are fine anyway,
and sometimes we just learn from them.
Now, why don't you hop over to
and see what she has to show you.
I'm sure it's something quite wonderful.
Thanks for stopping by today,
I hope you are inspired in some way.
Remember to have fun with whatever you are working on.
Come again soon,
you never know what you'll find on 
Kristie Kreates.

Note the links are only to give a reference so you can
see what the products are.
I didn't necessarily purchase from these sites,
and you may find better prices elsewhere.
I am in no way promoting any particular site.