My Other Pages

To make it easier to read about our trip to Ireland, I have made a page that is just for that. There is a tab above for Ireland Trip 2014 or click on the Home tab to read my other posts. I have also created a new page for My Weight Loss Journey if you are interested in that, click on the tab above.
Showing posts with label Cricut. Show all posts

Thursday, September 26, 2019

Marie on the Wall

It's been a long time since I posted anything
here, sorry about that!
A lot has been going on and I also found that
my pictures were not showing up for y'all.
Hopefully, I have that problem solved now.
As many of you know, I'm going to be a 
Grandma in November.
Marie's room is going to be a combination theme
of Harry Potter, Marie from Aristocats and Disney.
Sara, my daughter in law and I got together to 
work on the nursery one day and got most of the
one wall done.
I used my Silhouette Designer Edition software
and my Silhouette Cameo
to create a large "Marie" for the wall with 
removable vinyl.
It had to be cut in a few pieces.
Each piece was then put onto transfer tape.
I made sure it was adhering to the 
transfer tape.
Then it was put on the wall.
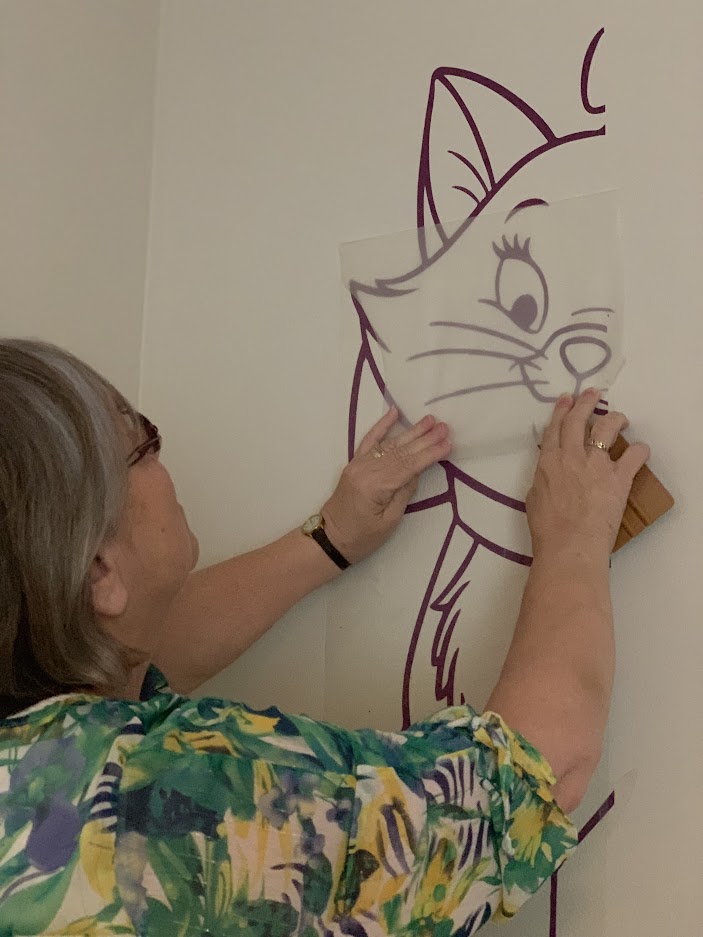
And the transfer tape was removed, 
leaving the vinyl design behind.
First piece done.
Second piece lined up and added.
Once Marie was on the wall, I added
her Harry Potter scar and glasses.
TaDa!  Sara is so happy with how she turned out!
Sara and I also cut Harry and Disney themed characters
and "symbols" with my Silhouette and her Cricut.
Here is the wall, almost done.  Jaryd added a couple more
pieces to the wall when he got home.
I don't have pictures of the whole room for this post,
but it's just about done now, with 
twinkle lights and her furniture.
We are all thrilled with how the wall and the whole
room has turned out.

Thanks for visiting today,
I hope you've been inspired in some way.
Until next time, give something new a try,
maybe a giant cut out!

Wednesday, April 3, 2019

Baby Shower Decorations

Hello!
Don't you love baby showers?
My daughter in law was helping give a shower
for her sister, who is having a baby girl.
Here are some of the decorations and favors that
she made.
She used pens that she bought for her Cricut
to make tags for the favors.
First the Cricut wrote out the wording
then cut them out.
Here are the finished tags.
Aren't they cute?!?!
And the favors.  Each tube was filled with
Violet seeds and some paper shread, which can be put 
right in the garden to grow.
The baby's name is Violette Rose,
so this is perfect for the favor and so
sweet.
I think this gift banner is adorable.
Each of the little onsies were embellished with
silver foil around the neck and for snaps. Soooo cute!
And how sweet is this 
Welcome baby Violette banner?
Here is one more banner, in progress.
I don't have a picture of this one finished,
but I'm sure it was adorable from seeing this
laid out like this.
I think she did a fabulous job for the shower.

I'm so glad I could share this with you today.
Have you ever decorated for a shower or party
 using your crafty skills?
Hope to see you again soon,
until then,
Happy Crafting!

Thursday, January 31, 2019

Baby Shower Invitations

Hello everyone!
Today I'm showing you the baby shower
 invitations that I helped my daughter in law, Sara,
make for her sister's shower.
Sara did the designing with Cricut
design space and sent me the
invitations to print. 
I printed them for her,
 then we got together to finish them.

This is the front of the invitation that I
printed.

This is the back of the invitation.

She picked out a couple vinyls for us to work with.
This was the first time we had tried the Joann's brand of
vinyl, and I have to say we loved working with it.

Here is the pink, ready to cut the roses.

Here is the purple, ready to cut the names.

They all cut out beautifully and weeded very easily.

The roses were added to the unicorns
and look beautiful.

And the names turned out beautiful too.
I wish you could really see how beautiful
the foil vinyl looks.  It really makes the
invitations pop!

I adhered the front and back panels to
purple card stock and they were done.
When her sister got hers in the mail, she was
thrilled with how they turned out.
Sara and I were happy with the end
result too.

We also made these little Diaper Raffle
tickets too.
I think they are adorable.
Sara is making some decorations for the shower too.
I'll try to get some pictures of them to share with
y'all soon.  They are absolutely adorable.
I do love having a crafty daughter in law!

Thanks for stopping in to see what I've been up to.
Hope if you're having some of this cold and snowy
weather that you are getting a chance to do some crafty
projects.
Please come again soon and see what else I've been up to.
Until then,
stay warm and have some fun crafting.


Wednesday, September 28, 2016

Inspired by Kristina Werner

Hello!  Hope you are having a beautiful day!
Today I have 2 cards to show you,
they were inspired by 
Kristina is one of my favorite bloggers and artists.
If you haven't discovered her yet, be sure to pop over
and check out her blog, she's really quite wonderful.
Now I have to start by saying that I goofed up both my cards.
This first one I adhered the vellum in the wrong spot for 
the style I was going for, but that's not really a problem,
because I love the way it turned out.
Kristina use a background stamp on her card, but 
I didn't have one large enough with me at the time,
so I used a patterned paper.
You can barely see the patterned paper in the pictures,
but in real life you can see it.  It's a fairly delicate purple pattern.
I cut the shapes on the Cricut from white card stock.
I then embossed them with silver embossing powder.
The sentiment, I did a little differently.
I covered a piece of card stock with Versa Mark ink
and silver embossing powder and heated it.
Once I had that done I used a die to cut out the sentiment.
I arranged all the pieces and glued them on with 
Although this wasn't as I intended it,
I do like how it turned out.
For the 2nd card I decided to go with a Christmas theme.
This one I put together the right way.
The snow flakes were cut on the Cricut,
adhered with Scotch Quick Dry Adhesive
and covered with clear Wink of Stella.
I added a little bling on the centers of the flakes also.
The vellum opens to reveal this striped card front.
This is a piece I had in my stash that I had made a while 
ago when I was experimenting.
I made it using 
and 
I didn't add a sentiment to this panel yet,
I want to see about fixing my goof on this card first.
I'll show that in a bit.
Lastly the front opens at the top and shows the sentiment 
inside the card.
This sentiment is 
from Eureka Stamps.
I put this card together pretty quickly as I was running out of time.
It's not prefect, far from it, but I wanted to post it anyway.
I don't mind showing my mistakes and sometimes I think
it encourages people to try new things and continue trying
until they like the results.
Now for the goof on this card.
Here you go!  
When I was stamping the sentiment inside
the card, I got red ink on one of the snowflakes as well as
on the vellum.  It came off the vellum pretty well, but not that
flake.  Can't get that snowflake off either, that Quick Dry Adhesive
really sticks!
Oh well, it was a quick card and I wasn't crazy about those
flakes anyway.  
Things don't always turn out the way we want them to,
but sometimes they are fine anyway,
and sometimes we just learn from them.
Now, why don't you hop over to
and see what she has to show you.
I'm sure it's something quite wonderful.
Thanks for stopping by today,
I hope you are inspired in some way.
Remember to have fun with whatever you are working on.
Come again soon,
you never know what you'll find on 
Kristie Kreates.

Note the links are only to give a reference so you can
see what the products are.
I didn't necessarily purchase from these sites,
and you may find better prices elsewhere.
I am in no way promoting any particular site.

Tuesday, February 22, 2011

You're an Angel

QKR Stampede has the cutest angel images!  For this card I used Praying Angel (#16215) I stamped this adorable angel onto white card stock and colored her with watercolor crayons.  I then fussy cut her, adhered her to some Core'dinations Card Stock and fussy cut again, this gave the image a bit more depth on the card.
The base of the card is white card stock. I used some speckled card stock in a very light purple for the first layer.  I got a packet of these 4"x6" pieces at Hollo's Paper Crafts in Brunswick, Ohio.  If you are ever in the Cleveland area, you need to stop there, they have so many wonderful paper and crafting items at fabulous prices.
For the sentiment, I used my SCAL2 program and my Cri-Kits Metallic pens and my Cricut Expressions to write it out.  Then cut it down to size, layered it onto Core'dinations Card Stock, then adhered it to the card. 
Praying Angel was adhered with foam tape.
The little star bling is from my stash.

Stop over at QKR Stampede to see this and so many other adorable angel images, both in rubber and digital stamps.

Thanks for stopping by today.  Leave me a comment and let me know what you think.

Until next time, Happy Crafting!

Thursday, October 21, 2010

Let's Talk Turkey Blog Hop

Welcome to the QKR Stampede Let's Talk Turkey Blog Hop!  If you are coming from Jessica's blog, you are in the right place!  Great project she has posted isn't it?   If you have come to my blog first, you will want to go start at the beginning of the hop at the QKR Stampede Blog.  You won't want to miss a single post from our design team.  If a link doesn't work somewhere along the line, have no fear, you can go back to the QKR Blog and click on the link from there.  Be sure to go to each blog, leave a comment and then go back to the QKR Blog and comment there that you have gone through the entire hop.  There will be a lucky winner who will receive a $20 gift certificate from QKR Stampede.  So be sure to comment on all the blogs for that chance to win.

So let's see what I have to show you today.  I thought I would give you an example of a way to use stamping on your scrapbooking layouts.  Stamps can be used in so many different ways, but I think most of us think of them as something to be used on cards.  That isn't their only use, as you can see here.  On this layout I used the Leaf stamp from QKR Stampede.  I love this stamp, as there are so many different ways that it can be used. 
This layout is about my very favorite fall activity.  Going on our annual pumpkin hunt.  We have been doing this since my kids were very young, they are now 18 & 20, but they still love this day out with Mom and Grandma. 

For all the leaves I gathered all kinds of scraps that were in fall colors, including some patterned papers, some of which were polka dots and paisleys.  I stamped them with the Leaf stamp, using Black Onyx Versafine ink.  I then 'fussy cut' all the leaves.
I usually start my layouts by positioning the photos, but this time I knew where I wanted the leaves, so I put them around the bottom of the pages.  Some of them I attached with my ATG Tape Gun, some I attached with foam tape to give a bit of dimension.  Next, I placed the photos and added the text.  The "Fall Fun" is a mix of chip board letters from a few different sets.   The "Annual Pumpkin Hunt" was cut on the Cricut Expressions with the Plantin Schoolbook cartridge.  The "2010" was done with some rub-ons from my stash.  I added a few more leaves to the layout and I love the finished project.

I hope you like my layout and will consider using some stamps in some of your scrapbooking too.  I'd love to hear what you think of my layout, so please leave me a comment and become a follower if you like. 

Now from here you will want to hop on to Carol's Blog - Stamp Alley and see what wonderful project she has to show you today, it is sure to be inspiring!

Thanks for stopping by, I hope you were inspired in some way, come back soon.
Until next time, Happy Crafting!