My Other Pages

To make it easier to read about our trip to Ireland, I have made a page that is just for that. There is a tab above for Ireland Trip 2014 or click on the Home tab to read my other posts. I have also created a new page for My Weight Loss Journey if you are interested in that, click on the tab above.
Showing posts with label Hollo's Papercrafts. Show all posts

Monday, February 20, 2017

Valentine Treats

Hope you all had a lovely Valentine's Day!
Here are the goodies that I put into the boxes
that I made for my family.
I started out by putting mini marshmallows
on little pretzel sticks.
I then dipped them into melted milk chocolate.
Then I made Rice Krispie Treats and cut them into
hearts with a little cookie cutter.
I melted some white chocolate and dipped one
side into the chocolate and added a few sprinkles. 
 I also dipped little pretzel sticks into chocolate,
then rolled them in sprinkles, chopped pecans
or coconut.
The last goodie I added was a Chap Stick.
Something they all can use during this cold weather.
These little cello bags that I picked up at 
Hollo's worked perfectly.
I put the bag into the goodie box and filled them
inside the boxes, closed it with a twist tie 
and added the Chap Stick on top.
Hubby got his on Valentine's day, but I didn't
see the others until later.
I don't think they minded at all that they were
a little late.

Thanks for stopping in today.
I hope you'll come again soon,
you never know what you'll find on
Kristie Kreates!

Tuesday, February 14, 2017

Valentine's Cards

Hello!
Happy Valentine's Day!
I don't always send/give Valentine's Day cards,
but this year I am.
I saw this idea on Kristina Werner's blog and
was inspired to try it.
I cut pieces of watercolor paper into squares.
I then taped them down to a board.
This helps prevent warping of the paper when
it is wet.
I cut thin strips of tape to make the "cross bars"
You can use masking tape, painter's tape or Washi tape.
Just be sure that it isn't too sticky and you'll be able to 
remove it easily without tearing the paper.
I then used Distress Inks to paint them.
I smooched some ink, in the colors I wanted to use,
onto an acrylic block and mixed with some water.
Once they were completely dry I removed the tape
and cut the pieces down to the size I wanted.
This watercolor piece I embossed 
Swirl Heart from Biblical Impressions
with silver embossing powder and matted
it with a silver metallic paper that I found
I printed all the sentiments for the insides of these
cards from my computer.
I matted the sentiments to mimic the outside of the
cards.
I love these mini crazy birds from
Tim Holtz.  I colored them all with 
colored pencils and cut them with the matching dies.
The heart was hand cut and I wrote 'Love You' 
on it with black pen.
I cut a slit in the birds beak to hold the heart.
This one was heat embossed with 
and mounted onto 
shiny metallic silver card stock
that I got at Hollo's
I used "I Love You" from Eureka Stamps
for these next 2 cards.

This card I watercolored the entire piece with one 
color and embossed "You're Huggable" onto the 
panel and added that adorable bird.
I simply stamped this heart, fussy cut it
and put it through a slit in the bird's beak.
I heat embossed this "Scribble Heart" from
Biblical Impressions onto a watercolored panel,
then layered it onto Matte Silver Metallic Card Stock
from Hollo's

This final card I used a piece of card stock for 
the front panel, added the crazy birds and heart,
it needed a little something more and the gold ribbon
worked perfectly to pull it all together.
I love how these Valentine's cards turned out
and I hope the recipients like them as much as I do.

Thanks for stopping by today,
if you come again soon, you will see
what I made for Valentine's treats to go with
some of these cards.
Until next time,
make something fun!


Note the links are only to give a reference so you can
see what the products are.
I didn't necessarily purchase from these sites,
except where specified,
and you may find better prices elsewhere,
I am in no way promoting any particular site.


Thursday, January 5, 2017

Sienna' Gift

Hi everyone!
I have the most adorable :"greats"  
that's what I call my great nieces and nephews!
Today I'm showing you what I made for one
of my greats.
I used a 5x7 canvas board, that I picked up at 
I mixed some red and white 
to make pink paint and 
painted the entire board with the pink.
I cut a ballerina with my Silhouette from black vinyl.
I used one of the dancers from the
"Ballerina Border" which I purchased from
I also cut her name using the
Segoe Print font.
I used transfer tape to apply the vinyl to the painted
canvas board.
I then made a 'dress' for the ballerina.
For the dress, I used a strip of lace
and a piece of pink ribbon,
I doubled the lace to give it a bit of fullness.
I layered the pink ribbon on top of the edge of the
doubled lace and used a running stitch with white
thread along the length of the lace and ribbon.
I then pulled the thread to gather the top edge 
and secured it with a few stitches.
I tied a small bow with the same pink ribbon and 
to glue the bow to the dress.
I also used the Multi Medium to glue the dress
to the dancer on the board.
I used the same glue to adhere 3 flowers to the 
hair of the ballerina
I framed it in a black frame.
I think this turned out adorable.

I hope Sienna loves this as much as I do.
I enjoyed creating it for her.

Thanks for stopping by today.
Come again soon.
Until then, I hope you'll 
create something.


Note the links are only to give a reference so you can
see what the products are.
I didn't necessarily purchase from these sites,
except where specified,
and you may find better prices elsewhere,
I am in no way promoting any particular site.


Saturday, December 3, 2016

Cards for Card Drive #6

Hi friends!
Can you believe it's December and Christmas
is right around the corner?
Here are a few more cards for the 
Caring Hearts Card Drive.
I've said it before and I'll say it again,
I love heat embossing.
When I apply the heat to that powder and it melts
and turns all shiny and pretty, I just have to smile.
If you've never heat embossed you really should
try it, it's kind of like magic to watch.
I love this image from 
and it works perfectly with heat embossing.
I heat embossed with silver powder and then matted with a 
shiny silver mat.
I got the silver card stock at 
It's located in Ohio, near Cleveland and
if you can get there, it's worth the trip.
If you're a papercrafter, it's like
Heaven being there.
I used several different colors of card bases for these
cards and I love how they turned out, very simple
and elegant.
I uses an embossing folder to emboss the bottom of this
card, then added the top in black with the silver heat 
embossed sentiment.
I used gold Stickles to put some stars in the sky.
This is the sentiment that I used in all of my cards
for the card drive.
I think it's simple and beautiful.

Thanks for stopping in,
come again soon.
Hopefully, you've gotten some inspiration
from one of my cards in this series.


Note the links are only to give a reference so you can
see what the products are.
I didn't necessarily purchase from these sites,
except where specified,
and you may find better prices elsewhere,
I am in no way promoting any particular site.


Tuesday, February 22, 2011

You're an Angel

QKR Stampede has the cutest angel images!  For this card I used Praying Angel (#16215) I stamped this adorable angel onto white card stock and colored her with watercolor crayons.  I then fussy cut her, adhered her to some Core'dinations Card Stock and fussy cut again, this gave the image a bit more depth on the card.
The base of the card is white card stock. I used some speckled card stock in a very light purple for the first layer.  I got a packet of these 4"x6" pieces at Hollo's Paper Crafts in Brunswick, Ohio.  If you are ever in the Cleveland area, you need to stop there, they have so many wonderful paper and crafting items at fabulous prices.
For the sentiment, I used my SCAL2 program and my Cri-Kits Metallic pens and my Cricut Expressions to write it out.  Then cut it down to size, layered it onto Core'dinations Card Stock, then adhered it to the card. 
Praying Angel was adhered with foam tape.
The little star bling is from my stash.

Stop over at QKR Stampede to see this and so many other adorable angel images, both in rubber and digital stamps.

Thanks for stopping by today.  Leave me a comment and let me know what you think.

Until next time, Happy Crafting!

Saturday, January 1, 2011

Tag You're It! contest.

Frantic Stamper's blog is having a Tag You're It contest.  I entered a few tags into it, but unfortunatly I didn't make the finals.  Below are 4 tags that I entered.  I think they turned out pretty nice.  I've never done a lot of tags like this, so this is something new for me. 
I love the rose on this tag.  It is one that I made a little while ago and knew that eventually I would find the perfect project for it. I got the doily at
Hollo's Papercrafts.  The bird is a stamp from The Paper Company.

Yeah, that's me on that tag.  I was thinking this would make a nice tag to give someone on a gift,  wouldn't have to sign it, they could just look at the pic  and see who it was from.

Made this one mostly with supplies I got in a grab box that I got for Christmas filled with Prima products.  It was bought from Frantic Stamper.

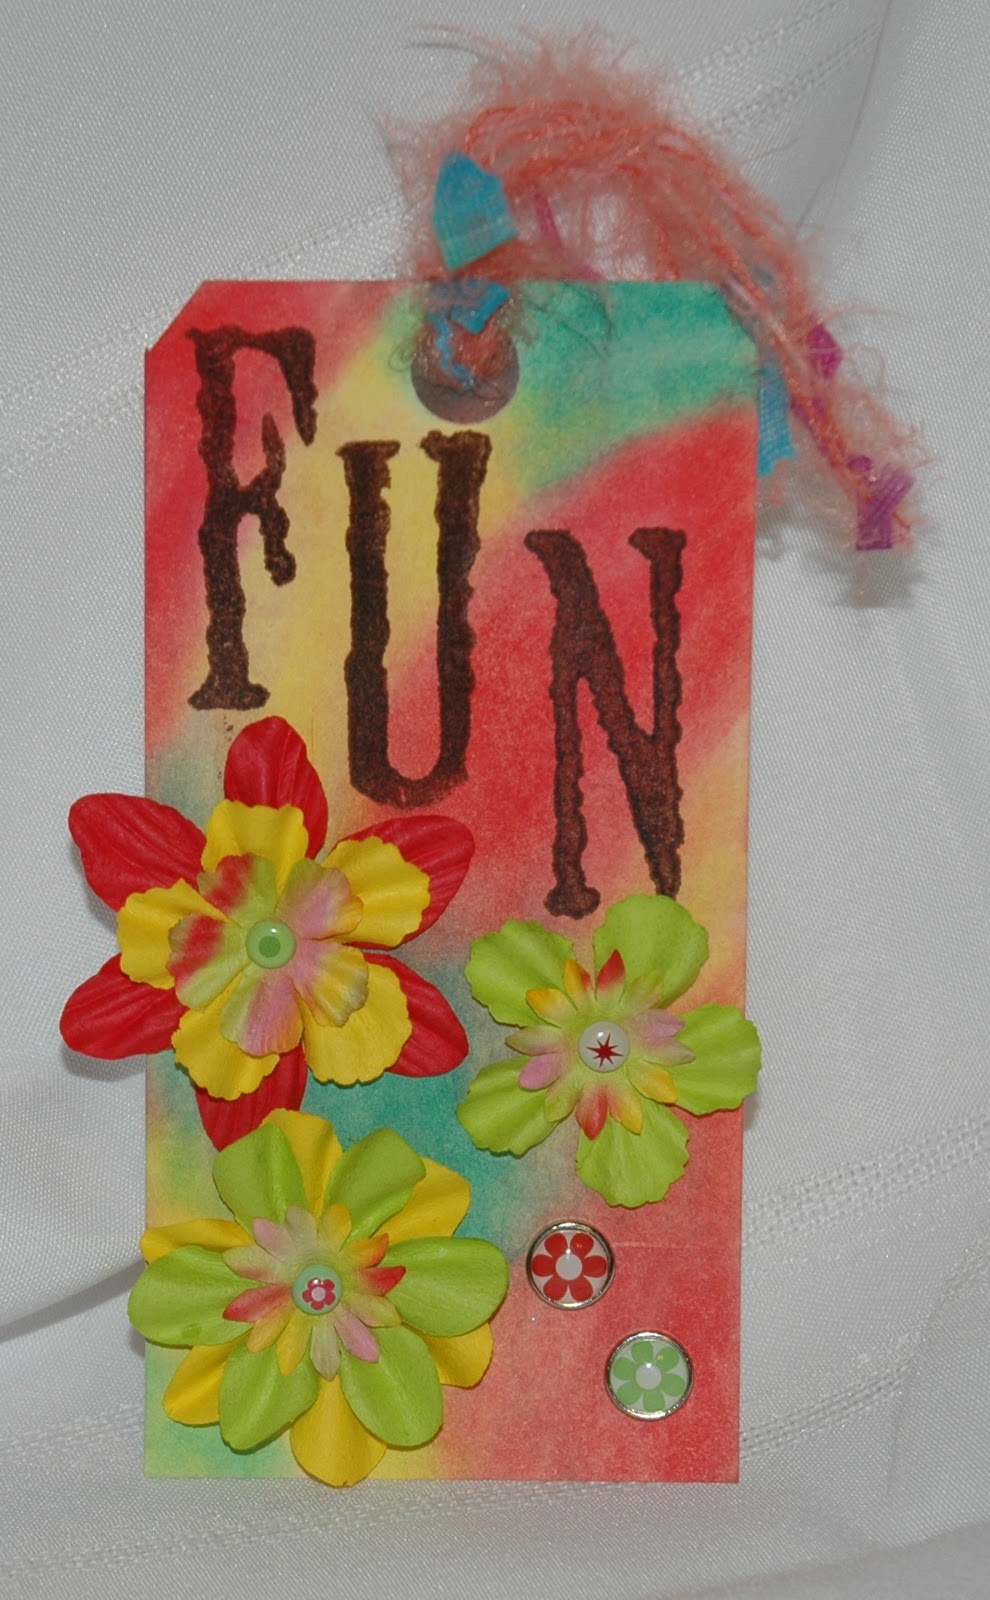
I love this FUN tag!  I received some Pan Pastels for Christmas and wanted to mess around with them.  That is what I used to color the tag.  Love it!  I stamped the FUN onto the tag and the flowers were others that I got in my grab box.  All the brads in the flower centers and lower right hand corner are ones I got in a prize pack that I won from Kristen Swain on her blog, Blankety Blank Blank.

Thanks for stopping by today.  I hope you have enjoyed my tags.  Leave me a comment and let me know what you think.  Which one do you like best?
Until next time, Happy Crafting!

Tuesday, December 14, 2010

Best Wishes

Welcome friends!  Today I have a card that was inspired by Kristina Werner who is one of my favorite bloggers.  I have mentioned her before, so hopefully you have checked out her blog.  She is wonderful.
I used papers from my scrap stash for this card.  I love that striped paper and wish I had more of it, it is double sided and just gorgeous.

I recently visited my friend, Mary and we took a little trip to Hollo's Papercrafts near Cleveland, Ohio.  If you live anywhere near Cleveland, you really should check it out.  They have the most amazing things there. But be warned, you will come out of there with a much lighter wallet.  Their prices are phenomenal, but there is just soooo much to choose from and it is all hard to resist.
Hollo's is where I found some very reasonable priced paper doilies, something like $.02 or $.03 each, so I picked up a few.  That is one of the things I love about Hollo's, you can buy 1 or 100 or 1000 of anything.
I have wanted to use some doilies on some cards recently and finally did on this card.  I cut the doily to fit into the corner of the card and glued it to a scrap of green, then trimmed around it.  This was layered onto the striped paper, which was in turn layered onto Kraft card stock.

The sentiment was stamped onto another scrap of green with brown Staz On ink and adhered with foam tape.  The entire front was then adhered to an A-2 sized white card base.

I really love how this card turned out and I hope you do too.  Leave me a comment and let me know what you think.

Thanks for stopping by today, come back soon. You never know what might inspire you.

Until next time, Happy Crafting!