My Other Pages

To make it easier to read about our trip to Ireland, I have made a page that is just for that. There is a tab above for Ireland Trip 2014 or click on the Home tab to read my other posts. I have also created a new page for My Weight Loss Journey if you are interested in that, click on the tab above.
Showing posts with label leaf. Show all posts

Wednesday, October 10, 2012

Falling leaves

Has fall taken hold in your area yet?
It has in the Buffalo, New York area.
One of the things I like about fall is the colors.
So I used those colors as inspiration for this card.
I made this fall themed card with
"Leaf" (#3901) from QKR Stampede
I started by tearing some scrap card stock.
I adhered the pieces of card stock to either side of a piece of white card stock with removable adhesive.
I used Distress Inks and a blending tool to apply ink
between the two pieces of torn card stock. 
This gave me the "strip" of color down the middle.
I stamped the "Leaf" image with brown Color Box Fluid Chalk Ink.
The button was one I found in my button jar
and I thought it went perfectly on the card.
 
Are you a fan of the fall season?
Leave me a comment and let me know.
Thank for stopping by today.
See you soon!
 
Until next time, Happy Crafting!

Wednesday, September 26, 2012

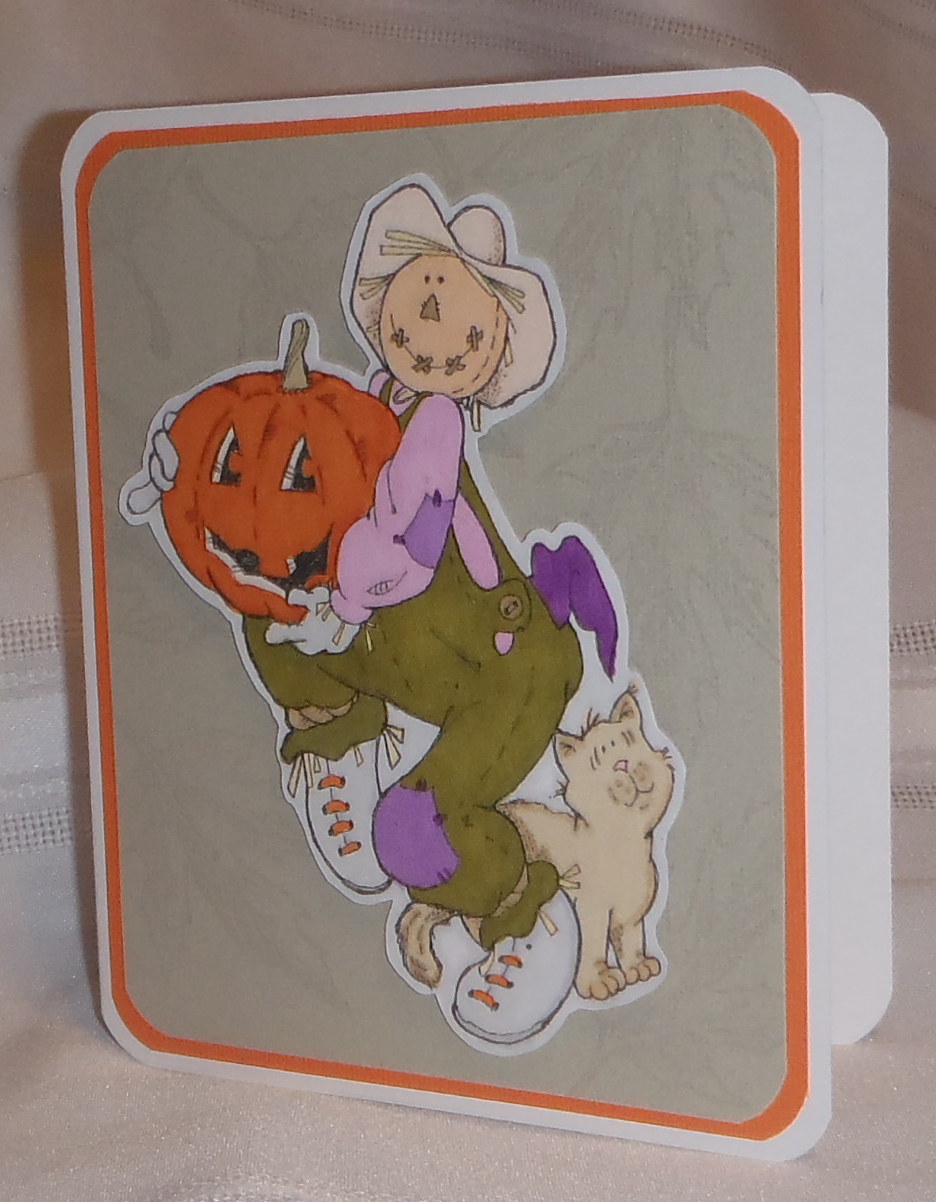
Free digi scarecrow

Hi bloggy friends!
To celbrate our fans, QKR Stampede posted a freebie on the
This adorable scarecrow is the free digi that you can download.
Just stop by and "like" us on that page and download your image.
I colored the image with FlexMarkers.
For the background I stamped "Leaf" (#3901) also from
QKR Stampede, randomly with VersaMark ink.
This image was done with a red rubber stamp,
but it is also available in digital format.
QKR Stampede has tons of wonderful images that are available in
both unmounted red rubber and digital.
Be sure to stop in to the QKR Stampede shop and see all the
image offered.
And don't forget to pop over to the facebook page for
and sister company
(there's a freebie there too!)
"like" us and see what other fun things are going on.
For even more fun, stop in to the
get some inspiration and join our challenges.
Hope to see you there!
 
Thanks for stopping by today.
Until next time, Happy Crafting!
 

Wednesday, September 5, 2012

Leaves

Hello blog friends!
Today I'm showing you a card made with one of my favorite
QKR Stampede images.
"Leaf" (#3901) was one of the first stamps I got from QKR and it has remained one of my favorites.
I stamped the image onto white card stock with VersaMark ink
then embossed them with white embossing powder.
I used Distress inks to color the leaves, then fussy cut them.
The green diamond design was done by positioning a piece of acrylic, inking with Distress ink, moving the acrylic, inking again and so on until I had covered the entire sheet.
It was then cut to size for the card.
The base card is also white card stock and I inked the edges of it also.

Here is a close up of the leaves so you can see the detail a bit better.
The white ribbon is from May Arts Ribbon 
and the button is one from my stash, as is the embroidery floss.
 
I hope you like my card and may be inspired to try some embossing, some inking or maybe just some stamping.
Be sure to hop over to the QKR Stampede store and see all the fabulous image they have to offer in red rubber or digital format.
Also check out the QKR Stampede Blog and see the challenge going on there.  We have a new challenge every week, so pop in and check it out and also see what wonderful things the design team has to show you.
 
Until next time, Happy Crafting!

Saturday, October 1, 2011

Two of my favorite fall stamps

Hello friends!

Today I'd like to share with you, a card using 2 of my favorite fall stamps from QKR Stampede.
Last night I made this card using the Leaf (#3901) image and Pumpkin Vine (#18802) that are under the 'Autumn" category in the QKR Stampede store.

I used the Leaf stamp with VersaMark randomly on Kraft card stock and brushed them with gold Mica Powder for my background.

I stamped the Pumpkin Vine on orange and green pieces of card stock and fussy cut them.  If you look at the Pumpkin Vine image in the QKR Store you will see that there is more to the image than shows here.  I chose to only use part of the image.  This is one of the things I love about stamping, you can use all or parts of an image.  Stamps are so versatile.

After piecing the Pumpkin and Vine I used foam tape to adhere it to the background.

The ribbon came out looking very bright in the pictures, but it actually matches much better than it looks.  Sorry for the poor photo, it is very rainy and dreary here today.

I hope you'll hop on over to the QKR Stampede store and see all the fall stamps they have to offer in both rubber and digital format.
Also be sure to check out the variety of Mica Powders that are offered in the store.

Thanks for stopping by today, come again soon.
Until next time, Happy Crafting!

Wednesday, August 31, 2011

Gold Leaf, black hot glue & Make a Mold OH BOY!

Hello everybody!
What a fun time I had this past weekend.
There was a stamp and scrapbook convention in the area on Saturday and Sunday and QKR Stampede/Biblical Impressions/Eureka! Stamps were here.
Fellow design team member, Jessica and I helped out with demoing.
We got to meet Maribeth, the owner of these 3 sister companies, and her husband and grand daughter.  What lovely people they are.

I got some fabulous products that I hadn't worked with before and learned about them and had just an absolute ball teaching others about them.

The title says it all.  Well maybe not all, there is even more, and I'm going to tell you a bit about these products, how they are used and show you what I made with them.

I have some pictures to show you from the show as well as the card I made with my new products.  So let's get started. There is a lot to tell you about!
This is a picture of Kristie (that's me) Maribeth (the owner)
and Jessica (friend and design team member)

The next few pictures are of Jessica giving a demo on how to use Sticky Powder and Gold Leaf.

We used the Leaf (#3901) stamp from QKR Stampede for our demo.
The first step is to ink up the stamp with a VersaMark watermark pad.
Then cover the stamped area with Sticky Powder, just as you would if you were using embossing powder.  The Sticky Powder will stick to the VersaMark.
Now here is a very important part, heat up your heating tool until it is hot, then heat the Sticky Powder, when it turns from white to shiny STOP heating it.  You do not want to over heat it, as it will become dried and not sticky any longer.  Now you have a sticky impression.  This will stay sticky for a while, so if you are making a quantity of cards, go ahead and do 8 or 10 of them, then move on to the next step.  Experiment with this as the temp and humidity in your space may make a difference in how long it will remain sticky.

Next put your piece into your container with the Gold Leaf and cover it with pieces of Gold Leaf.  Use a fairly coarse brush and pounce over the sticky image, pressing the Gold Leaf onto the image.  Then begin to brush the extra off the image.  You don't need to be gentle at all, you want to get all the extra Gold Leaf off and back into your storage container. 
Nothing dainty about this process.
Once you have gotten all the excess off, take a soft cloth (we used Swiffer cloths, you can use an old diaper, a scrap of flannel, whatever you have handy) and buff up the image.  This is metal, so buffing it will make it shine.
Now you have a beautiful image that can be used on a card, scrapbook page or any other project you can come up with.  Gold Leaf can be used on other surfaces as well, glass, ceramic tile, acrylic, wood.  Use your imagination and play with it, see what you can come up with.
This is a card I made with one of the images I made at the show. 
I used a pen with metallic ink for the dash lines around the outside border.
Here is a little bit closer picture.
Can you guess what that dragon fly is made with?
Believe it or not it is BLACK HOT GLUE, yep that's right! 
I'd never seen it before either!
I did demos on Make a Mold and Black Hot Glue along with the
Sticky Powder and Gold Leaf on Sunday. 
What great products they are, so much fun!  Oh and then there's the Mica Powder!

Make a Mold is a product that allows you to make a mold of any object that you would like to be able to make multiples of.  Maribeth had made the dragon fly mold by pressing a drawer pull that she had bought at a home supply store (like Lowe's or Home Depot) into the Make a Mold compound.

All you do is mix equal parts of the compound together and press an object into it, let it set up for about an hour, pull the object out and you have a reusable mold.  You can used, beads, buttons, drawer pulls, jewelry, cameos, what ever you like, I have even used ribbon roses to make molds.

What I did with the dragon fly mold was fill it with black hot glue.  When you do this you need to do it slowly with the tip of the glue gun right down in the glue, so you don't get bubbles.  Then you set it aside to cool.
You can use any kind of medium that will hold it's shape once it is dried/cooled.  Polymer clay, paperclay, hot glue to name a few.

Once the glue is cooled you remove the piece from the mold.
What I did next was use a little bit of Mica Powder on the tip of my finger (you can also use a small paint brush or even a Q-tip) and rub it over the surface of the molded piece.

Now I had a Gold Leafed image and a dragonfly.  What do I do with them.  Well, of course, I combined the two.  Since the dragonfly is made of hot glue all I had to do was heat the back of it just enough to make it sticky again, then I could place it on the card stock piece and it is stuck for good.
If you have a small piece, put it onto the card and heat from under the card.  The card will heat, then the molded piece and it will be adhered to the card.

I can imagine so many ways to use the Make a Mold and the Black Hot Glue!  Cards, scrapbook pages, embellishments for frames and vases.  Use your imagination.

I know this is a very long post, but I just needed to share this with y'all.  I am so excited to share these products and techniques with you.
Below is a list of the products from QKR Stampede
that I used.

Thanks for stopping by today, I hope you will try out some of these techniques, they are really a lot of fun!

Product list
Sticky Powder (check out the different ideas for using it here)
Gold Leaf (there are many colors to choose from)
Mica Powder (many color choices here too,
the one I used was from True Metals)
Follow the links above or go to QKR Stampede and use the
search box to find these products.

These 2 products below are not currently on the website.
I will check on how to order them and post that information as soon as possible.
Make a Mold ($14.95 for a large kit)
Black Hot Glue ($9.99 for 10 - 10" glue sticks)
New info: These products will be up on the website very soon. If they are not there and you have questions or would like to order, please e-mail Maribeth through the "contact us" link.


                                 Until next time, Happy Crafting!

Saturday, October 23, 2010

Another Annual Pumpkin Hunt layout

First let me apologize for the quality of the pictures today.  There is no natural light at the time I'm taking them.  The weather just doesn't want to cooperate with me these days.  Can't take layout pictures on a cloudy rainy day.

I have my second "Annual Pumpkin Hunt" layout to show you today.  These pictures were taken after 'the hunt' when we went to dinner.  We had such fun at Quaker Steak and Lube, having dinner, acting silly and laughing a lot.

Isn't this just the cutest picture of my Mom on the bottom of this page?  I just love it.  She will be 86 in November and I think she looks just great, don't you?  Anyway, I digress.  The leaf on this first page was made using a Creative Memories journaling template.  I just traced it and cut it out.  The buttons on both the pages are from my stash, I believe I got them at Joann's ages ago on a clearance sale, but I don't know what company they are from.
                              
On this second page I used one of the Leaf stamps from QKR Stampede that was left from the ones I made for my other Pumpkin Hunt layout.  The little pumpkin was made using the Cuttlebug.  Flowers are from my stash and as usual I have no idea what company they are from, sorry about that.  The little journaling tag is from a set from Paper Crush that I got at Tuesday Morning, I do love that store. 

I'm not sure about this layout, I think it still needs something, but I don't know what.  Have any ideas?   Leave me a comment and let me know what you think.

Thanks for stopping by, come back again soon.
Until next time, Happy Crafting.

Thursday, October 21, 2010

Let's Talk Turkey Blog Hop

Welcome to the QKR Stampede Let's Talk Turkey Blog Hop!  If you are coming from Jessica's blog, you are in the right place!  Great project she has posted isn't it?   If you have come to my blog first, you will want to go start at the beginning of the hop at the QKR Stampede Blog.  You won't want to miss a single post from our design team.  If a link doesn't work somewhere along the line, have no fear, you can go back to the QKR Blog and click on the link from there.  Be sure to go to each blog, leave a comment and then go back to the QKR Blog and comment there that you have gone through the entire hop.  There will be a lucky winner who will receive a $20 gift certificate from QKR Stampede.  So be sure to comment on all the blogs for that chance to win.

So let's see what I have to show you today.  I thought I would give you an example of a way to use stamping on your scrapbooking layouts.  Stamps can be used in so many different ways, but I think most of us think of them as something to be used on cards.  That isn't their only use, as you can see here.  On this layout I used the Leaf stamp from QKR Stampede.  I love this stamp, as there are so many different ways that it can be used. 
This layout is about my very favorite fall activity.  Going on our annual pumpkin hunt.  We have been doing this since my kids were very young, they are now 18 & 20, but they still love this day out with Mom and Grandma. 

For all the leaves I gathered all kinds of scraps that were in fall colors, including some patterned papers, some of which were polka dots and paisleys.  I stamped them with the Leaf stamp, using Black Onyx Versafine ink.  I then 'fussy cut' all the leaves.
I usually start my layouts by positioning the photos, but this time I knew where I wanted the leaves, so I put them around the bottom of the pages.  Some of them I attached with my ATG Tape Gun, some I attached with foam tape to give a bit of dimension.  Next, I placed the photos and added the text.  The "Fall Fun" is a mix of chip board letters from a few different sets.   The "Annual Pumpkin Hunt" was cut on the Cricut Expressions with the Plantin Schoolbook cartridge.  The "2010" was done with some rub-ons from my stash.  I added a few more leaves to the layout and I love the finished project.

I hope you like my layout and will consider using some stamps in some of your scrapbooking too.  I'd love to hear what you think of my layout, so please leave me a comment and become a follower if you like. 

Now from here you will want to hop on to Carol's Blog - Stamp Alley and see what wonderful project she has to show you today, it is sure to be inspiring!

Thanks for stopping by, I hope you were inspired in some way, come back soon.
Until next time, Happy Crafting!

Thanksgiving place cards

In today's post I'm showing you some place cards to be used for Thanksgiving.  They were all stamped onto white card stock with Versafine Black Onyx ink then colored with watercolor crayons.  
All three of the images are from QKR Stampede.
The "I'm thankful for..." and the names were printed from my computer then the image was stamped and colored. 
This first one I used the beautiful Rose Label which measures 4 1/4" x 2 1/2"  I have this image mounted onto dark brown card stock.
For this Second place card I used the Thanksgiving Feast stamp which measures 2" x 2"  I mounted this one on a gold colored card stock. 
                                   
This third place card was made with the Leaf stamp, which measures 3" x 2" and is one of my favorite fall themed stamps.  Although it could be as easily colored green and used for a spring or summer purpose.  This one is mounted onto rust card stock. 
Here is a picture of the three of them together.  Although they are different sizes, I think they would look beautiful on any Thanksgiving table.  Variety is the spice of life you know.

Thank you for stopping by today, I hope you have been inspired and have enjoyed seeing what I have created.  Be sure to stop back tomorrow, October 22nd, for the QKR Stampede Design Team Blog hop.  This will be my first time participating in the blog hop.  I'm sure you will be inspired by the projects the team has planned to show you.
Until next time, Happy Crafting!

Saturday, October 16, 2010

Fall leaves and Happy Birthday

It is a beautiful fall day here in the Buffalo, NY area.  Sunny and about 60 degrees.  Personally, I'd like it about 10 degrees warmer, but in this area it would be a little unseasonable, but that would be fine with me.  It has been gorgeous though, let's hope it continues.

Today I'm showing you a birthday card.  I love this leaf image (also available in digi form) from QKR Stampede and have been playing with it a lot.  As we all know, I have a huge stash of scraps, so I went to my scraps and found some fall colors, stamped the image onto them and cut the squares.  I then attached them to a piece of cream colored card stock.  I don't often ink edges, but in this case I thought it helped to soften the over all look.
 
I stamped the Happy Birthday with a stamp from the Happy Birthday set from QKR.  This is a great set as it includes 4 different sentiments.  I used the same scraps for the sentiment and it's layers, then attached it. 

I found this orange "ribbon" in my stash and attached it to the card stock and then attached the whole thing with foam tape to a piece of brown card stock, again from that famous scrap stash. 
You can see below that I used another piece of ivory card stock with inked edges on the inside. 

I hope you have enjoyed my post for today and that you will come back soon.
Leave me a comment and become a follower if you wish.

Until next time, Happy Crafting!