My Other Pages

To make it easier to read about our trip to Ireland, I have made a page that is just for that. There is a tab above for Ireland Trip 2014 or click on the Home tab to read my other posts. I have also created a new page for My Weight Loss Journey if you are interested in that, click on the tab above.

Friday, October 30, 2015

Gift Card holder

Every year for Christmas I send my Aunt Marilyn
gift cards as part of her gift.
She loves to go to fast food places for lunch
and for her a $10 gift card lasts a while.
I send cards for a few different restaurants and each 
year I make a gift card holder for them.
This year I decided to make a "paper bag card" 
type holder.
Here it is.
Here's the front, I fussy cute the floral design
from another sheet of paper and overlaid them onto the 
design with foam tape.
This gives a nice dimension to it.
Inside I stamped and matted greetings.
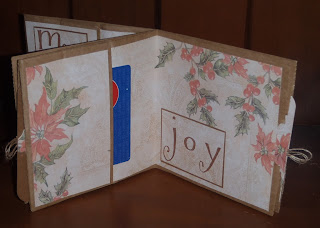
There is a little pocket on the tag that pulls out of the page.
Here is another page, showing that there is a pocket 
to put a gift card into.
This is the tag from the 2nd pocket.
I really love how this turned out,
I know Aunt Marilyn will love the gift cards,
I hope she likes the holder too.

Thanks for coming by today,
I hope you like my gift card holder,
maybe you'll be inspired to make holders for any
gift cards you'll be giving as gifts too.
Until next time, Happy Crafting!

Tuesday, October 27, 2015

I'm La Shot, Too! Note cards.

Hello and welcome! 
Today I thought I'd show you a little of what I do for my
husbands business.
Dave is a photographer and sells mostly at Art Festivals 
in the Northeast US.
His business is La Shot Photography and that is linked to his
website if you are interested in seeing his work.
Many years ago, I decided that he should have a line of 
note cards with his photographs on them,  so I designed a 
template and have been making them ever since.
My "division" of the business is
"I'm La Shot, Too"
I also make mouse pads and coasters with his images
and I do custom orders too.
Today I'll show you just what's involved in making the note cards
First I have to print off all the cards that Dave needs.
I can print 2 per sheet of card stock using our ink jet printer.
This is about 650 note cards ready to be finished.
Each sheet is folded in half by hand
and creased with a bone folder.
Here they are all folded.
Next I use my stack cutter to cut them in half.
There is a huge blade that cuts an entire stack at one time.
For a few years I cut each sheet individually with a guillotine paper cutter.
I'm so glad I invested in the stack cutter, it makes things so much
faster and easier.
Just have to be sure I have it set at the correct measurement. 
Ask me how I know!  LOL
\
Next I prepare the cards for packaging.
Most sets are 4 cards each of 2 different images,
there is one set that is a variety pack of 8 different cottage images.
Here they are, in sets, ready to be packaged.
Dave cuts down scrap matting into the perfect size for packaging.
I use my "Paper Gator" to round the corners.
I print up labels with our business information on them
and put them on the mats.
The variety packs have a label on the back showing
which images are included.
Here are the mats ready to go.
Now for the envelopes.
Each package of note cards comes with 9 envelopes.
I count out the envelopes and have them ready ahead of time.
Except of course when I run out 
and have to do 2000 envelopes at one time.
I count out 4 and 5 envelopes and box them up.
This is my set up when I'm ready to package the cards.
I put 4 of one card on the front with 4 envelopes
and 4 of the other image and 5 envelopes on the back.
They all get stacked into boxes and Dave takes them and
shrink-wraps them.
I'm so glad I don't do that part.
I can do it and have done it, but prefer not to.
This is what about 80 packs of note cards looks like ready
for shrink-wrapping.
So there you go, my process for making note cards for 
It's a lot of work, and this is after I get the picture all
scanned in and color corrected, but I have it down to a science now.
After almost 30 yrs of making them and countless packs, 
I could do them in my sleep.

Thanks for stopping by today, come again soon.
Never know what you'll find on 
Kristie Kreates.

Tuesday, October 20, 2015

Caring Hearts Card Drive

The Caring Hearts Card Drive 
is again underway.
Here is a link to all the pertinent information
on Jennifer McGuire's Blog
Last year I was honored to be able to help with this
card drive by delivering cards to a local
nursing home and rehab center.
I will be doing the same this year and adding on
the assisted living home where my Mom lives.
I also went through my stash of cards and found a variety of
Christmas cards to donate to the cause.
Wish I would have taken a picture before I 
packaged them up to send out.  Darn!
If you make cards each year and have any left overs
or would be kind enough to make a few,
this is a wonderful card drive that brings 
smiles to many people in nursing facilities.
Please consider donating some cards to this worthwhile 
endeavor.
This would make a great service project for any group.  
Scouts, church groups, craft groups, anyone can participate.

Here are links to a few of the cards I donated


I hope y'all will check out this card drive and donate
some cards to bring smiles to others this holiday season.

Thanks for stopping by,
come again soon.
Until then, Happy Crafting!

Friday, October 16, 2015

Get Well Card


Hello!
Today I have a get well card to show you.
I have a friend who recently had surgery and I wanted to
send her a card.
I've been wanting to make a shaker card and thought
this would be perfect for her.
Shaker cards always make me smile.
I used Distress Inks to make the front panel of the card.
I used one of my new rectangle dies to cut the window
then used the cut out to die cut the 'get well soon' sentiment.
I dripped some water on the panel here and there then blotted it up,
 to give it a little more interest and texture.
Micro beads and sequins were used in the shaker area of the card.
I hope she likes her card, I thought it turned out cute.

Thanks for stopping by today.
Come again soon.
See you then!

Sunday, October 11, 2015

Where I find deals.

Hello crafty people!
I'd like to talk a little bit about shopping for crafty supplies.
I don't know about you, but I'm cheap.
OOPS!  Not cheap, frugal!  
My friend Mary tells me I'm not cheap, I'm frugal.
She's right, it does sound much classier.
I don't buy any kind of craft tools or supplies unless they are on
sale, clearance or I have a coupon.
A few years ago I put myself on a "spending diet" 
I really try not to spend much on crafty things,
not because there isn't anything I want, but because I really
don't NEED anything. 
I have enough 12x12 paper to last the rest of my life,
so I really try not to buy that, but there are times when I have a 
weak moment and find a really good deal and have to buy some.
I recently was in Tuesday Morning and found a few things that I just
could not resist. Although I had some card stock in my cart
and I put it back!  (Good girl Kristie!)
I don't have a lot of dies and when I saw these for only $3.99 and
that embossing folder for only $.99 I just couldn't resist.
I follow quite a few blogs and see lots of great ideas using dies.
I don't have many and thought these would be great for making 
some shaker cards.
I do love shaker cards and I seldom make them, but I'm hoping
I will use these dies to create something wonderful.
As for the embossing folder?  I just love birch trees and I think
I can make some great backgrounds with that folder.

Do you have some favorite places to get deals on crafty things?
Other than the big guys like Joann's and Michael's?
I have a few, Tuesday Morning is at the top of the list.
Others are Big Lots, Ollies and The Dollar Store.
You never know what you'll find in these places,
so keep your eyes open!

Thanks for stopping by today,
I hope you'll come by again soon.
You never know, you might just see a shaker card
one day soon.
Until next time, Happy Crafting!


Thursday, October 8, 2015

Brownie Cup Fail

Hi!
Today I have a fail to show you.
the other day.  Looked pretty easy, so when I was having the kids
over for dinner, I thought I'd make them and fill them with 
ice cream.
I followed what they said to do, but things didn't turn out as they
show they would.  I guess the problem for me was that they
never said exactly how much batter to put into each cup.
They weren't hard to get out of the tins,
they just didn't look very good once I did.
And the tins?  
Well you can see how they looked,
But we ate them anyway, and they tasted great!
Just didn't look so great.
I might give this a try again, now I'm thinking maybe 
it just wasn't the amount of batter, but also that the 
cupcake tins might not have matched in size.
Who knows?
It might just be easier to make the brownies and
cut them up into squares, eh?
Have you ever tried something you saw on a video or on
Pinterest?  Did it work out?
I've done some other things that worked out great.
This one?  Not so much!

Thanks for stopping by today,
come again soon.
You never know what I'll be posting about.

Monday, October 5, 2015

My "Wall of Fame"

I've said at the end of some of my posts to come back soon,
you never know what you'll see here.
Here is one of those "surprise" posts.
Recently I saw a post on one of my favorite blogs
"Older and Wisor" (link to the blog)
 titled 
"How to Make a Photo Wall" (link to specific post)
I told Rebecca in my comment that it inspired me to write about 
my Wall of Fame, so here I am to write about it and give you a little
glimpse at my messy (it's really all my hubby's mess) office.
(I'm not showing my messy half)

Many years ago, I decided to put pictures in the little space that I have 
in the office.  It started off with a bang and I added to it quite often.
Unfortunately, the additions stopped and I never filled up all the space
available.  I'm thinking I need to add some more pictures and finish filling 
the walls, before it's time to paint again.
Here's what I see when I'm sitting at my desk.
I know that bookcase doesn't look great, but heck, it's an office,
what can you expect?
Above the doors to the living room.
(click on the pictures to enlarge them)
This is one wall in the corner of the room,
and........
this is the other wall adjacent to it.
Next to the door there is a very narrow space,
I even fit a group of pictures there.
And above the windows across from the desk.
Looking at these makes me realize how old these pictures are.
I need to add some new ones.
Of course I'll leave the old ones up, I just need to add more
people.  I don't have any of my "greats" 
(that's my great nieces and nephews)
on the walls.
That's horrible, they are some of my favorite people!

Do you have a space, like an office, where you think
you don't have any room for pictures?
Is there any wall space at all?
If there is, you can still have some pictures to brighten your day.
That narrow vertical wall next to the doorway is only about
3 1/2" wide, the spaces above the windows and doors 
are only about 6 1/2" high.
Those 2 adjacent walls are only about 12" and 14" wide.
Just find some frames that you like, that will fit,
print up some pictures and hang them in
those small spaces.
Every time I look at the pictures they bring back
 a wonderful memory or two.

Be sure to check out Rebecca's photo wall,
maybe you'll have a wall that you can do like she did hers.

Thanks for stopping by today,
I hope you've been inspired to look around
your home to see where you can fit some fun memories.
Come again soon, like I said, you never know what you'll see here.

Thursday, October 1, 2015

C/C Trip #4 Back to Charlotte


As is our usual routine, we headed back to Charlotte
to visit with Aunt Marilyn a couple more days.
Not many pictures from here on out, but here are a few.....
selfies.  
I don't do a lot of selfies unless
they are with someone else.
But the mood struck me so here are a couple,
while we were driving along in the car.

Once we go to Aunt Marilyn's we started our routine
of cleaning her apartment.  She does a good job of keeping
up with it and has someone that does the floors for her, but
Dave does a little heavy duty cleaning when we visit.
Then we made our plans for the next couple days,
Walmart for groceries and a couple other things,
Kohl's and Barnes & Nobles.
She does love to do a little shopping.
Of course, we needed to get together with Monica again.
If you are ever in Charlotte, you should look up a restaurant
It has become a favorite of ours.
Their food is "southern comfort food."
I love the country fried steak.
Every entree comes with a deviled egg, 
they have the usual southern sides like
collard greens and grits as well as
mashed potatoes and other veggies.
And their soups?  To die for!
Here is a picture of Aunt Marilyn showing her new ring
that she got while we were shopping at Kohl's.
Our 2nd evening there we ate at a Mexican restaurant 
then went back to Aunt Marilyn's to have some homemade 
strawberry ice cream that Monica made for us.
We had a lovely time visiting and hope to be visiting again soon.
There is a lot to do in the Charlotte area,
but since she is will be 92 at the end of the month,
we don't get out to do much more than shop with Aunt Marilyn.
She is a doll though and years ago we used to visit some of
the other "sites" in the area.
Places like the Biltmore Estate and the
North Carolina Zoo in Asheboro.
There is also the amusement park, Carowinds.
If you are there around Christmas time a trip to
McAldenville, Christmas Town USA 
is something to see with it's 375 Christmas trees.
Bright and early on Sunday morning we were up and on our 
way back home.
We were greeted by this beautiful sunrise.
I'm not a morning person, by any stretch of the word,
well, not unless I've been up all night!  LOL!
I must say it was nice to see this beautiful sunrise though.
We made good time and were home for dinner with our son and
his girlfriend by about 6:00 p.m.

So there you go!
That's the end of our Charlotte/Charleston trip.
I hope you have enjoyed hearing a little bit about 
a couple of our favorite places to visit in the south.
Thanks for stopping by and I hope to see you again soon.