My Other Pages

To make it easier to read about our trip to Ireland, I have made a page that is just for that. There is a tab above for Ireland Trip 2014 or click on the Home tab to read my other posts. I have also created a new page for My Weight Loss Journey if you are interested in that, click on the tab above.

Sunday, December 24, 2023

2023 Christmas Card

Hello! 
 Merry Christmas and Happy Holidays
I just want to take a moment to share 
a heartfelt wish with y'all for a very 
happy holiday season.
Whatever you celebrate, may it be
wonderful.
This is the Christmas card I sent out to family
and friends this year.
I love it and have received many compliments
on it.
Here is the sentiment I put inside and
I'm wishing you all the same.
Enjoy your holidays and I'll see y'all 
soon.


Monday, December 11, 2023

Sorry I'm MIA

Hello everyone!
I'm sorry I've been MIA lately.
There's been a lot of Christmas prep going on and
I was visiting my friend in Toledo for a week.
We had a wonderful time, 4 days at Inspiration in Bloom
for a fabulous crop.
I got a lot done, but can't show you as it was all Christmas
gifts.  All in good time.
I'll be back soon, hopefully, once things calm down
a little bit for me and the family.
Thanks for your patience and support.


Tuesday, November 21, 2023

Tikki Shirt for Marie

Hello and welcome!
Our granddaughter, Marie, turned 4 last week.
Sara asked me if I could make a shirt for her for 
her party.  The party theme was Miraculous Ladybug and
other super heroes. 
I chose to make her shirt with Tikki, from Miraculous
Ladybug, on it.
I found a picture of Tikki and traced it with my 
It then was pressed onto the shirt with an
iron.  I usually use my heat press, but I 
was out at a crop and used the iron that was
available.  It worked great.
Here is Marie in her shirt. 
She loved it.
She is such a cutie and the shirt was 
adorable for her.

Thanks for stopping in to see what I've been up to.
I hope you have been inspired in some way,
and will come again soon.
Until then,
make a child smile with something you create.


Note the links are only to give a reference so you can
see what the products are.
I didn't necessarily purchase from these sites,
except where specified,
and you may find better prices elsewhere,
I am in no way promoting any particular site.


Wednesday, November 15, 2023

October Swap

Hello crafty friends!
Today I have a card I made for an art swap.
The "parameters" were
Color: Use green or blue
Technique: Stencil, stamping, collage
Product: stencil paste, ink, magazine page, 
paper napkin/tissue paper
Theme:  nature, peace/calm, women
Finished piece:  card,  ATC, frameable/hangable art piece
Color: I used blue and green
Technique: I just realized that I failed on this one,
I didn't use any of them. 
Product:  I used ink and tissue paper for the background "water"
I also used magazine pages for the fish and seahorses
I covered them with packing tape, then soaked them in water
and rubbed the paper off.  This leaves the image on the tape.
I then glued some of them to plain white card stock and fussy cut them.
The larger seahorse was easy to cut and glue down 
with out the card stock.
I went with the nature theme in the over all card,
as well as in the "sea weed" which is actually
pressed and dried pieces from one of our plants
that we had in a planter this summer.
I just heard from my friend that she had received 
the card and loves it.

Thanks for stopping by to see what I've been up to.
I hope you'll come again soon.
Until then,
challenge yourself!


Saturday, November 11, 2023

Thanksgiving Turkey Card

Hello everyone!
I hope you are having a wonderful day.
Do you send out Thanksgiving cards?  
Sometimes I do and some times I don't.
I happened to find this turkey all colored and 
ready to go, in my stash.
I fussy cut him and added him to a
pieced panel that I had just made.
I thought the colors were perfect for a 
fall/Thanksgiving themed card.
On the inside I used a small strip of the 
front panel that I had cut off, just to
give it a little more interest.
I think I'll be sending this card to my
100 yr old Aunt in North Carolina.
Who doesn't love to receive a card in the mail?
If you send out cards for Thanksgiving, have
you made them yet?

Thanks for coming to spend a little time
here, I hope you have been inspired in some way.
Come again soon.
Until then,
get those cards made and 
ready to go.


Tuesday, November 7, 2023

Birthday Card For My Friend

Good day blog friends!
I have a friend who recently turned 50,
her family threw a surprise party for her,
so I needed a card and gift for her.
She is an avid reader and book lover,
and I had bought this stamp specifically
to make a card for her.
For the back ground I used a napkin.
Here is a link if you are interested in the  
process.  I layered the background onto 
a white card stock base.
When I made the background, the second layer
of the napkin had a light image on it,
I used that also and then stamped onto
it with VersaMark ink, then embossed with
gold embossing powder.
In the picture, the image behind the stamped image
doesn't show very well, but it's very subtle and pretty
in person.
On the inside of this card I wrote a personal message
and included a gift certificate for Barnes and Noble.
I thought that was appropriate, especially with this card.

I'm glad you have come to spend some time here today.
I hope you have enjoyed your visit and have
been inspired in some way.
Come again soon.
Until then,
read a good book!


Note the links are only to give a reference so you can
see what the products are.
I didn't necessarily purchase from these sites,
except where specified,
and you may find better prices elsewhere,
I am in no way promoting any particular site.


Friday, November 3, 2023

2022 Christmas Ornaments

Hello!
It's that time of year to be thinking about what
to make for Christmas.
Every year, for the past several years, I have made 
Christmas ornaments for the family.
In 2022, it was a very busy and tumultuous time for us.
It was getting late and I had to think of a Christmas
ornament to make.
I came up with these gnomes.
They were very quick and easy to make and the family
loved them.  There are a lot of different video's on how to
make ornaments like these on YouTube.
I watched a couple and combined ideas from
them and got to work.
I used the yarn that I had in my stash and made 
several different colors and styles of yarn.
So each one is unique.
I didn't have the beads I intended to use for the noses,
so I used what I had and that happened to be
a variety of colors of little pom poms.
I added little heart gems or Christmas
embellishments to the hat of each gnome
and also made little tags with the year on them.
All in all I made about of dozen of these ornament.
My daughter told me that she thinks we should continue
this tradition forever.
I responded that I would continue until I was old and
feeble.  She said that she would take it up after that.  
Thanks for stopping by today,
I hope you have enjoyed your visit and were inspired
in some way.
Come again soon.
Until then,
start working on your Christmas cards and gifts.


Monday, October 30, 2023

Recycle, Upcycle and Reuse

Hello crafty friends!
Are you a recycler, an upcycler or a reuser?
I definitely am and today I'm going to show you a great
upcycling project that I've been working on.
Someone on my Buy Nothing Group offered two
large bags full of used Amazon mailers.
I jumped right on that offer and brought them home,
I already have one full bag in my craft room, so now
I have 3 big bags full.
You might ask,
What in heaven's name are you going to do with them? 
The answer is to reuse them.
They will need padded envelopes to mail out some of their items.
So I'm making them some cute mailers.
Here are a few of the mailers I covered with 
wrapping paper.  It's easy and very inexpensive
to make these and no one knows they are
old reused mailers.
Here are a few of them that I covered with 
scrapbook paper that I had in my stash that I will 
probably never use.
From one Amazon mailer, I can get 2 - 4 "new" mailers,
depending on the size of the mailer.
All they'll need to do is put a label on the front with an
address and return address, put their item inside,
pull off the double sided tape backing and seal it up.
Now they are ready to mail it.
If you are interested in how these are made,
here is a video showing how it's done.
Easy peasy.
If you are interested in what my girls are 
creating, follow the link below and it
will take you to their website.
They are adding more to their site often,
so be sure to check back at another time.
I'm really proud of what they are doing,
guess the creative gene runs in the family.
The name of their business is 
Clumsy Cloud Gifts

Thank you for stopping in today to 
check out what I've been up to.
Please come again.
Until then,
recycle, upcycle and reuse!


Thursday, October 26, 2023

Cool Cat Halloween Cards

Hello everyone!
Today I have a couple Halloween cards to show you.
My friend gave me a die set that cuts out this
background.  There are several pieces that you
have to put together, but it's really simple.
I die cut with this set on black card stock
and 3 different colors of paper that I thought
were prefect for Halloween.
I also stamped my "cool cat" onto the orange
paper and fussy cut him.
The bats were stamped and fussy cut also
from a stamp that a friend had.
All of it was layered onto a white card stock
base.
I stamped the sentiment onto the
same papers that I used for the outside of the card,
then cut around each word and adhered them inside the 
card.
For this card, I used the scraps from the 
card above and cut random strips of paper.
I covered a piece of card stock with 
double sided tape and put down the
strips of paper to use as the background.
I again stamped and fussy cut the cat and adhered him 
with foam tape to the front of the card.
The sentiment was stamped with a stamp in my 
friend stash.
Inside this card, I stamped this sentiment.
I really love how these cards turned out,
and I hope the recipients do too.

I'm glad you stopped in today,
I hope you are inspired in some way
and will come again soon.
Until then,
Happy Halloween!


Sunday, October 22, 2023

Key Lime Pie

Hello creative people!
Today I'm showing you my creative side in the kitchen.
I've never even tasted Key Lime pie before, no less 
made one.  But it was my son in laws birthday and I 
know he loves it, so I dove right in.
I found the recipe on one of my favorite chef's websites.
If you are interested, you can find it here.
It was really quite easy to make and the filling 
sure tasted good when I was making it.
Who doesn't need to clean out the bowl in the end?
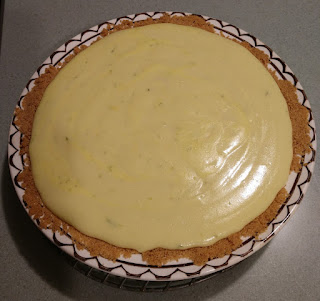
Here is the pie after baking, cooling and garnishing.
No, it doesn't look like Billy Parisi's, but 
I think I did pretty good for a first try.
And Brad loved it!
Happy Birthday Brad!

Thanks for stopping in today,
I hope you were inspired in some way.
Come again soon,
until then,
try something you've never tried before.


Wednesday, October 18, 2023

Halloween Pumpkin Fun 2021 & 2022

Hello everyone!
It's getting close to Halloween, so I thought I'd share
these layouts from the last couple years with y'll. 
This is one of my 2021 layouts.
After doing our Pumpkin Hunt together, the kids
went to Kelsie and Brad's house to carve pumpkins.
In 2022 they gathered at Jaryd and Sara's house to 
carve pumpkins, bake some seeds and 
Sara and Marie also cooked up a pie pumpkin 
and made a home made pumpkin pie together.
Marie loved helping with the pie, but 
when she tasted it, she thought it was pretty
"Yucky"
Soon we'll be going on our 2023 
Family Pumpkin Hunt and I'm sure
we'll have a lot of fun, as we
always do.

Thanks for stopping by and checking out what I've
been up to.
Come again soon,
until then,
eat some pumpkin seeds!


Thursday, October 12, 2023

Santa Christmas Card

Hello crafty friends!
I know it's not even Halloween yet, but
if you're like me, you have a bunch of Christmas
cards to make.  This is just a little reminder
that you might want to start early.
This isn't what I'm making to send out to 
my family and friends, I'll show you those 
closer to Christmas.
I happened to find this Santa image in my 
stash of colored images and thought I'd make it 
into a card.
For the background panel, I laid down strips
of double sided tape, peeled off the backing,
then added red flocking to it.
One quick and easy card done.
I'm sure that image took a while to color and
fussy cut, but since I already had it done in my 
stash, it came together very quickly.
Now just to get the rest of my Christmas cards
finished, but at least I have them started.
Deciding on a design is usually my hardest 
part of making my cards.
How about you?
Do you make your Christmas cards?
How many do you make?
I make about 60.

Thanks for stopping by today,
I hope you have been inspired in some way.
Come again soon.
Until then,
get to work on those 
Christmas cards.


Sunday, October 8, 2023

Warm Fuzzies

Hello and welcome creative people.
Today I have a card to share with you.
I was going through a stash of images that I found
in my craft space that I had totally forgotten about.
I found this one and decided that I needed to make it into
a card for my grand kids.
I colored and flocked this several years ago and 
I'm not sure what company it's from or if it's even available
any longer.
I colored the caterpillar, then added a little bit of glue
to areas on the little guy.
I then added green flocking for a fuzzy look.
I went through my background stash and found
one that I felt matched with the image and used that for
the background panel.
I think the kids will get a kick out of this card.
I think it's adorable.

Thanks for sending some time with me,
I hope you've been inspired in some way,
and will come again soon.
Until then,
use an old supply that you forgot you had.
Maybe you have some flocking in your stash too.


Wednesday, October 4, 2023

Inspire Card

Good day everyone!
A couple posts ago I shared a 
herringbone background like this one.
Here is another card I made with the pieces
I made in my play session
I used some left over pieces from my stash
to make this background, so it was a good 
'use your stash' project.
I happened to have a scrap of card stock sitting
on my work area with butterflies on it.
So I fussy cut one of them and added it to
the card.
The sentiment was from an old set from my
stash.
When you have some scraps on hand, or a background
piece that you have made and put into your stash,
it's easy and fast to get a card together.

Thanks for spending some time with me today.
I hope you'll come again soon.
Until then,
use your stash.


Saturday, September 30, 2023

Card With Dimensional Circles

Welcome!
I'm glad you are here to visit for a little while.
Today I am sharing a card that I made using a 
technique that I saw on a You Tube channel that
I follow.
In the video, she uses rice paper, but I didn't 
happen to have any.  I did, however, have another
type of paper that was fairly thin, so I decided to
give it a try.
I punched circles from card stock with punches that I had handy,
then glued them together to give them a bit more 
depth.  I think I used 3 for each circle.
The circles were glued to a piece of card stock.
I then used alcohol inks to color the paper.
The panel was then covered with glue.
I used glue stick, as I didn't want it to dry before
I got the colored piece in place as I wanted it.
I used a bone folder to smooth the paper down and over
the circles.  I had to be sure to press around the circles
to have that paper adhere around them and show the dimension.
The "joy" was stamped onto a piece of card stock and punched
out with an oval punch.  I inked the edges of the oval with
the same color I used to stamp the sentiment, then
adhered it to the front of the card.
A simple white card base set it off very nicely.
I'm very happy with this card, something a little different
and I think, very pretty.

Thanks for stopping today, 
I hope you have enjoyed your time here and 
have been inspired in some way.
Come again soon.
Until then,
try something new, even if you
don't have the same supplies in the 
example you see.


Tuesday, September 26, 2023

Halloween Card

Hello!  Happy fall.
Since it's now officially fall, I'm showing you
a little Halloween card that I made.
I had seen this technique for the background and
had made a few pieces to try it out.
I then found some images that I had colored and 
had been in my stash for a while.
I thought one of my grand children would love it,
so I fussy cut it and added it to the front of the card.
I used foam tape to adhere the image to the 
card to give it some dimension.
I think this turned out very cute.
Do you send out Halloween cards?

Thanks for stopping by today, I hope
you have been inspired in some way.
Come again soon.
Until then,
embrace the season.


Friday, September 22, 2023

Fall card with pumpkin

Hello!
How has the weather been in your area?
Here in Western New York, it's been a bit cooler lately.
I'm a big fan of summer and not crazy when it's ending and
we're going into fall.  I'm not a fan of cold weather and 
as most people know, Buffalo, NY can get pretty darn cold.
But I do love the beautiful fall colors
Today I'm sharing a fall card that I made with you.
This card is pretty basic and shows that you don't have to
have anything fancy to make a card.  
Dig into your stash and see what you have and put it 
together.  Easy peasy.  A basic clean and simple card.
This is a little out of my comfort zone, as I usually
have a bit more "busy-ness" and embellishment on
my cards.  I have a problem with "white space"
How about you?  Do you tend to fill up the space
or are you okay with the "white space"?

Thanks for stopping in today.
I hope you will come again soon.
Until then,
try something outside your comfort zone.


Wednesday, September 13, 2023

Journal for a Friend

Hello and welcome!
Today I have a journal to show you.
A friend's birthday was coming up, so 
I decided that I'd make her a journal.
I used mat board for the covers and spine,
covered them with this gorgeous paper
that was in my stash.
Pictures don't do this cover justice, the paper 
I used is a very shimmery gold and silver
and so stinkin' pretty.
I used a variety of papers for the pages.  
Some I printed lines for writing, some are plain.
Some are colored and some have a little bit of at pattern 
on them. When you make it, whatever you want to
use is good.
I added metal corners to all 4 corners,
not only does this give the journal a bit of
elegance, it gives it protection.
It's hard to see in this picture, but each 
signature is hand sewn.
The insides of the covers are a lovely 
silver paper.
I love how this turned out and I think 
my friend loved it too.

Thanks for stopping in today,
I hope you'll come again soon.
Until then,
give making a journal a try.
Here's a link to my favorite journal maker.
This is the first in a series of videos,
but she has a lot of other wonderful videos
available.


Sunday, September 3, 2023

First Zoo Trip for Asher

Hello and welcome!
A very quick post for today.
 I'm showing you a layout that I created
of my grandson's first trip to the zoo.
It's a simple layout that was very easy to put together.
I love the zebra base paper that I used
and I think the colors worked well together.
The little animals that I used as accents were
fussy cut from other scrapbook papers.
If you click on the picture, you will see them
much better.

Thanks for coming by.
Come again soon.
Until then,
visit someplace fun!


Wednesday, August 30, 2023

Alcohol Ink Stash Card

Good day to you all!
Today I have a card that I made when I decided to 
just use papers from my stash of  background papers 
that I made in the past.
I challenged myself to use this background piece that
I wasn't all that crazy about.
I decided to embrace the circles, so I punched out
the scalloped circles from another piece from my stash,
then the small circles from a scrap of the orange piece.
I layered them up and adhered it to a scrap of yellow card stock.
I stamped the sentiment on another scrap of yellow card stock.
Added onto a white card base and it was done.
This is a little different than my usual style,
but I think I did pretty good with a piece I didn't care for.

Thanks for coming by to check out what I've been creating.
I hope you'll come again soon.
Until then,
try working with something different and out of your
comfort zone.