My Other Pages

To make it easier to read about our trip to Ireland, I have made a page that is just for that. There is a tab above for Ireland Trip 2014 or click on the Home tab to read my other posts. I have also created a new page for My Weight Loss Journey if you are interested in that, click on the tab above.

Wednesday, June 29, 2016

Sympathy cards


Sadly, I have needed some sympathy cards recently.
I didn't have a sentiment that was exactly what I wanted and
decided on "Just a note..." from Eureka Stamps
This way I could write my message inside the card.
These cards could easily be used for any type of note.
I stamped the poppy image from
onto watercolor paper and used my watercolor
crayons to color them.
I have both Lyra and Neo Color water color crayons 
and love them both.
The difference doesn't show up a great deal
in the pictures, but I tried using different combinations
of reds, oranges and purple to color the flower
and a few greens for the rest.
I fussy cut the flowers and adhered them to 
a blue background paper,
then onto the white note card.
I varied the size of the card a little bit
and I like how they both turned out.
Sometimes simple is best.

Thanks for stopping by today,
Until next time, make something beautiful.

Saturday, June 25, 2016

Homemade cleaner/bug spray

I recently saw this posted on facebook and thought
I'd give it a try.  I don't know the original poster, but there
are several different versions on Pinterest.
It's as simple as this:
This is all you need.
I had some clementines that were getting a 
little old to eat and figured, why not make use of them.
I peeled all the clementines and put the peels
in a mason jar.
I added white vinegar to the jar and put the lid on.
Now to let it sit for a couple weeks and we'll see
how it works.
I'll post again once it's done and let y'all know
how it turns out.
Hopefully, I won't have any ants that I need
to get rid of.
Thanks for popping in, come again soon.
Never know what you'll see on 
Kristie Kreates!

Wednesday, June 22, 2016

Etching

I have a friend, Danielle, who asked for some help 
creating a gift for a friend.
Tom wanted an anniversary gift for his wife and 
knows that Danielle is 'crafty' and asked for her to 
make something.
She found what she wanted to make and since she doesn't
have a Silhouette yet, asked me to help out.
We found the font we wanted and cut out the D etc.
in vinyl.
Then I weeded out the letters and laid the rest onto
the glass.
We then used Armour Etch.
Armour Etch can be found in any of your craft stores,
I think I got mine at Michael's
You simply spread this "goop" over the glass, let it 
sit for several minutes, rinse it off and remove the vinyl
and this is what you are left with.
I think this turned out beautiful!
This is a shadow box frame and yes that D is off center.
She is going to put their invitation to the right side
and a picture of them from the wedding on the left.
In the lower corner will be a red rose.
I can't wait to see how the finished project looks.
I'm sure her friends will be thrilled with it.

Thanks for stopping by today,
come again soon and see what else I've been work on.
I hope you'll try some etching, it's fun, it's easy and it
has real impact.
Until next time,
Have fun crafting!

Sunday, June 19, 2016

First Harvest

News from my farm!
Today I had my first harvest.
2 of the romaine plants had leaves big enough that
they needed to be harvested, so I took a knife out
and picked some lettuce for my lunch.
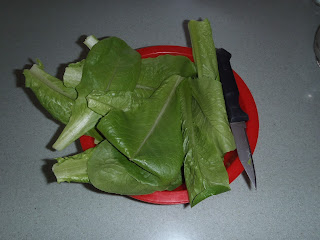
Here's what I got, that is actually a pretty good 
sized bowl, probably about 8" across, so it's a
pretty decent sized salad.
If hubby was home, I could have made 2 dinner salads
from what I got.
My only mistake was that the leaves were a little limp,
I probably should have watered them,
and picked it later.
But I ran them under some cool water and they did 
perk up a bit.
Live and learn.
Here is my salad,
added a little cheese, croutons and onions
and I have a nice tasty salad.

It was 3 weeks ago that I planted my farm and I'm
surprised to have something to eat already.
Can't wait to have more.
These are the 2 that I picked from, 
I only picked the outside leaves,
so the lettuce should continue to produce.
Something special about eating something that you 
grew yourself.

Thanks for stopping by today.
Do you have a vegetable garden?
What do you grow?
Hope to see you again soon.


Friday, June 17, 2016

The Farm is Growing!

Just a quick update on my little farm.
It's been 2 1/2 weeks and my plants are still alive.
In fact most of them are doing really well.
The hot peppers are doing well, have had a few 
blossoms on them.
Cucumbers are so-so. Some are doing okay, but 
growing slowly and a couple are just not growing at all.
The romaine is growing very well,
I should be able to harvest enough for a salad very soon.
The zucchini are doing very well too.
Lots of new growth on those guys.
No blossoms yet though.
The tomatoes are taking their sweet time,
not a lot of growth, but I have changed their location
so they get more sun and I just noticed some new 
growth on them.
Thanks for stopping by,
hope you'll pop in again soon.
You never know what you might see on
Kristie Kreates!

Monday, June 13, 2016

Emmett Book for Great Grandma

A little while back my Mom asked me to put the 
pictures etc. that she had of the latest addition to our family,
Emmett, into a book for her.
I'm sure she didn't expect me to make a scrapbook
from scratch, but that's what I did.
I finished it tonight and I love how it turned out.
The over all size is 11 1/2" x 8 3/4"
I made the covers with chipboard and covered them with 
scrapbooking paper.
(If you click on the pictures, you will see them larger.)
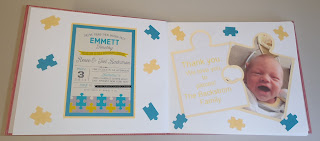
Here is his birth announcement.
This is the invitation to the shower. 
The shower was held after he was born, because
Emmett was a welcome surprise and was adopted.
He was the missing piece in the family.
I made the puzzle piece "thank you" notes for the 
shower tables.
Here's a "Happy Spring" card that Emmett sent out
and the first time he met Great Grandma at.....
his baptism party.
More pictures at his party with Grandma and
Great Grandma.
Happy little guy!
Thanksgiving and Christmas were
joyful.
The turkeys and the ornaments were stamped, colored and
fussy cut, then adhered to the pages.  I used
home made bakers twine to 'hang' the ornaments.
February 2, 2016 was a very special day for our family,
Emmett will forever be a member of our family.
And look at that adorable little Valentine!
Renee, his Mom is "into" mustaches, so I added one along
with glasses to a picture for some 'silly fun'
And Emmett is one year old already!
The party theme was Doc McStuffins
and we all had a great time.
I made those little band-aids and I think they turned
out pretty cute.
I love the picture of him sitting on the huge turtle.
And yes, that is a real turtle!
They had a reptile lady come with a bunch of
cool animals.
These are the most recent pictures that I have 
of Emmett.
Is he just too cute or what?!?!?!
I also put in some extra pages that we can add more
pictures as we have them.
I think Mom is going to love this little scrapbook
about Emmett.
I know it will be looked at over and over.

Thanks for stopping by today,
come again soon.
Until then, kreate something wonderful!

Wednesday, June 8, 2016

Farming update

It's been about a week and a half since I planted my
little farm and I'm really happy with how it's coming along.
Above are my plants the day I put them in,
below is what they looked like yesterday.
I'd say they are coming along very nicely.
Especially that Romaine!
Here's how my zucchini are growing.
I can't believe I didn't take any pictures of them when I
put them in.
They have lots of new growth coming out.
Can't wait to actually see a blossom and a squash
coming along.


Here's one of the tomato pots, they don't seem to be doing as well 
as the rest of my farm.  I did change spots for them so they would get more
sun.  Hopefully they will start growing a little faster soon.

Thanks for coming by today.
Come again soon,
you never know what you'll find on
Kristie Kreates.

Sunday, June 5, 2016

Flowers

Isn't the internet a wonderful thing?
I love all the ideas I get from Facebook and Pinterest!
I recently found an article about repurposing 2 liter bottles.
I decided to give this idea a try.
Here are the supplies I needed.
2 liter bottle
twine
scissors
I cut our a section of the side of the bottle.
I know this isn't a great picture, just couldn't get a good
shot of that clear plastic, but it will show a little better
later when you see the finished project.
I poked holes in the "top" and "bottom" of the bottle
and strung twine through the holes.
I also poked a few holes along the bottom of the bottle.
I did that on both sides of the bottle and tied it on the bottom.
I filled the bottle with soil and a couple 
Vinca plants and I have a hanging planter for 
my farm area.
Of course with the 2nd one I thought to run the twine 
across the bottom, up through the other side and 
tie it on top.  Looks better this way.
I didn't have any more bottles, but I did have a container
that I planted the rest of the Vinca in.
Right now they are sitting near the deck stairs,
who knows where they will end up.
Hubby just shaped the garden in the front of the house
the other day, so maybe they will end up out front,
when he gets that garden planted.
Once they grow a little more
they will add a nice pop of color somewhere.

Thanks for stopping by today,
I hope you've been enjoying my farm/garden posts
and that maybe you'll be inspired to plant a little something
yourself or repurpose something for your yard.
Come again soon.
Until then, I hope you're enjoying some beautiful weather.

Thursday, June 2, 2016

Zucchini

Hello everyone!
How is your weather where you are?
Ours has been very hot and sunny these past few days.
We've broken some records in our area with temps
in the 90s and I'm loving this summer weather.
Today I'm going to show you what I did for zucchini 
for my little farm.
I really wanted to grow some zucchini as we just love it.
I did a little research on the net and found that they 
can be grown in pots.
When I was a kid my Dad always grew them, but he
let them get huge.  I just loved having fried zucchini or
zucchini parmesan for dinner,
I will not be growing them that big since I just don't have
the room for it.
I went to The Dollar Store and picked up 4 of these
plastic containers.
I used my Crop-A-Dile to put 2 holes in opposite
sides of the containers.
I poked some holes in the bottom for drainage.
If you do this, be careful as you can crack the 
bottom of the container, don't ask how I know.
I used 3 strands of twine and ran them though the hole
on one side of the container and tied it securely.
I realized with the 2nd one that it would be more secure 
if I brought the ends up and tied it to the 3 strands
above the lip of the container.
I then braided the 3 strands and threaded the ends through the other
side of the container.  Of course as I went
I learned more and made the loose ends longer,
so I could bury them along the inside of the container in 
the soil.
I planted my zucchini plants in my containers and
they now hang on the fence in my little 
farm corner of the yard.

I'm glad you stopped by today,
keep coming back, I'll be updating on my 
farm as it grows.
Next post I'll show you what I did with a few
flowers to brighten up the yard.
See you soon!