My Other Pages

To make it easier to read about our trip to Ireland, I have made a page that is just for that. There is a tab above for Ireland Trip 2014 or click on the Home tab to read my other posts. I have also created a new page for My Weight Loss Journey if you are interested in that, click on the tab above.

Wednesday, August 30, 2017

Animals

Hi All!
Today I have a card to show you that I made just for fun.
My friend Marie, has this adorable stamp and let me borrow it.
I stamped the image onto white card stock with 
and colored it with my 
add the green for the grass and the blue for the sky
around the image.
I don't know who will receive this card, but I think
it's just adorable.
Thanks for popping over today,
I hope you'll come again soon.
Until then,
Happy Crafting!


Note the links are only to give a reference so you can
see what the products are.
I didn't necessarily purchase from these sites,
except where specified,
and you may find better prices elsewhere,
I am in no way promoting any particular site.

Friday, August 25, 2017

Anniversary cards

Hello blog fans!
Today I have a couple Anniversary cards to show you.
My friend Emma and her husband just celebrated their
50th wedding anniversary.
I was invited to a party for them, but I couldn't attend.
I couldn't let their party go by without making a card for them.
I made 2 cards and now have one in reserve for the next time
I need one.
This is the card I sent them.
I'm sorry it doesn't show up better, but it turned out 
really pretty.  For the hearts I cut out a heart shape from a piece 
of card stock, placed it onto white card stock and smooched
over it with VersaMark ink, covered it with silver embossing powder
and heated it with my heat gun until melted.  I made 2 hearts this way
and fussy cut them and adhered them to the background with foam tape.
The Happy Anniversary sentiment is from Eureka Stamps.
I stamped it onto silver vellum and heat embossed it with 
silver embossing powder.
After wrapping it around the background panel, I adhered the panel 
to a white card base.
Inside I wrote a personal note to Emma and Charles.
This is the other card that I made.
I ran a piece of white card stock through my Cuttlebug
in an embossing folder and embossed tiny hearts covering the 
panel.  I cut out a heart from a piece of card stock and used it as 
a stencil and "colored" the heart using Nuvo Mousse in gold.
To see this technique watch this video that my friend
Marleen made.
The sentiment strip was made the same way as the one above,
I added strips of silver vellum at the top and bottom of the
embossed panel and adhered it to the white card base with
foam tape.

Thanks for stopping in today, come again soon,
you never know what you'll find on 
Kristie Kreates!


Note the links are only to give a reference so you can
see what the products are.
I didn't necessarily purchase from these sites,
except where specified,
and you may find better prices elsewhere,
I am in no way promoting any particular site.


Monday, August 21, 2017

Little Gift for Mom

Hello blog friends!
Today I have a little something that I made for my Mom.
If you've been following me for a while, you know that
my Mom is 92 yrs old and lives in an assisted living home.
We have all given her plants over the last few years, but they 
never seem to live very long.
One of the problems is that they get too big for the pot and
once they get transplanted to another pot they don't do so well.
I think it's a general consensus that it's my black thumb that does
it.  All she has left right now is a sad African Violet that isn't going to
last much longer.  Someone keeps watering it and it's getting too much 
water.  Recently I bought a cute little "planter" of artificial succulents
and that's doing very well. LOL
I thought I'd make her up a little arrangement of silk flowers for 
the stand in front of her window.
Here's what I used.
I found some flowers when I was at the craft store for 
70% off, so I picked those up.
I had some styrofoam balls in my stash of craft supplies,
I cut one in half to hold the flowers.
I put some ATG tape on the flat bottom of one of the 
pieces and stuck it to the bottom of the "vase" that I 
was going to use.
I found this piece at Savers for a couple dollars.
It's the perfect size for what I wanted.
I really had no idea what I was doing, but I think 
this little arrangement turned out cute.
 
Here are a couple more pictures.
I think she's going to like this and it will brighten her room.
AND it won't die either!
Here's a view from the top to show what flowers 
there are.
So in the end, I spent about $3.00 to brighten Mom's 
room, I'd say that's a darn good deal.

Thanks for stopping in today!
I hope you'll come again soon.
Until then,
try something new,
like flower arranging.
Who knows you might be able to
brighten someones day too.

Saturday, August 19, 2017

Family We Chose and Good Times

Hello Blog Fans!
Today I have a couple more layouts in a series 
that I've been working on.  They have all been pictures from my 
"nieces" family picnic in 2013.
These are the last 2 layouts in that series.
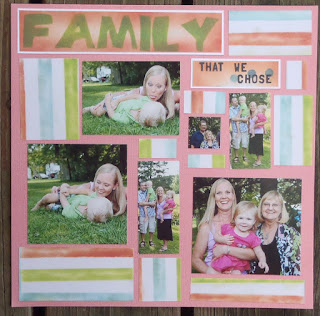
The title on this layout is Family That We Chose.
I don't know about you, but my family has a lot of what 
I like to call my "fake family"
My "niece" Tammy's Grandmother was one of my Mom's
friends since high school.  We always called her Aunt Lou.
Her daughter Nancy, in the picture above wearing black and white
I have always considered my cousin.  My children call her Aunt Nancy.
Her daughter, Tammy, holding the baby, calls me Aunt Kristie and is 
my niece.  I know it's a little convoluted, but it's how we are in my 
family.
In this page of the layout are 4 generations of our 
Family That We Chose!
This layout is of my family.
Dave, my husband, me, my kids, Kelsie and Jaryd,
and my wonderful Mom.
In that lower right hand corner is the whole group of us.
My family and the decendents of Aunt Lou.
Are my kids just too beautiful or what?
When I was making this layout, I said
"Gosh my kids are beautiful!"
My friend Emma started laughing and said
"You say that every time you do a layout of your kids."
I guess that's true, but I just can't help it!
They are just gorgeous!
Proud Mama here I guess.

Thanks for stopping in today.
I hope you've been inspired in some way.
Come again soon.
Until then, 
Happy Crafting!


Tuesday, August 15, 2017

HB2U

Hi All!
Today I have a birthday card to show you.
I love the Crazy Dogs stamp set from Tim Holtz!
One of my friends has the set and I stamped all the
different dogs onto watercolor paper to color
when I got to them.
I wanted to use one for a birthday card for my son
and I chose this cute little guy.
The stamp doesn't come with the spots, I added those
as I painted with my watercolor crayons.
I used the HB2U from the
Whole Shebang stamp set
from CAS-UAL Fridays Stamps
I added a bit of Glossy Accents to his nose 
and the tag hanging from his collar to give a little shine
and dimension.
The sentiment inside the card is from the
Whole Shebang stamp set also.
I think this card turned out adorable and Jaryd will 
love it.  He is a big dog and cat lover and I'm sure he'll
appreciate it.


Note the links are only to give a reference so you can
see what the products are.
I didn't necessarily purchase from these sites,
except where specified,
and you may find better prices elsewhere,
I am in no way promoting any particular site.


Friday, August 11, 2017

Not Just Cards Challenge #47

 Hello and welcome to my blog.
Today I'm posting for the
Not Just Cards Challenge #47 
This month our theme is children.
Our sponsor is
and I chose this adorable unicorn
to work with. Her name is Ursula.
I was also given the unicorn sentiment from
I have an adorable little Godchild who loves
unicorns, so I made this card to send to her.
I printed the digital image onto white card stock
then colored it with my Fantasia colored pencils then
fussy cut the image.
I did add a little Wink of Stella in gold
to the star on her head to make her even more 
fabulous.
I used some scraps from my stash to make the card
and found this cute polka dot paper scrap for the front
panel.  I used an Action Wobble on the back of the 
image and adhered it to the card.
You can see Ursula in action 
I printed the sentiment onto white card stock
and adhered it inside the card.
I think this card turned out adorable and I think
Andrea will love it too.
Thank you for stopping by today,
you can find more inspiration at the 
I hope you will play along with the challenge too.

Come again soon and see what I've been creating.
Until then, 
have fun crafting!


Note the links are only to give a reference so you can
see what the products are.
I didn't necessarily purchase from these sites,
except where specified,
and you may find better prices elsewhere,
I am in no way promoting any particular site.


Monday, August 7, 2017

Adorable Andrea

Hello blog followers!
Today I have another layout to share with you.
My last layouts were of Anthony and Andrea and today
I have another one from the same day that they were from.
This one is of Andrea.
As you can see from the title on the layout,
Andrea is our Godchild.
She is such a sweet little girl and we love her dearly,
how could we not?
 
I still remember the day Tammy called me and asked
if we would be her Godparents.
I burst into tears, I was so excited and touched
that they would ask us.
The title says adorable, but she is so much more.
Just love this little one, as well as her older brother!
The title was stamped with  wonderful 
alphabet stamp sets by Concord & 9th
The paper I used for the background is some I've
had in my stash for ages, but couldn't seem to use.
I was waiting for just the right layout and I guess
I found it, because I really love how it turned out.

Thanks for stopping in.
I have a couple more layouts from this same
picnic, of the rest of the family, so I hope you'll come back
and see how they turned out.
Until then,
enjoy the kids in your life,
because they grow up too fast.


Note the links are only to give a reference so you can
see what the products are.
I didn't necessarily purchase from these sites,
except where specified,
and you may find better prices elsewhere,
I am in no way promoting any particular site.


Friday, August 4, 2017

Catching Up On Some Scrapbooking

Good Day Blog Friends!
Recently I went on a scrapbooking weekend with my 
friend Mary. If you follow my blog you have seen the 2 bag books
I made that weekend.
Here are a couple layouts I also made.
My "niece" Tammy hosted a picnic and had a photographer friend 
come and take pictures.
These are some of the pictures he took that day.
There were so many good pictures of Anthony
that I had a difficult time narrowing them down.
Is he "The Man" or what?!?!?!
More of Anthony with little sister Andrea.
They are both just too cute!
I'm so far behind with my scrapping that these are
already a few years old.
 
Andrea is now going to be starting Kindergarten.
These are from 2013.
They both are so grown up now.

Thanks for stopping by today to see what I've been
 up to.  I hope you'll come back again soon.
You never know what you'll find on 
Kristie Kreates.