My Other Pages

To make it easier to read about our trip to Ireland, I have made a page that is just for that. There is a tab above for Ireland Trip 2014 or click on the Home tab to read my other posts. I have also created a new page for My Weight Loss Journey if you are interested in that, click on the tab above.

Friday, July 29, 2016

Sympathy Card

Today I have a sympathy card to show you.
I used a very light purplish color of card stock
for the front panel.
I inked up an embossing folder with purple ink
and ran it through my Cuttlebug with the card stock.
The ink enhanced the embossing.
The flowers and leaves were made with a pretty old
layered stamp set from Stampin Up.
I hadn't used the set before as I didn't have a clue
how I would line the layers up and get it right.
With the MISTI stamping tool, it was much easier,
but I also have to say it would have been even easier 
if the stamps had been clear acrylic rather than red rubber.
I used only one color of ink on the flowers and the leaves.
Using multi layers of the same color just intensifies the color
and gives the look of having different colors.
I fussy cut the flowers and leaves and adhered them to the
embossed panel.  One flower is adhered directly to the panel
and one was adhered with foam tape.
Here is the final card.
The sentiment was printed from my computer and 
trimmed down, adhered to a piece of the same purplish 
card stock and trimmed with a very narrow mat.
Here is a close up of the embossing and the dimension
of the flower.
I sometimes struggle with sympathy cards, as many do.
I know the family receiving this card will appreciate it.

Thanks for stopping by today,
I hope you'll come by again soon.
Until then, create something wonderful!

Tuesday, July 26, 2016

Homemade Cleaner Results

Hi all!
Remember when I made that homemade cleaner?
Here's the post about it.
Today I used it for the first time and I have to tell you,
I'm pretty impressed with how well it works.
A few days ago I asked my hubby for a small fan,
he brought one that has been sitting in our basement for years.
It was grosser than gross, so I didn't want to use it
until I cleaned it.
Below are some pictures of what it looked like before 
I cleaned it.


Pretty disgusting, eh?  What can I expect though, it had
been used for years, then put into the basement to 
just sit?
I put my cleaner in a spray bottle and sprayed the fan
parts with it.  Oh MY!  all that gunk just wiped right off
with a paper towel.
I did use an old toothbrush to get into the small spaces,
but it didn't take much effort to clean it up at all.
I'm really loving this cleaner
Below you'll see how it looks after cleaning.
Easy peasy!


Thanks for stopping by today.
I hope you'll be inspired to make some of this great 
cleaner.  Pop over to the post linked above and see how.
It's really simple and cheap as can be!
Come again soon,
you never know what you'll see on 
Kristie Kreates!

Friday, July 22, 2016

Wedding Gift and Card

Today I have a wedding gift and card to show you.
I like to give a handmade gift when I can and I hope
Esther and Thomas like this.
I used a floating frame, which is one with 2 pieces of glass
and no back.
I used the "M" design, added their names and established date,
then cut it from black vinyl, with my Silhouette Cameo,
and applied it to the glass.
This isn't a very good picture, but I wanted to show that
these frames have a "foot" so they can be stood on a 
mantel or table.
Here is what it looks like hanging on our wall.
I think it turned our great and I hope they like it too. 
This is the card we are giving them.
Inside I added a white piece of card stock with 
a sentiment.

Thanks for stopping by today,
hope you are having a wonderful day and 
that you will stop by again soon.
Until next time,
Happy Crafting!

Tuesday, July 19, 2016

Grandma's Boys Bag Book

Hello blog friends!
Do you remember when I made the 
bag book as an exchange gift at Christmas time?
Well, a friend saw it and loved it, she asked if I could
make one for her.
We chose to make one to feature her grandsons.
Here is the finished book.
I hope she likes it.
I thought stars were appropriate as I 
know they are the stars in her life.
Every page has a pocket with a 4" x 4.5" 
double sided mat to hold pictures.
There is also a larger 6" x 5.5" 
double sided mat that pulls out from the 
end of the page.
Each page has different papers and embellishments.
Every tag is also different,
You can see I used jute twine as 
pulls for the larger tags.
There is also space for pictures on the "flap"
at the left side of each page.
There are 24 spaces for picture.
I tried to incorporate the different sports 
that the boys are involved in
as well as some general "boy" things.
I'm sure she will have plenty of wonderful
pictures to fill her new book.
And she will enjoy it for years to come.
Thanks for stopping by today.
I hope you are inspired in some way and maybe
you'll give one of these 'bag books' a try.
I hope you'll stop by again soon,
you never know what you'll see on 
Kristie Kreates.

Friday, July 15, 2016

Freezing Strawberries

One of my favorite childhood summer memories is
when I'd hear the strawberry man coming down the street.
We're talking early to mid 60s here.
He'd have his truck and yell out
"Straaaaaawwwwberries, 3 quarts for a dollar!"
The women in the neighborhood would come out to buy 
his strawberries. That night we'd have strawberry shortcake
for dessert.
Can you imagine getting anything for that price these days?
The supermarket that I shop at, Tops, often has sales that are
buy 2 get 3 free and now and then they have
berries on that sale. 
When they were on sale this time I picked up 5 - 16 oz. packages.
Since there are only 2 of us, that's a lot of strawberries.
I gave a package to our daughter, and decided to do some freezing.
I cut the tops off and put them into a bowl of water to rinse.
I fill a bowl with cool water and don't over fill the bowl
with berries.
When you have enough to cover the top of the water
while floating, you've got enough.
I then swish them around a bit, the pick the out of the water
a couple at a time.
If you don't over crowd them, it gives space for the 
dirt particles and other "debris" to fall to the bottom of
the bowl.  You'll be surprised what comes off your berries.
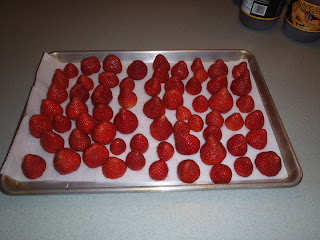
I then place them onto paper toweling to dry.
Be sure they are not touching and that they can dry completely,
you don't want any water left on them at all,
as this will crystallize on the berries and we sure 
don't want that.  No freezer burn for me!
Drying completely can take an hour or two.
Once they are dry, place them onto a cookie sheet with a
dry piece of parchment paper lining the pan and place 
them in the freezer to freeze.
Freezing doesn't take long at all,
maybe an hour or so.
Once they are frozen you can put them into freezer
bags, remove as much air as possible.
Freezing them before putting them into the bags
will keep them from freezing together in a big clump.
This way you can take out only what you need.
I didn't freeze them all, I did eat some of them
and boy were they good.
In fact they were so good that when we had 
company come for dinner,
I picked up 5 more containers, made strawberry shortcake
with some and froze some more.
We're going to have some nice strawberries during the 
off season.
"Straaaaaawwwwwberries, 6 quarts in my freezer!"

Thanks for stopping by today,
I hope you've learned something and maybe
will try freezing some produce for your off season.
Come again soon,
you never know what you'll see on 
Kristie Kreates!


Tuesday, July 12, 2016

Sadly another sympathy card

We got word that a very special lady had
passed away.
She and her sister are very loyal customers of
my husbands and we have come to be friends with
these sisters.
Wendy was diagnosed with cancer only a matter
of a few weeks ago, it took over very quickly.
I wanted to make a card for Donna, the other sister,
and this is what I made.
I love how this card turned out.
I heat embossed the rose with silver embossing
powder, then covered it with a mask.
I made the mask by stamping the same image onto 
a piece of white card stock and fussy cutting it.
After covering the rose with the mask,
I used Peacock Feathers and Broken China
Distress Inks and blending tools to 
ink over the entire area.
Removing the mask revealed the rose image
that I think turned out beautifully.
The background is silver vellum.
Adding that bit of ribbon, finished the card off
nicely.
I know Donna will appreciate this card and
our thoughts and prayers are with her.

Thanks for stopping by today.
Come again soon.

Friday, July 8, 2016

Anniversary gift

A couple weeks ago, I showed you the
etching I did with my friend Danielle.
Danielle finished the gift and I thought I'd give you 
a look at what she did.
Now this isn't the best picture mind you,
but at least you can get the idea of how it turned out.
I think she did a great job and I bet 
Sue and Tom just love it.
Thanks for stopping by,
come again soon.
Now go create something beautiful!

Tuesday, July 5, 2016

I pick you

Recently there was a local story about a
young boy that has cancer, the Mom was asking
for birthday cards for him as he was supposed to have
a birthday party, but because of the cancer and treatment
it had to be cancelled.
She said the cornier the better.
Here is what I came up with for him.
The background paper is some I made with 
alcohol inks and THIS technique.
The stamp is "Picking" from 
QKR Stampede,
I colored it with colored pencils,
and fussy cut it.
Here is the inside of the card.
I think this is something that will make a 
young boy laugh,
I sure hope so.

Thanks for stopping by today,
hope you have a fabulous day!
Come again soon,
until then have some fun crafting!

Saturday, July 2, 2016

Graduating Greats

Two of my great nieces graduated this year and are headed for 
high school.
When I saw the pictures of them on facebook, I couldn't
believe how grown up they are.
Just like everyone, I wonder where the time went. 
I still remember when their Dad's were this age and I 
couldn't believe it.
Here are Lexi and Dejah,
two wonderful, beautiful young ladies with so 
much to look forward to.
And here are the cards I made for them.
The color of the caps is actually a lot closer to the color
of their actual caps and gowns than it looks
in the picture.
The background paper is some that I made
using THIS method.
The cap and diploma were stamped onto white
card stock, colored with 
Recollections Watercolor Crayons
then fussy cut and adhered to the card base with
foam tape.
The Congratulations! sentiment was stamped
directly onto the card front with 
VersaFine onyx black ink.

Thanks for stopping by today,
come again soon.
Glad I could share my cards and a couple
of my Greats with you today.
Until next time, Happy Crafting!