My Other Pages

To make it easier to read about our trip to Ireland, I have made a page that is just for that. There is a tab above for Ireland Trip 2014 or click on the Home tab to read my other posts. I have also created a new page for My Weight Loss Journey if you are interested in that, click on the tab above.

Friday, March 31, 2017

With Sympathy

Hello crafting friends!
I recently had to make another sympathy card.
Here is the card I made,
simple and elegant.
The image was stamped with 
onto white card stock.
I then cut it to size and sponged it with
The image and the sentiments are from the 
from Cas-ual Friday Stamps.
The embossed piece was made using
a damask embossing folder and my Cuttlebug
I borrowed the folder from a friend and don't know
which company it was from.
There are many available online or in stores.
I also sponges Faded Jeans ink onto the
card base before adhering the front panel.
The ribbon and the pearl accents pull the card 
together nicely.
I kept the inside simple also and created this
sentiment with the Casual Comfort set.
Thank you for stopping by today,
I hope you will come again soon.
Until then,
enjoy spring.


Note the links are only to give a reference so you can
see what the products are.
I didn't necessarily purchase from these sites,
except where specified,
and you may find better prices elsewhere,
I am in no way promoting any particular site.


Tuesday, March 28, 2017

Simple Spring Card

Hello and happy Spring!
I hope you are having some nice spring weather
in your area!
Today I've got a simple spring card to show you.
I stamped 
from Biblical Impressions
twice onto white card stock 
and colored them with my 
I fussy cut one full image,
the other I cut the flowers and some of the
leaves then layered them onto the full image
with foam tape to give dimension.
You can see some of the dimension in this picture on the 
flowers and leaves.
I used scraps papers cut and layered 
onto a white card base for
the background for this simple, but lovely 
image.
I love the simplicity of this card.
Thanks for popping in today,
I hope you'll stop by again soon.
Until then
create something beautiful.


Note the links are only to give a reference so you can
see what the products are.
I didn't necessarily purchase from these sites,
except where specified,
and you may find better prices elsewhere,
I am in no way promoting any particular site.


Saturday, March 25, 2017

2 Cards Same Stamp

Hello crafty people!
Today I'm going to show you 2 very different cards
made with the same stamp, which happens to be
one of my favorites.
This poppy image is 
3101AA POPPIES
from
This first one I stamped onto watercolor paper
then colored it with my 
I stamped this poppy again with VersaFine Onyx Black,
but colored it with my 
I used a mask to cover the poppy and stamped 
a polka dot background stamp.
I'm not sure which polka dot stamp I used,
but there are many available.
Both sentiments are from the 
Cas-ual Fridays Stamps.

I love how these 2 cards turned out,
of course, like I said, it IS one of my favorite
stamps.  So how could I go wrong?
Thanks for stopping by today.
I hope you're having a lovely day and
you'll take time to create something
beautiful.
Until next time,
Happy Crafting!


Note the links are only to give a reference so you can
see what the products are.
I didn't necessarily purchase from these sites,
except where specified,
and you may find better prices elsewhere,
I am in no way promoting any particular site.

Wednesday, March 22, 2017

3 More Cards

Greetings fellow crafters!
Today I have the last 3 of the Easter cards
that I made.
For this card I used 
Eureka Stamps
I stamped it with VersaFine Onyx Black Ink
and colored it with colored pencils.
I used Distress Ink to add a little color around the
image.
I inked the background for this card with 
Distress Inks and stamped the grass with 
from Biblical Impressions.
I cut strips of brown card stock to make the basket.
I wove the strips then used ATG Tape to adhere it to
a piece of card stock.  I then trimmed it into the basket
shape.
The eggs were stamped, colored and fussy cut, then adhered
with Mini Glue Dots to the card.
My last card is a shaker card.
I stamped the Happy Easter onto the card base,
then added the shaker window over it.

Thanks for stopping by today,
I hope you've been inspired in some way.
Until next time:
Enjoy being creative!


Note the links are only to give a reference so you can
see what the products are.
I didn't necessarily purchase from these sites,
except where specified,
and you may find better prices elsewhere,
I am in no way promoting any particular site.

Sunday, March 19, 2017

Easter Blessings

Hello all!
Today I have a few more Easter cards to show you.
I don't know what companies these stamps
are from, I borrowed them from a friend 
and have no clue.
Sorry.
I stamped this bunny onto Kraft card stock and colored
it with colored pencils.  I trimmed it down and
mounted it onto the same paper the sentiment
is stamped on, then onto white card stock.
All stamping was done with 
These 2 cards are made with the same papers, but 
from different sections of the paper.
I'm not sure if I like the one with the ribbon better
or the one with out.
I do think they both turned out very nice though.

I'm glad you stopped by and I hope you've 
been inspired in some way.
Have you started on your Easter cards?


Note the links are only to give a reference so you can
see what the products are.
I didn't necessarily purchase from these sites,
except where specified,
and you may find better prices elsewhere,
I am in no way promoting any particular site.

Wednesday, March 15, 2017

Somebunny Loves You

Easter is on it's way!
Hi all!
Do you make and send Easter cards?
I haven't really in the past, but this year I'm
trying to send out more cards and thought
Easter cards were in order.
Here are a few that I made that are similar.
This one is a shaker card and I think it turned out cute.
This is "Daydreaming Bunny" from 
QKR Stampede.
Another shaker card with the same bunny.
The grass under him is
"Field Grass Right"  from 
Biblical Impressions
For this card, I used Distress Inks to make the 
background inside that oval cut out.
I have stamped
Somebunny Loves You
 from QKR Stampede inside these cards.
And last, I made this card.
The sky and ground were sponged with 
and I used the Field Grass stamp again to 
stamp the grass, also with Distress Inks.
The bunnies were all stamped
colored with colored pencils and fussy cut.
The sentiments were also stamped with 
VersaFine Onyx Black Ink.

I hope you enjoy my cards and will 
think about making some yourself.
Come again soon and see some
more of the Easter cards I have ready to 
send to some family and friends.
Until next time:
Get Creative!


Note the links are only to give a reference so you can
see what the products are.
I didn't necessarily purchase from these sites,
except where specified,
and you may find better prices elsewhere,
I am in no way promoting any particular site.

Saturday, March 11, 2017

2 Layouts

Hello crafty friends!
Today I have 2 layouts to show you.
On Christmas Eve my daughter, Kelsie, and I got a
little silly taking selfies together.
This layout is the result of that.
I love the relationship that I have with her,
mother, daughter and best friends.
Having an adult daughter is absolutely wonderful!
I'm so glad I have these pictures that show our
 silly side.
This layout is from Kelsie's 27th birthday.
We were out to dinner for her birthday, my hubby's birthday
and our anniversary.
Kelsie took a selfie with each of us.
The Mickey bracelet was a gift from her boyfriends
parents.
This page is about her birthday with her boyfriend,
Jason.  He made it very special for her.
I used their posts from Facebook for the journaling.
I love how this layout turned out,
I think it was her best birthday ever.

Thanks for stopping by today,
I hope you'll stop by again soon.
Until then,
Happy Crafting!

Wednesday, March 8, 2017

Annual Souper Crop

We recently held our
Annual Souper Crop.
For this crop my friend Danielle and I 
make soups for our dinner.
We add a nice salad and bread and butter
and it's one of our favorite crops of the year.
We made squash bisque and chicken enchilada soup,
both back by popular demand.
We also give out some goodies, have a couple games
and prizes and always have a lot of fun.
Each cropper receives some little goodies,
one of the goodies included is always a 
ticket for a free drink.
This is the ticket I created for this crop.
We also played a bingo game.
I printed up these boards for everyone,
with a list of crafting "items" printed on the
back of the board.
Everyone filled out their board from the 
items on the list.
Then we told them that to cross off the
item on the board, they had to use it on
a project.
So if they chose 'ink' they had to use
ink on their project, not from a pen, but 
either stamping or distressing etc.
The cropper that won, really wanted to 
win and did enough on one single layout
to get a bingo.
Now that's determination!
I wish I had some kind of pictures 
of our other game.
We took 10 paper lunch bags, put some kind of
crafting item in each one and stapled them shut.
Our croppers had to feel the items in the bag and
guess what they were.
Some of the items we put in the bags were:
pencil sharpener
circle cutter
roll of magnetic tape
jar of embossing powder
Xyron X refill
You get the idea.  They all really enjoyed
this game.  The cropper that won this game
had 8 of 10 correct items.
Pretty darn good, I'd say.

It was a great crop.
The soups were yummy,
the games were fun,
and the company was fabulous.

Thanks for stopping in today.
Maybe if you're organizing a crop one day
you'll be able to use our ideas.
Until next time,
make something fun!

Saturday, March 4, 2017

Love Layout

Hello blog friends!
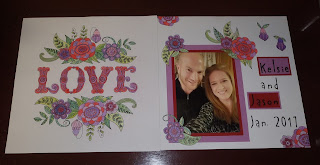
Today I'm showing you a layout that I did of
my daughter and her boyfriend.
A while back I found a pad of 12 x 12 coloring pages
on clearance at Michael's and had to have it.
I wasn't sure when I'd ever find a layout that I would use them
for, but the pages were so beautiful that I just had to have that pad.
I'm so glad I picked it up.
There are 2 of each design in the pad and that worked out
perfect for this layout.
I started out by coloring the full page with colored pencils.
I chose purple because it's Kelsie's favorite color
and the red because it's Jason's favorite.
I knew I wanted to use this picture,
because it was their first picture together and the one
that he had printed and framed for me.
I had a 5x7 printed and wished I had it done bigger,
now I'm so glad I didn't, I think the 5x7 works perfectly.

I colored and fussy cut the flowers from the 2nd page
and decided where I wanted them.
Then I decided on their names and the date for a simple
title for the page.
When I was happy with where everything was, I adhered it all with 
ATG tape and called it done.
I am thrilled with how this came out.
It is my first page for my scrapbook about
Kelsie and Jason and I think it's 
beautiful.

Thanks for stopping by today,
I hope you'll come again soon.
Until then, think outside the box,
if you like something, give it a try,
maybe you'll end up loving it!