My Other Pages

To make it easier to read about our trip to Ireland, I have made a page that is just for that. There is a tab above for Ireland Trip 2014 or click on the Home tab to read my other posts. I have also created a new page for My Weight Loss Journey if you are interested in that, click on the tab above.

Saturday, January 23, 2016

Sara's Calendar

Hello blog friends.
Today's project is one that I had very little to do with.
Sara, you know, my son's girlfriend, wanted to make
a 2016 calendar for her Mom for Christmas.
Yes, I did give her some advice on it, and I showed
her how to do some different techniques and made some
suggestions, but she made the whole thing.
Well, with a little help from Jaryd, my son.
If I have to pick a favorite month I'd have to pick
January.  Those mittens are just so darn cute.
A lot of the months have specific colors,
sometimes for whose birthday is that month.
Holidays and birthdays are marked on each month.

I think this is one of Sara's favorites, she loves those
cats at the top.  I have to admit they are adorable.
Birthdays are noted with a persons initial and a little gift.
July has a Navy theme because her Mom was in the Navy
when she was younger.


October was another of her favorites.
On this page she learned how to heat emboss,
you can't tell in the picture, but that web and spider are
embossed with clear embossing powder.

December is another of my favorites.
Those stockings are so darn adorable!
Here's her Mom showing off the calendar.
The cover has a picture of the family.
On each month there are pictures 
of family and friends. 
And here's Sara and Mom with the calendar,
they are showing Sara's birthday month.
I think she did a fabulous job with her calendar.
It was a lot of work, but well worth it,
her Mom loves it!

Thanks for stopping by today.
See you again soon.


Thursday, January 21, 2016

Cutting boards

And she said:
"I need a little help with something."
It was cutting boards.
Jaryd and Sara wanted to customize some cutting
boards for Christmas gifts.
What they needed were some templates,
so we went to my computer and used my 
Silhouette Studio Designer Edition Software
to create what they needed.
I cut a meat cleaver from vinyl and she put the negative space
onto the cutting board.
It was traced with pencil onto the board and
"Chop it Like it's Hot" 
was written onto the blade.
Then she used her wood-burning  tool to 
burn the pattern into the wood.
The same process was done with the tree.

She added 2015 to the trunk of the tree.
The last one I helped her with was her raven board.

She put her family name on this one.
I think she did a great job on all of these.
And to make things even better,
I was lucky enough to get the tree board in one of the
Christmas exchanges.
Jaryd and Sara also made infused olive oils 
to go along with the cutting board.
I got Basil and Rosemary infused oils.
My sis in law got the "Chop it Like it's Hot" 
board with garlic and red pepper infused oils.
I love mine and I'm sure my sis in law loves hers too.
It's always great to get hand made gifts.

Thanks for stopping by today.
I hope you'll come again soon.
And I hope you're having a better than average day!


Tuesday, January 19, 2016

Bracelets for the Greats

Hello!
I hope you are having a wonderful day.
I don't know how old you are, but if you're my age
you'll remember way back when, when macreme was all the rage.
I made many, many macreme projects, plant hangers, even a couple
hanging table/lamp combinations.
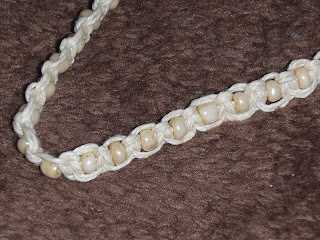
I also made some jewelry and that is what I decided to make
for a few of my great nieces for Christmas this year.
Apparently, I forgot to take pictures of the process I used 
for those pieces in the center of the bracelets, sorry about that.
But it's really very simple.
I bought washers at the local hardware store,
they are very inexpensive, a matter of cents each.
It's pretty easy, just place a few drops of ink onto the 
felt pad and pounce onto the metal washer.
The best thing is, if you don't like the color or how it
looks for any reason, you can take it off with alcohol or the
blending solution and start again.
Try different color combinations and see what you like.
Once I had the washers to the colors I liked, I chose 
cords to match the colors and knotted them to make the
bracelets.
Here are 4 of the bracelets I made.
Here they are from the side showing the beads I added 
on each side of the bracelets.


As it worked out, I gave the right colors to the right 
great nieces.  It just happened that the one whose favorite color
is purple got that one, the same with the blue and the other one got
the gold/brown tones which she also loved.
And the pink one is left over, not sure about where that one
will go.


They each got one of these bracelets also.
I was happy to see they were putting them on right away,
not only to try them on, but to wear them.
I was a little leery about giving them these bracelets,
you never know with teens and tweens, 
but they seemed to love them.

There are many great patterns and videos
showing how to make macreme jewelry online,
so if you have an interest check them out.
These that I made are really very basic knots, 
but turn out looking great.

Thanks for stopping in today to see what I have going on.
I hope you'll be back again soon.
Until then, have some fun learning something new,
or playing with something crafty that you love.


Sunday, January 17, 2016

Wine Glass Candle Holder Process

Hello craft lovers!
Remember these candle holders that I made 
for Christmas?
Today I'm going to give you a quick tutorial on how
they are made..
I started out with a plain wine glass.
I get them at the Dollar Tree.
I created a pattern with my 
Silhouette Studio Designer Edition software.
This picture shows how it looks on my computer,
I have color coded all the pieces to the colors of glitter
I will be using. I cut all the pattern pieces from vinyl.
Once the pieces are all cut, they are layered onto the
wine glass. You need to figure out which colors you will be doing 
last and layer up from there.
On the penguin, the last color I was applying was the orange, 
so those pattern piece went on first.
The feet were first, then the white belly.
We then used Mod Podge to cover the glass,
then poured on the black glitter.
We waited until the first coat was good and dry,
then applied a 2nd coat.
Different colors may require more applications, 
use your judgement and do what you like best.
Once the black was done, we removed the pattern
piece where the white would go and added that.
And so on until we were finished.
The trickiest part was the eyes.
We had to remove the large white circle and
before putting on the white glitter, we laid down
a smaller circle for the black of the eye.
The little white dot in the eye was added last with
a little bit of Liquid Pearls.
Once all the glitter was applied and had all dried,
we sprayed them with a glossy spray sealer
If the Mod Podge you have is a glossy one,
you can use that to finish them.
DO NOT use a matte Mod Podge!
(don't ask me how I know)
This final seal will prevent the glitter from flaking off
your project.
This is the pattern I used for my Grinch candle holder.
We used the same process as with the penguin.
When we removed the different pieces, 
we used a fine paint brush to apply the Mod Podge
since the areas were so small, 
but it was worth the effort.

I have seen some very cute ideas for Valentines Day
using this same process and supplies and I'm thinking of
making a couple for that holiday also.
If I do, I'll post them for y'all to see.

Thanks for stopping by today,
I hope you've learned something 
and been inspired in some way.
Come again soon.


Friday, January 15, 2016

Smells Swell

Hello friends!
I'm going to get personal today.
Have you seen the product Poo Pourri?
(If not, check out that link.)
Have you tried it?
I have and I gave some to my son, which he used up 
pretty quickly.
I had heard that you could make your own version
of this product with just a few ingredients.
So I check on Pinterest and sure enough
there were lots of posts about it.
Guess who got my version, which I call
Smells Swell,
in their Christmas stockings.
Yep, my family did.
Here's how I made it.
Gather together:
a spray bottle 
 (mine is 8 oz, it's all I could find at Bed Bath and Beyond,
I didn't want to get a cheap ones at the Dollar tree
 and have them poop out on my family.)
Isopropyl alcohol (mine is 50%)
Essential oil (whatever scent appeals to you)
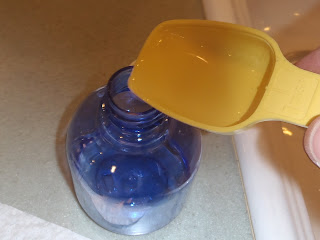
a 1 teaspoon measuring spoon.
Measure 2 tsp of alcohol into the spray bottle
Remember I'm using an 8 oz bottle.
Add about 30 drops of essential oil
You can add more or less depending how strong you want
the scent to be, be sure to use enough though!
You don't want the wrong scent to come through!
Fill the bottle the rest of the way with water.
Shake it up to be sure it's mixed.
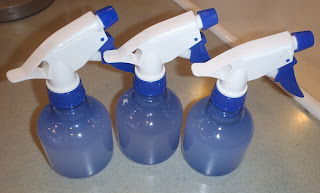
The solution will be cloudy, this is how it should look.
Here are the 3 bottles I made.  

This is the label I made for the bottles.
And I just got word that it works well from Sara, 
they tested it out when she had house guests for 
Christmas.

Thanks for stopping by, I hope you are going to 
give Smells Swell a try.
And if you want a good laugh, 
and watch their commercials.
Come again soon,
you never know what you'll find on 
Kristie Kreates.


Wednesday, January 13, 2016

Kelsie and Jaryd Quotes

Hello!
In my last post I showed you the "art piece" I 
made for my friend Mary with some specialty paper.
Today I'm showing you the ones I made for my kids.
Kelsie loves anything that is zebra print and when I 
saw this zebra print paper, I knew I had to do something
for her with it.
I won't go through the whole process since I wrote that up
in my last post.
Her quote is:
If I could give you
one thing in life,
I would give you 
the ability to see yourself
through my eyes,
only then would you realize
how special you are to me.
Kelsie's is framed in black, I should have taken the picture
against a light background.  Sorry about that.
It's hard to tell what Jaryd's paper is in the picture, 
but it's a very fine paper made of gold and bronze
fibers.  I layered his over a dark burgundy piece of card stock.
For his quote, I used watercolors to create the background.
His quote is:
If I could sit 
across the porch
from God
I'd thank Him 
for giving me
you.
His is in a gold frame.

I loved making these for my children
and I think they loved them too.

So glad you stopped in today.
I hope you will consider making something
special like this for someone you love.

See you again soon.
You never know what you'll be seeing next on
Kristie Kreates!